Welcome to the final lesson of our module on the LLVM contribution workflow. Over the past few lessons, you've learned how to find and filter bugs, write targeted test cases, minimize reproducible examples, and even use git bisect to pinpoint the exact commit that introduced a regression. You now have all the skills needed to analyze a bug; this lesson completes the cycle by teaching you how to submit the fix.
Our goal is to master the final, crucial learning outcome for this module: Prepare and submit a pull request to the LLVM project following their GitHub code review workflow. This process is more than just a git push; it involves adhering to the project's specific conventions for commit hygiene, code review etiquette, and merging. Mastering this workflow is the last step before you can make your first tangible contribution to LLVM.
The GitHub Contribution Workflow: A Refresher
Before diving into LLVM's specific rules, let's quickly review the standard open-source contribution model on GitHub, which forms the foundation of our process. The core idea is to work on your own copy (a "fork") of the project, and then request that the main project pull in your changes.
How to make a pull request on an open source project
The video "How to make a pull request on an open source project" by Web Dev Cody provides a clear, practical demonstration of this entire lifecycle. While it's not specific to LLVM, it covers the universal Git and GitHub mechanics that you will use.
Watch the following segments to solidify your understanding of the basic steps: Forking and Cloning: This shows how to create your personal copy of a repository and clone it to your local machine. Creating a Branch: Learn why you should always create a new branch for each distinct change. Committing Changes: This covers staging your changes with git add and saving them with git commit. Pushing to Your Fork: See how to push your local branch up to your remote fork on GitHub. Creating the Pull Request: Finally, this demonstrates creating the PR itself in the GitHub UI, which initiates the review process.
A critical concept from that video is the distinction between origin (your fork) and upstream (the main LLVM repository). You will push your changes to origin and request that they be merged into upstream. Keeping your local repository synchronized with upstream is vital, a topic we'll return to.
Preparing Your Patch: The LLVM Standard
With the general Git mechanics understood, let's focus on LLVM's specific expectations for a patch. A high-quality submission goes beyond just correct code.
Contributing to LLVM — LLVM 23.0.0git documentation
The official LLVM contribution guide outlines the checklist for a good patch. These are not suggestions; they are requirements for getting your change accepted.
Read the section titled How to Submit a Patch. Pay close attention to the bulleted list of requirements.
Here are the non-negotiable elements you must ensure before submitting:
- Include a Unit Test: As we've practiced, every bug fix or new feature needs a test. For compiler bugs, this is often a
littest usingFileCheck. A patch without a test is almost always rejected. - Adhere to Coding Standards: LLVM has strict coding standards. The easiest way to comply is by using the
clang-formattool. Before committing, rungit clang-formaton your changes to automatically fix any style issues. This tool is built along with Clang, so it's already in your build directory (bin/git-clang-format). - Create an Isolated, Single-Commit Change: Your pull request should address one single, logical issue. Don't mix a bug fix with a refactoring and a documentation update. During the development process, you might create many commits, but before you submit, these should be squashed into a single, clean commit that represents the entire change.
Crafting the Perfect LLVM Commit
The commit message is the first thing a reviewer sees. It serves as the primary documentation for your change. LLVM has a specific format that you must follow.
A typical LLVM commit message looks like this:
[Component] A brief, one-line summary of the change

A more detailed explanation of the change. Explain the problem you are
solving and the approach of your solution. If it fixes a bug, reference
the GitHub issue number (e.g., "Fixes #12345"). Wrap lines at 72
characters.

This detailed description can span multiple paragraphs if necessary.
- [Component]: This is the part of the project your change affects, like
[Clang],[InstCombine],[X86], or[Docs]. It helps route your change to the right reviewers. - Summary Line: A concise, capitalized summary of the change.
- Detailed Body: This is where you explain the why behind your change. What was the bug? How does your patch fix it? Why did you choose this particular implementation?
The Pull Request Lifecycle
Once your branch contains a single, perfectly formatted commit with a well-written message, you're ready to create the pull request.
1. Push and Create the PR
Push your local branch to your fork on GitHub: git push origin my-fix-branch.
GitHub will then display a banner with a button to "Compare & pull request". Clicking this will take you to the PR creation page. The title and description will be pre-filled from your commit message.
2. Find and Add Reviewers
A PR won't be reviewed unless you request reviews from the right people. How do you find them?
MAINTAINERS.md/CODE_OWNERS.rst: Look for these files in the subdirectory you've modified (e.g.,clang/,lldb/). They list the official owners of that component.git blame: Rungit blame <file>on the source files you changed. This will show you who last modified each line. People who have recently worked on the code are excellent candidates for a review.- Ask: If you're unsure, you can leave a comment on your PR asking "Who would be a good person to review this?"
As a new contributor, you may not be able to assign reviewers directly. In this case, you can "@-mention" their GitHub usernames in a comment on the PR (e.g., "@
3. The Review and Update Cycle
After you submit, one of two things will happen:
- Approval: A reviewer will approve the changes, often with a comment like "LGTM" (Looks Good To Me).
- Changes Requested: More commonly, a reviewer will leave comments asking for changes.
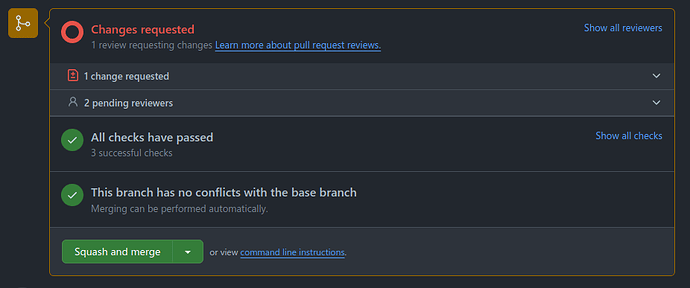
When you need to update your patch in response to feedback, the LLVM workflow has a specific preference to maintain review history.
LLVM GitHub User Guide — LLVM 23.0.0git documentation
The LLVM GitHub guide explains the preferred method for updating your PR during the review phase.
Read the section on Updating Pull Requests. The key takeaway is the preference for "fix up" commits over force-pushing during the review.
Instead of immediately amending your original commit and force-pushing, you should create new "fixup" commits. This makes it easy for the reviewer to see exactly what you changed in response to their comments.
The workflow is:
- Make the requested changes in your code.
- Create a fixup commit:
git commit --fixup <hash_of_original_commit> - Push the new commits to your branch:
git push origin my-fix-branch
This will automatically update the PR with the new commits.
4. Landing the Change
Once your PR receives the necessary approvals, it's time to merge it. Because LLVM maintains a linear history, you cannot have merge commits or a long series of fixup commits in the main branch. You must first clean up your branch.
LLVM GitHub User Guide — LLVM 23.0.0git documentation
The final steps of rebasing and merging are detailed in the user guide. This is where you prepare your branch for its final inclusion into the main repository.
Read the sections on Rebasing and Force Pushes and Landing your change. Focus on the process of squashing commits and using the "Squash and merge" button.
The final steps are:
- Fetch Upstream: Get the latest changes from the main LLVM repository:
git fetch upstream. - Rebase and Squash: Rebase your branch on top of the latest
upstream/mainand squash all your fixup commits into your original commit. Theautosquashfeature of interactive rebase makes this easy:git rebase -i --autosquash upstream/main. Your text editor will open with a list of commits; ensure the fixup commits are set tofixupand your main commit is set topick. Save and close, and Git will combine them into one. - Force Push: Push your newly cleaned, single-commit branch to your fork. Since you have rewritten history, you must use
--forceor, more safely,--force-with-lease:git push --force-with-lease origin my-fix-branch. - Merge: As a new contributor, you won't have permission to merge to
main. After you've cleaned up your branch, add a comment to the PR: "@<reviewer_username>, this is ready to merge." The reviewer will then use the "Squash and merge" button on GitHub to land your patch. This action takes the PR's title and description and uses them for the final commit message in themainbranch.

Conclusion
You have now traced the entire path of an LLVM contribution, from identifying a bug to submitting a polished, professional-quality pull request. This process combines technical Git skills with an understanding of the LLVM community's specific conventions and etiquette.
Key Takeaways:
- Preparation is Key: Before submitting, ensure your patch has a test, conforms to coding standards (
git clang-format), and is a single, logical change. - Commit Message Matters: Use the
[Component] Summaryformat and write a detailed body explaining the why of your change. - Review is a Dialogue: Use "fixup" commits to address reviewer feedback, keeping the review history clean.
- Clean Up Before Landing: Before the final merge, rebase against
upstream/mainand squash your work into a single commit. - Communication is Crucial: Know how to find reviewers, @-mention them, and politely ask for a merge when your patch is approved and ready.
With the full contribution workflow now demystified, you are equipped not just to understand the LLVM codebase, but to actively improve it. In our next module, we will pivot from workflow mechanics to the core internals of the compiler, starting at the very beginning with the Clang frontend. You'll learn how C++ source code is parsed and transformed into an Abstract Syntax Tree (AST), the first major data structure in the compilation pipeline.