Introduction
In our previous lesson, we meticulously engineered the bra's foundational support system: the band. By calculating negative ease based on fabric stretch, we created a stable chassis ready to carry the load. That band, with its precisely drawn wire line, forms the perimeter within which we will now construct the bra's most defining feature: the cup.
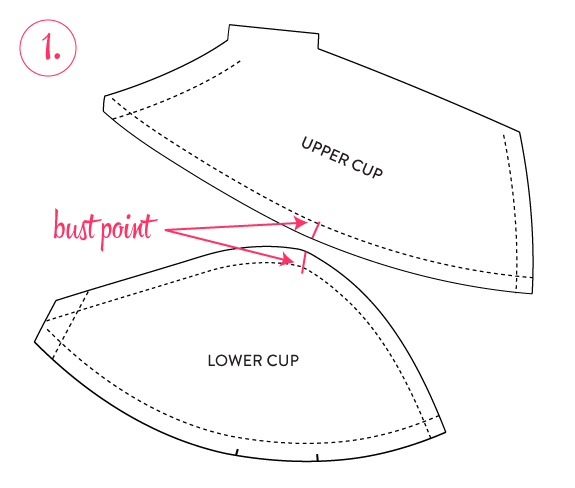
This lesson focuses on drafting a two-part vertical seam cup. This is a cornerstone of bra design, providing excellent forward projection and a rounded shape, making it an incredibly versatile base for many Bollywood costume designs, from simple blouses to elaborately decorated tops for dance numbers. Our objective is to translate breast volume and shape into a set of 2D patterns that, when sewn, create a 3D cup perfectly aligned with the breast apex and the desired level of projection. This process merges geometric principles with anatomical understanding, a blend that should appeal to your analytical background.
The Geometry of a Bra Cup
Before we begin drafting, let's establish the core principle. We are tasked with enclosing a three-dimensional, semi-spherical form—the breast—using two-dimensional pieces of fabric. The seams we introduce into the pattern are what allow us to create this 3D shape from flat material. A vertical seam, running from the wire line to the neckline, is particularly effective at controlling forward projection.
Think of the breast as a semi-sphere. Our goal is to create pattern pieces that wrap around this sphere. This is a classic problem in geometry and cartography: representing a curved surface on a flat plane.
Bra engineering - WO2017096075A1 - Google Patents
This patent document, "Bra engineering," provides a highly technical overview of the principles behind bra design. It discusses the traditional model of the breast used in pattern making.
Please read the introductory paragraphs to understand how the industry conceptualizes the task. Focus on the section that describes the breast as a model, starting with the half sphere model and continuing to where it states that the circle is a key shape. This establishes the geometric foundation for our drafting process.
As the text highlights, while real breasts are rarely perfect semi-spheres, this model provides the mathematical basis for calculating volume and creating a pattern. The vertical seam we are about to draft is the primary tool for shaping the front curve of this semi-sphere.
Step 1: Acquiring the Data – Key Cup Measurements
Just as we needed the underbust measurement and stretch ratio for the band, we need a specific set of measurements to draft the cup. This is not about standard cup sizes (like 34B), which are generalizations for mass production. For custom work, especially for a performer, we need direct anatomical data.
The video below provides a comprehensive method for drafting a full bra pattern. We will focus only on the measurements and drafting steps relevant to our two-part vertical seam cup.
Pattern Construction Underwire BRA (detailed) sup.1.1.5
This detailed tutorial by Katerina Ivanova, "Pattern Construction Underwire BRA," walks through a complete drafting process from measurements. We will use it to gather our input variables.
Watch the segment from the cup measurements. The instructor explains the three crucial measurements we need: Tissue Width: The horizontal diameter of the breast root. Height of the Center: The vertical distance to the fullest part of the breast. Width of the Center: The horizontal distance from the center-front to the apex. These three measurements define the volume and position of the breast on the chest wall. They are the primary inputs for our drafting model.
Step 2: Drafting the Cup Pattern Pieces
With our measurements in hand, we can begin constructing the pattern. The process involves creating the lower cup section first, then using its dimensions to draft the upper cup. We'll continue using the Katerina Ivanova video as our guide.
The process is a sequence of geometric constructions: drawing lines, dividing them, and connecting points to form the curves. Your experience with algorithms and structured processes will be useful here as you follow the steps.
Pattern Construction Underwire BRA (detailed) sup.1.1.5
We will now follow the step-by-step drafting process from the same video.
Please watch the following segments carefully. You can pause and re-watch as you follow the logic of the construction. Drafting the Lower Cup: Watch from drafting the lower cup. This part shows how to use the measurements to create the two halves of the lower cup piece. Pay close attention to how straight guidelines are established first, and then curvature is added to create the rounded shape. Drafting the Upper Cup: Continue from drafting the upper cup. This section explains how the dimensions of the upper cup are derived from the measurements of the band's wire line (which we drafted in the last lesson) and the lower cup pieces we just drew. This ensures all the pieces will fit together.
The image below shows the logical flow of these steps. You start with the wire line (Step 1, from our previous lesson), define the midfront-to-armhole line, and then construct the cup pieces within that framework by drawing the vertical "coupe line" (Step 2 & 3).

Step 3: Quality Control – Truing the Seams
You have now drafted two separate pieces: the inner cup (center-front side) and the outer cup (armhole side). Before you can add seam allowance and cut fabric, you must perform a critical quality assurance step known as truing, or "walking the seams."
The goal is to verify that the two curved edges that will be sewn together are exactly the same length. If they are not, the seam will pucker, or one piece will be stretched, distorting the cup's shape. This is a common failure point in pattern drafting.
Drafting a Vertical Seamed Cup with a Bra Sloper by Porcelynne using the Bare Essentials: Bras Draft
The video "Drafting a Vertical Seamed Cup" by Porcelynne provides an exceptionally clear demonstration of this essential technique.
Watch the section on walking the edges. Observe how the drafter places one pattern piece over the other and carefully pivots along the seam line to check for any length discrepancy. Then, watch how she corrects the wire line and neckline. If walking the seam reveals a mismatch, you must adjust one of the pieces and then smooth out the connecting lines (like the wire line or the top edge) to ensure there are no awkward dips or points at the seam.
This verification step ensures the integrity of your design before construction, saving significant time and materials. It's the pattern-making equivalent of running a unit test on a piece of code.
Step 4: Fine-Tuning – Aligning the Seam with the Apex
The drafting method we followed produces a well-proportioned cup, but the vertical seam may not land perfectly on the wearer's apex. For a truly custom fit, especially for the high-definition scrutiny of a camera, you may need to shift this seam. This adjustment is crucial for optimizing support and achieving the most flattering shape.
Case Study: The "Item Number" Dance Sequence
Imagine you are designing for a lead actress in a high-energy "item number." The choreography involves powerful, sharp movements. The bra must provide a very specific, uplifted, and rounded silhouette that remains perfect from every camera angle.
- Problem: After fitting a prototype, you notice the actress's apex is about 1 cm further towards the center front than the bra's vertical seam. This causes a slight flattening of the profile and means the point of maximum support is misplaced.
- Solution: You need to adjust the pattern to move the vertical seam inward by 1 cm.
This is a common and straightforward pattern alteration.
Moving the Apex in: Adjust the Vertical Seam position – Primrose Dawn
This tutorial from Primrose Dawn provides a clear, step-by-step guide for this exact adjustment.
Read the entire tutorial. The core logic is simple and elegant: Add the required amount (e.g., 1 cm) to the seam edge of the outer cup piece. Subtract the same amount from the seam edge of the inner cup piece. This effectively shifts the entire seam line without changing the overall size of the cup. After making the change, you must re-blend the curves and re-true the seams to ensure they still match perfectly.
This final adjustment elevates a standard draft to a truly bespoke pattern, ensuring the engineering of the cup is perfectly aligned with the anatomy of the performer.
Conclusion
Today, we have translated a set of anatomical measurements into a functional, three-dimensional cup pattern. We've seen that drafting is a systematic process rooted in geometry, but one that requires careful verification and fine-tuning to achieve a perfect result.
Key Takeaways:
- A two-part vertical seam cup is engineered to create forward projection by converting flat fabric into a 3D semi-spherical shape.
- The drafting process begins with precise measurements of breast tissue width, height, and apex position.
- The pattern is constructed by first drafting the lower cup, then deriving the upper cup's dimensions to ensure a perfect match with both the lower cup and the band's wire line.
- Truing the seams is a non-negotiable quality control step to ensure the joining edges are identical in length, preventing puckers and distortion.
- The vertical seam's position can and should be adjusted to align perfectly with the wearer's apex for optimal fit, support, and aesthetics.
Next Lesson Preview:
We have now drafted the two largest components of our bra block: the band and the cups. What remains is the crucial piece that joins them at the center front—the bridge, also known as the gore. In our next lesson, we will draft this connecting piece and analyze how its height and width are critical variables for controlling breast separation, defining the neckline, and ensuring structural stability.