Introduction
In our previous lessons, we have systematically drafted the primary components of our bra block. We began with the band, the stable chassis providing foundational support, and then engineered the two-part vertical seam cup to create shape and projection. We now arrive at the crucial component that unites these elements at the center front: the bridge, or gore.
This lesson focuses on drafting this connecting piece. More importantly, we will analyze the bridge not just as a static pattern piece, but as a dynamic control system for fit and aesthetics. Your goal is to learn how to draft the bridge pattern and, crucially, how to adjust its height and width to achieve specific levels of breast separation and support. Given your background in experimental design, you can think of the bridge's dimensions as key variables we can manipulate to optimize the performance of the entire bra system, whether for a deep plunge neckline or for maximum stability during a high-impact dance sequence.
The Physics of the Bridge: Why "Tacking" Matters
Before we draft, we must understand the primary function of the bridge. Its most important job is to ensure the bra "tacks," meaning the fabric of the bridge lies flat against the sternum, between the breasts. A tacking gore is the hallmark of a well-fitting underwire bra. When it tacks, it acts as a stable central anchor.
To understand the structural importance of this, let's explore the physics involved.
Bra Physics Part 3: What can we learn about the wires and cradle?
This article from the blog "Hugs for your Jugs" provides an excellent, physics-based explanation of bra support mechanics. It clearly articulates the role of a tacking gore.
Please read the section titled "Is tacking really all that important?". Focus on how a tacking gore ensures the cups maintain tension around the entire breast and provides friction against the torso to prevent the bra from shifting. Note the consequences of a "floating gore," where this central anchor fails.
As the article explains, a floating gore signifies a failure in the support system. The inner halves of the cups lose tension, reducing support and allowing the entire bra to tilt forward and dig in at the bottom. In the context of Bollywood design, where a garment must remain perfectly positioned through long, energetic takes, a non-tacking gore is a critical failure point. Therefore, every adjustment we make to the bridge pattern is driven by the primary objective of making it tack perfectly.
Drafting the Basic Bridge Pattern
The bridge pattern itself is geometrically simple, but its dimensions are critical. It connects the two cups and sits between the two underwires. The shape is typically a small, tapered rectangle, but its precise height and width are key design decisions.
To draft the bridge, you need two primary inputs:
- Bridge Height: This is determined by the desired neckline. A full-coverage bra will have a tall bridge, while a deep-plunge style will have a very short one.
- Bridge Width: This is determined by the anatomy of the wearer—specifically, the natural separation between their breasts.
The drafting process follows these logical steps:
- Draw a vertical line representing the center front of the bridge.
- Mark the desired height on this line. For a standard bra, this might be around 6-8 cm.
- At the top and bottom of this line, draw horizontal lines representing the width. The bottom width must accommodate the space for two underwire channels plus the desired separation. For example, if the channels are 1 cm each and you want 1 cm of separation, the bottom width would be 3 cm total (or 1.5 cm from the centerline). The top width can be the same or tapered.
- Connect these points to form the bridge shape. The side edges, where the cups will attach, must be curved to match the wire line you drafted for the band.
Now, let's focus on how to strategically modify this basic shape.
Adjusting Bridge Width for Breast Separation
The most common adjustment is to the bridge's width, which directly corresponds to the wearer's breast separation. Getting this wrong is a primary cause of a floating or digging gore.
Case Study: Fitting Two Actresses for the Same Costume
Imagine you are the lead designer for a period drama. Two lead actresses will wear the same style of embroidered choli top for a key scene.
- Actress A has very close-set breasts, with almost no space between them.
- Actress B has wider-set breasts, with about 2.5 cm of space between them.
A single, standard bridge pattern will fail for both. Actress A will find the underwires sitting painfully on her breast tissue, forcing the gore to float away from her body. Actress B will find the cups are too close together, compressing her breasts from the sides. You must create two different versions of the pattern by adjusting the bridge width.
How to adjust the gore/bridge of a bra | Cashmerette
This tutorial from Cashmerette provides a clear, practical method for assessing and adjusting bridge width.
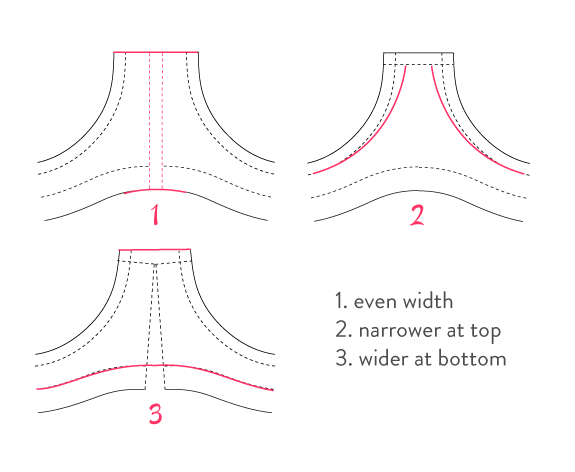
First, read the sections on assessing the fit. Start with how to identify the issue and then review the simple method for measuring breast spacing using your finger as a rough guide. Next, study the two adjustment methods: For Actress A (close-set), you would follow the instructions in the section "How to make the gore narrower". For Actress B (wide-set), you would apply the technique from "How to make the gore wider".
These adjustments are simple slices and shifts of the pattern piece, but they are incredibly powerful. Beyond a simple even adjustment, you can also taper the bridge. For instance, if someone's breasts are closer at the bottom than the top, you might use a bridge that is wider at the top and narrower at the base.
Adjusting Bridge Height for Style and Support
The height of the bridge is your primary lever for controlling the depth of the neckline and the level of central support.
Case Study: A Tale of Two Dance Numbers
-
The Glamour Item Song: The director wants a modern, "Western-fusion" look featuring a crystal-encrusted bra with a daringly deep plunge neckline. The goal is maximum cleavage and visual impact. Here, you would draft a very short bridge, perhaps only 1-2 cm high. Its sole purpose is to provide a minimal connection point for the underwires. The trade-off is reduced central support, which must be compensated for elsewhere in the design (a topic for Module 5).
-
The Traditional Folk Dance Sequence: The choreography is vigorous and athletic, involving high jumps and rapid torso twists. The actress wears a traditional, heavily embroidered top that needs to provide absolute security and support. For this, you would design a tall, full-height bridge. A taller bridge sits more securely against a larger area of the sternum, creating a very stable anchor that resists twisting and vertical bounce. It also accommodates different anatomical structures.

Ultimately, bridge height is an optimization problem: you are balancing the aesthetic demands of the neckline against the structural requirements for support and the wearer's anatomical comfort.
Conclusion
We have now defined the final piece of our foundational bra block. The bridge, while small, is a critical component that acts as the central linchpin of the entire structure. Its design is a clear exercise in cause and effect, where small changes in its dimensions have significant impacts on fit, comfort, and silhouette.
Key Takeaways:
- The primary function of the bridge (gore) is to tack against the sternum, creating a stable central anchor for the bra.
- Bridge width is adjusted to match the wearer's natural breast separation, preventing the wires from either digging into breast tissue or floating away from the chest.
- Bridge height is a key design choice that dictates the depth of the neckline and the degree of central support. Low bridges create plunge styles, while high bridges offer maximum stability.
- Drafting and adjusting the bridge is a process of optimizing variables (height, width, shape) to achieve a desired outcome in both aesthetics and structural performance.
Next Lesson Preview:
With the band, cups, and bridge individually drafted, our work is not yet complete. These pieces exist in isolation. In our next lesson, we will perform the essential quality assurance step of truing the pattern. We will "walk" the seam lines of all adjacent pieces—cup to bridge, cup to band—to ensure their lengths match perfectly, guaranteeing a smooth and pucker-free assembly.