Introduction
In our previous lessons, we completed the drafting of the core components of our bra block: the band, the two-part cup, and the central bridge. These pieces, however, currently exist as separate theoretical drafts on paper. Before they can be assembled into a functional garment, we must perform a critical quality assurance step. This lesson is dedicated to that process: truing the pattern.
"Truing" is the systematic process of verifying and correcting your pattern pieces to ensure that all adjoining seams are of equal length and that their curves and angles meet smoothly. For a garment as precisely engineered as a bra, this step is non-negotiable. It's the equivalent of a validation check in experimental design, ensuring that your blueprint is free of errors before you commit to building the final product. Your goal today is to master this technique, guaranteeing that the pieces you've drafted will sew together perfectly, without puckers or distortion.
What is Truing and Why is it Essential?
At its core, truing is about ensuring compatibility between pattern pieces. When you make adjustments, draft curves, or create new seam lines, it's easy for small discrepancies to emerge. A curve on one piece might end up a few millimeters longer than its counterpart, or two lines that should form a smooth contour might instead create a jagged point. Truing is how we find and fix these errors.
Let's begin with a formal definition of the process.
[PDF] Get a PERFECT FIT - Threads Magazine
This excerpt from a Threads Magazine article on pattern fitting provides a concise and clear definition of truing.
Please read the section titled TRUING REFINES PATTERN ADJUSTMENTS. Focus on the core idea that truing involves "reconnecting and smoothing altered lines" that have become jagged or misaligned during the drafting process.
As the article notes, this process is fundamental. In the context of a Bollywood production, the consequences of skipping this step can be significant. Imagine a heavily beaded bra for a lead actress. If the cup seams are not trued, they will pucker upon sewing. This not only looks unprofessional on camera but also creates weak points in the garment's structure, risking seam failure during a high-energy dance sequence. Truing eliminates these risks at the pattern stage.
The process primarily involves two actions:
- Walking the Seams: Physically pivoting one pattern piece against another along the seam line to compare their lengths.
- Blending and Smoothing: Redrawing lines at the junctions to ensure a smooth, continuous transition from one piece to the next.
Case Study 1: Truing the Vertical Cup Seam
The vertical seam on our two-part cup is a perfect place to start. Since both edges are curved, it's highly likely there will be a slight mismatch in length after the initial draft. Our objective is to make them identical.
A common method is to use tracing paper to "walk" one seam against the other. Let's watch this in action.
Drafting a Vertical Seamed Cup with a Bra Sloper by Porcelynne using the Bare Essentials: Bras Draft
In this video from Porcelynne, the instructor demonstrates exactly how to "walk the edges" of a vertical cup seam to identify and correct discrepancies.
First, watch from this segment. Observe how she aligns the two pieces at the apex and carefully pivots one along the other to see that one is shorter. She then marks the necessary adjustment. Next, watch how she refines the pattern from this point. After matching the seam lengths, she aligns the joined pieces to ensure the wire line and the top edge form a single, smooth curve. This prevents any awkward dips or points in the final cup shape.
This process of checking, marking, and re-blending the lines is the essence of truing.

Case Study 2: Truing Junctions
Truing isn't just for single seams; it's also for points where multiple pieces and lines converge. A classic example is the side seam, where the front cradle meets the back band. Here, you need to ensure not only that the side seam itself is a straight, continuous line but also that the top and bottom edges of the band flow smoothly across the junction.
The image below breaks this down into a simple, three-step process.
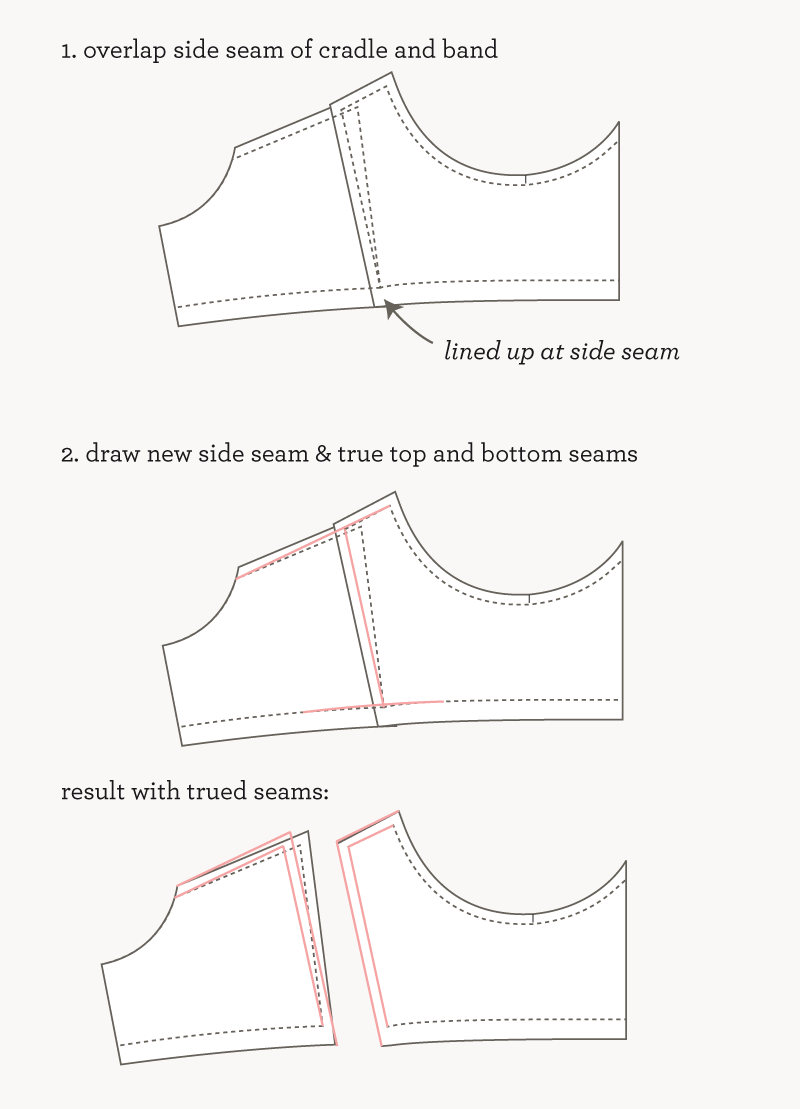
This same principle applies to other junctions, such as where the cup meets the bridge or where the straps will attach. You are always looking for smooth, logical transitions.
A Systematic Approach to Truing
Having seen specific examples, let's consolidate the process into a set of guiding principles. This systematic checklist will help you apply the technique to any pattern you create.
Adventures in Bra Sewing: Figuring Out Fit Part 3: Common Pattern Alterations – Doctor T Designs
This article from the "Doctor T Designs" blog offers an excellent summary of the core actions involved in truing a pattern.
Please read the two key bullet points in this section. The first, on "walking your seam lines," reinforces the technique of physically comparing seam lengths. The second, on "truing your lines," describes the subsequent step of smoothing the curves and lines with drafting rulers.
To put this all together, let's watch one final, comprehensive example. Here, the presenter checks all the pieces of her drafted cup pattern, highlighting the small but critical adjustments that make the difference between a rough draft and a professional pattern.
Pattern Construction Underwire BRA (detailed) sup.1.1.5
This clip provides a great overview of the full checking process. The presenter has drafted her pieces and is now performing the truing and validation step.
Watch from this section. Notice how she uses transparent paper to overlay the pieces. She quickly identifies a "very small dent" where the curves don't align perfectly and also notes how the bottom edges create a jagged line. She then marks the corrections needed to smooth everything out. This is a perfect real-world application of truing.
Conclusion
You have now learned the crucial skill of truing a pattern. This is the final step in the design phase of your bra block, transforming a collection of individual drafts into a cohesive and accurate set of blueprints. By meticulously checking and correcting your work, you ensure the integrity and professionalism of the final garment.
Key Takeaways:
- Truing is a quality control process. It validates that your pattern pieces will fit together correctly before you cut any fabric.
- The process involves two main actions: "walking" seams to ensure they are of equal length and "truing" the lines to create smooth curves and transitions at all junctions.
- Failing to true a pattern results in puckered seams, distorted shapes, and a poor fit—unacceptable faults in a professional garment, especially one designed for the demands of performance.
- Key areas to true include curved cup seams, the junction between the cradle and band, and the connection points between the cups and the frame.
Next Lesson Preview:
With our foundational bra block drafted and trued, it is now a complete "net" pattern. However, it's not yet ready for cutting. In our next lesson, we will convert this into a usable "gross" pattern by adding the final essential details: seam allowances, grainlines, notches, and other critical markings that guide the construction process.