Introduction
Welcome to the first lesson in our new module, "Drafting the Foundational Bra Block." In our last session, we took a high-level flight over the entire process of creating a basic bra block, seeing how measurements translate into the interconnected system of the frame, cups, and band. We touched upon the critical concept of negative ease as the force that brings support to the structure.
Today, we transition from that overview to a detailed architectural study of the single most important component for support: the bra band. A well-engineered band is the chassis of any high-performance bra. For the demands of Bollywood—withstanding high-impact choreography and supporting the weight of heavy embellishments—mastering the band is non-negotiable. Our goal for this lesson is to draft a custom-fit bra band pattern directly from body measurements, focusing on the precise calculation and application of negative ease to account for the properties of your chosen fabric.
The Engineering of Fit: Understanding Negative Ease
At its core, a bra band is an exercise in tension. To provide support, it must be shorter than the circumference of the torso it encircles, relying on the fabric's elasticity to close the gap and create a snug, stable fit. This intentional difference between the garment's dimension and the body's dimension is called ease. When the garment is smaller than the body, it's called negative ease.
For your background in statistics and modeling, you can think of ease as a control variable. The amount of ease—positive, zero, or negative—is a deliberate design choice that dictates the final fit and function of the garment. To build a strong intuition for this, let's watch a brief explanation.
What is Ease? Understand Ease in a Dressmaking Pattern
The video "What is Ease?" from the Made to Sew channel provides a clear, visual introduction to this fundamental concept in pattern making.
Please watch the following segments: First, watch from the beginning to the definition of ease and how it relates to stretch fabrics. Then, jump to the visual demonstration from the sample garments, paying close attention to the discussion of zero ease and negative ease in stretch garments. This will help solidify the concept of a garment being intentionally smaller than the body.
As you saw, for stretch garments like bra bands, negative ease is not an error but a requirement. Our task as designers is to move from this qualitative understanding to a quantitative method. How much smaller should the band be? The answer lies entirely in the properties of our material.
Step 1: Data Acquisition – Quantifying Fabric Stretch
Before we can draft, we must analyze our primary material. The most critical variable in our negative ease calculation is the fabric's stretch percentage. Different fabrics—powernet, lycra, spandex blends—all have unique stretch properties. A "one size fits all" pattern reduction would lead to inconsistent results: a band that's too loose and unsupportive with a high-stretch fabric, or one that's unwearably tight with a low-stretch fabric.
Therefore, the first step is always to measure the stretch percentage of your specific fabric.
Don't Measure Fabric Stretch the Wrong Way! Get the Accurate Stretch Percentage
This video, "Don't Measure Fabric Stretch the Wrong Way!" by Gina Renee, provides a precise, repeatable method for testing your fabric. It treats the process with the scientific rigor it deserves.
Watch these key sections to understand the complete process: Introduction to Stretch Factor: This section explains why this measurement is so crucial for determining negative ease. The Stretch Test: This is a practical, step-by-step demonstration of how to measure the horizontal stretch. This is the primary measurement we need for the bra band. 2-Way vs. 4-Way Stretch: This clarifies important terminology that you will encounter when sourcing fabrics. A bra band requires, at minimum, a good horizontal stretch.
This measurement process gives us our key input variable: the stretch percentage. With this number, we can now build a reliable model for our pattern.
Step 2: The Calculation – A Model for Negative Ease
Now we will translate the fabric's stretch percentage into a precise pattern adjustment. There are several effective models for this.
Method 1: The Heuristic Approach
A practical and widely used rule of thumb comes from the blog Cloth Habit. It proposes a direct relationship between stretch and reduction.
Adjusting Your Bra Band (With Math!) • Cloth Habit
This article breaks down the calculation into a simple, actionable formula.
First, review the section on finding stretch percent to reinforce what you saw in the video. Next, read the core formula. The key heuristic is: reduce the band length by 3% for every 10% of stretch.
So, for a fabric with 75% stretch, the calculation would be:
- Find the number of 10% increments:
- Multiply by the 3% reduction factor:
- This gives us a total reduction of 22.5%.
Method 2: The Coefficient Model
A more formal approach, which may resonate with your statistical background, uses a "coefficient of reduction." This is common in European pattern drafting systems.
2.4 Bras without cups - Sewing Lab Milano
This lesson from Sewing Lab Milano introduces the concept of reduction coefficients 'k' and 'y'.
Read the introductory section, focusing on the definition of the coefficients. Find the part that says Remember that k.
The horizontal reduction coefficient, k, is simply the multiplier you apply to your measurement. It's calculated as:
Using our previous example with a 22.5% reduction:
The final length of your drafted band piece is then a simple multiplication:
Since we typically draft half the pattern to be placed on a fold or mirrored, the formula we will use is:
Step 3: Application – Drafting and Adjusting the Band Pattern
With our target length calculated, we can now create the pattern piece. There are two primary scenarios: adjusting an existing pattern or drafting one from scratch.
Adjusting an Existing Pattern
Often, you will start with a base pattern and need to adapt it for a new fabric. The "slash and spread/overlap" method is an efficient way to do this. The Cloth Habit article demonstrates this perfectly.
Adjusting Your Bra Band (With Math!) • Cloth Habit
Let's return to the Cloth Habit article to see the practical application.
Read the final part of the article, starting from the slash and overlap method.
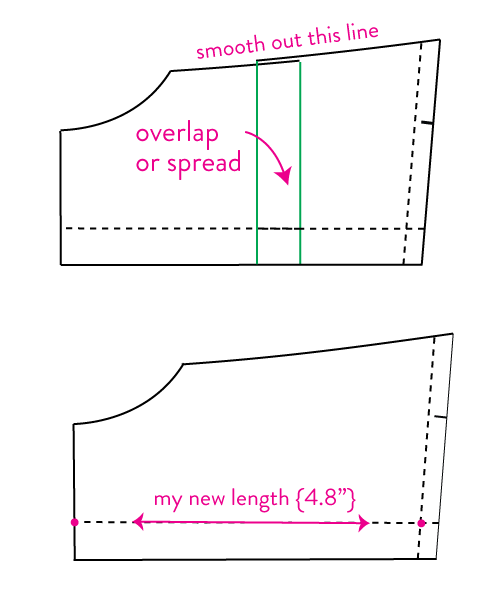
Drafting a Band from Scratch
When creating a fully custom block, you will draft the band using your calculated length from the very beginning. The process involves establishing a grid and plotting points based on your measurements, which have already been adjusted by the coefficient .
2.4 Bras without cups - Sewing Lab Milano
This tutorial shows the drafting of a full torso block for stretch fabrics. We can extract the essential steps for our bra band from this process.
Focus on the logic of how the reduction coefficient k is applied to the horizontal measurements to create the band shape. You do not need to draft the full bodice, only understand the principles for the band: Establish the Width: Review Step 1, specifically how the measurement a-b uses bust circ/2 * k to define the total width of the half-pattern. For our purpose, we would use the underbust circumference. Establish the Back Shape: In Step 3, look at how the back side seam is shaped. The measurement w-w3 uses the waist circumference divided by 4 and multiplied by k. This same logic applies to shaping the underbust band. Establish the Front Shape: In Step 5, the measurement w1-w4 mirrors the logic from the back to complete the side seam. The line connecting w4 to c4 would form the front part of your band's side seam.
The key principle is consistent: the horizontal measurements that define the band's length are pre-scaled by the coefficient k before you even draw the first line.
Case Study: Engineering a Band for a High-Tempo Dance Number
Let's apply this to a specific Bollywood scenario.
- Objective: Design a bra for the lead actress in a vigorous, high-tempo song sequence. The costume is heavily embellished, so the bra must be exceptionally stable.
- Material: A high-performance powernet.
- Measurements: Actress's underbust is 76 cm.
- Analyze Material: We test the powernet and find it has 80% stretch.

-
Calculate Reduction: Using the Cloth Habit heuristic:
- total reduction.
-
Calculate Coefficient
k: -
Calculate Drafted Length:
- Drafted Half-Band Length =
- Drafted Half-Band Length =
This significant reduction ensures the band will cling firmly to the body, providing the necessary anchor to counteract the forces of dance and the weight of the embellishments, preventing any slipping or shifting during performance.
Conclusion
In this lesson, we have systematically engineered the foundation of our bra: the band. We've moved beyond simple measurements to a model-based approach where the fabric's properties dictate the final pattern dimensions.
Key Takeaways:
- The bra band's support comes from negative ease, a calculated reduction in length relative to the body's measurement.
- The amount of negative ease is determined by the fabric's stretch percentage, which must be measured accurately.
- We can use a heuristic (e.g., 3% reduction per 10% stretch) or other models to calculate a reduction coefficient (k).
- This coefficient is then applied to the body measurements to determine the final drafted length of the band pattern pieces.
- This rigorous, calculation-based approach is essential for creating high-performance garments that are reliable under the stresses of dance and screen performance.
Next Lesson Preview:
With our supportive chassis—the band—now designed, we can turn our attention to creating shape and volume. In the next lesson, we will focus on drafting a two-part vertical seam cup. We will learn how to draft the pieces that form the 3D cup and ensure they integrate perfectly with the wire line of the band we have just engineered.