Introduction
In our previous lesson, we engineered support from within the cup by designing and integrating internal slings to manage bounce during high-impact movement. We successfully stabilized the contents of the bra, but the most sophisticated cup design is only as effective as its foundation. Today, we turn our attention to that very foundation: the bra band.
This lesson focuses on a common but critical point of failure in bra construction: the tendency for the band to roll, buckle, or ride up at the sides. You will learn how to incorporate channels for flexible boning into a bra's side seams, a technique that adds crucial vertical structure and stability. By preventing the band from collapsing under pressure, you ensure the entire garment maintains its position and supportive function, even during the most demanding choreography.
The Physics of Band Failure
Before we add a structural component, it’s essential to understand the forces we are trying to counteract. A well-fitting bra band is a marvel of engineering, designed to anchor the garment to the torso and bear the majority of the breasts' weight. However, it exists in a dynamic system of forces.
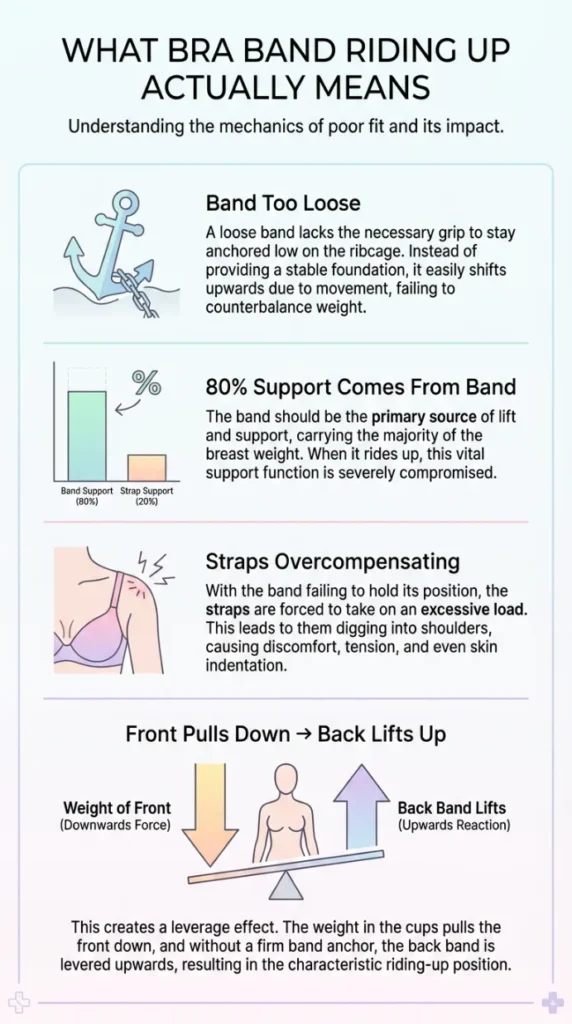
As the infographic shows, the weight in the cups creates a downward force. If the band is not sufficiently anchored and rigid around the torso, this force creates a lever effect, causing the back of the band to lift. At the side seam, this can manifest as the band rolling over on itself or collapsing vertically. This not only compromises the 80% of support the band is meant to provide, but it is also uncomfortable for the wearer and visually disruptive.
Your goal as a designer is to interrupt this leverage system by ensuring the band remains a stable, immovable anchor. Negative ease and high-modulus fabrics like powernet provide horizontal tension, but to prevent vertical collapse, we need a different tool: boning.
Selecting Boning for High-Impact Performance
Boning provides vertical rigidity. However, not all boning is created equal, and for a Bollywood costume, the choice of material is a critical design decision. Let's review the common types.
Three Ways to Attach Boning - Threads Magazine
This article from Threads Magazine provides an excellent overview of the most common types of boning available to sewers. We will use it to understand our material options.
Please read the introduction and the descriptions for 1. Precovered Boning and 2. Rigilene Boning. Take note of the assessment that these types provide structure but are "not appropriate for giving the body heavy shaping." This is a key limitation to keep in mind.
As the article suggests, standard plastic and Rigilene boning are suitable for light support. For everyday lingerie, this is often sufficient. However, for a high-impact dance costume that must endure hours of shooting, multiple takes, and vigorous movement, these materials have a high probability of failure—they can warp, snap, or deform under stress.
Now, let's look at the professional opinion.
Three Ways to Attach Boning - Threads Magazine
The comments section of this article contains invaluable insights from professional costumers. Their experience with garments built for performance is directly applicable to our goals.
In the comments, find the posts by users tarsier, tntmade, and tutudiva. Notice their consensus: for structured garments that need to last and provide predictable support (like wedding dresses or ballet costumes), they advocate for steel boning. The comparison to ballet costumes is particularly relevant, as the physical demands are similar to those of a Bollywood dance number.
For performance-grade garments, steel boning is the superior engineering choice. It comes in two main varieties:
- Flat Steel Boning: Extremely rigid, used in corsetry for significant shaping. It bends in only one direction.
- Spiral Steel Boning: Made of flattened steel coils, it is strong vertically but flexible in all directions, making it more comfortable for areas that require movement.
For the side seam of a bra, either flat or spiral steel can be used. Flat steel provides maximum resistance to rolling, while spiral steel offers a compromise between support and flexibility.
The "How": Incorporating a Boned Channel
Regardless of the boning material you choose, the process of incorporating it into the bra band is the same. You will create a "channel" or "casing" to house the bone, then securely attach this channel to the bra's side seam.
The Cloth Habit blog provides an excellent, clear tutorial on this exact process. We will follow its steps.
Bra Making: Add Boning to a Strapless Bra - Cloth Habit
This tutorial walks through every step of adding a boning channel to a bra's side seam. The photos are clear and the instructions are precise.
First, review the materials needed: plastic bones and extra underwire casing. Note that standard underwire casing is a perfect material for a boning channel. Next, follow the step-by-step guide: Measure and Cut: Read how to determine the length of the bone. It's crucial to leave space at the top and bottom to securely close the channel. Finish the Ends: This is a non-negotiable step for safety and durability. Read the instruction to round the ends of plastic boning. For steel boning, the ends would be filed smooth and then "tipped" with special caps or a tool-dip coating to prevent them from piercing the fabric. Attach the Channel: Study the image and description of how to stitch the casing over the side seam. Insert and Close: Finally, read how to insert the boning and securely close the ends of the channel. A strong closure is vital to prevent the bone from escaping during intense movement.
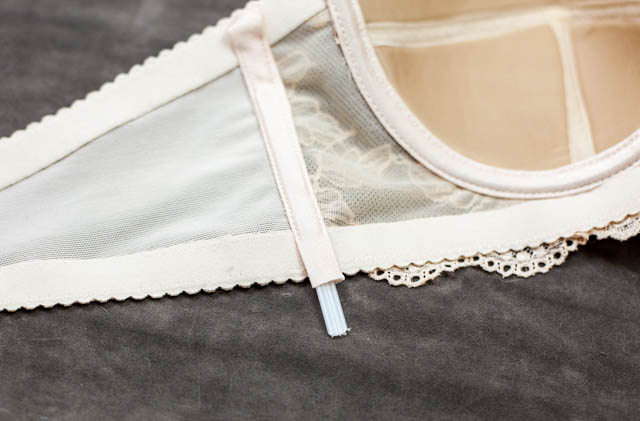
The image below shows this process in action. The casing is sewn on, and the flexible boning is being inserted before the top of the channel is stitched shut.
Case Study: Engineering a Choli for a High-Tempo Dance Number
Scenario: An actress is performing a fast-paced item number. Her costume is a contemporary choli with a 2-inch wide band, made from a fashion fabric overlaying powernet. The choreography is aggressive, with sharp torso isolations, deep side bends, and rapid arm movements.
The Problem: The side seam of the choli is a primary stress point. Without reinforcement, the 2-inch band is almost certain to buckle, roll, or collapse during the side bends, compromising the fit and creating a wardrobe malfunction that would stop the shoot.
The Solution: We will incorporate boning channels at the side seams.
- Boning Selection: Given the high-impact nature and the need for absolute reliability over multiple takes, 1/4" flat steel boning is the professional choice. It will provide the necessary vertical rigidity to keep the 2-inch band perfectly straight and smooth, even during extreme side bends.
- Channel Construction: We will use standard underwire casing. For a clean finish, the casing will be stitched to the lining layer of the bra band before the outer fashion fabric is applied. This hides the channel from the outside.
- Placement: The channel will be centered directly over the side seam.
- Execution:
- Cut the steel boning 1/2" shorter than the height of the finished band to allow 1/4" of clearance at the top and bottom.
- File the cut ends of the boning until smooth, then dip them in plastic tool-dip or apply steel boning caps to ensure they can never pierce the casing.
- Stitch the underwire casing to the powernet lining, centered on the side seam.
- Insert the finished bone into the casing.
- Securely stitch across the top and bottom of the casing with a dense straight stitch, bartacking for several passes to create an unbreakable seal.
By implementing this, we have transformed a potential point of failure into a pillar of stability. The choli's band will now remain perfectly flat and supportive, allowing the actress to perform with complete confidence.
Conclusion
You have now added another essential technique to your high-performance design toolkit. By incorporating flexible boning, you are directly counteracting the physical forces that cause a bra band to fail. This seemingly small addition provides the vertical structure necessary to keep the band anchored, ensuring the entire garment functions as intended under the most strenuous conditions.
Key Takeaways:
- Side boning provides vertical rigidity to prevent the bra band from rolling, buckling, or collapsing.
- It works in tandem with the band's horizontal tension to create a stable foundation for the entire garment.
- While plastic boning is common, steel boning (flat or spiral) is the superior engineering choice for high-impact performance costumes requiring durability and reliable support.
- The technique involves creating a channel (casing), inserting a bone with safely finished ends, and securely stitching the channel closed.
Next Lesson Preview
We have now stabilized the bra's key structural components: the contents of the cup via internal slings, and the foundation via side boning. However, many spectacular Bollywood costumes are built with delicate fashion fabrics like chiffon, satin, or fine lace that have no inherent strength. In our next lesson, we will learn how to draft and apply power mesh linings to stabilize these delicate fabrics, providing a hidden, high-strength chassis upon which to build a beautiful and durable performance garment.