Introduction
In our last lesson, we delved into the interior construction of a bikini top, establishing how crucial swimwear lining is for opacity, comfort, and structural integrity. We treated material selection as an engineering problem, developing a testing protocol to validate our choices for a demanding cinematic rainfall scene. Now, having secured the garment's internal foundation, we turn our attention to its external engineering: the closure and adjustment systems.
This lesson focuses on the final, critical steps of swimwear assembly: attaching secure clasps and creating functional, adjustable tie-string channels. These components are not mere afterthoughts; they are high-stress points that dictate the garment's reliability and fit. A failed clasp or a slipping tie can mean a costly disruption on set. By the end of this lesson, you will be able to select and apply appropriate hardware and construction techniques to create robust and professional closure systems, ensuring your designs perform flawlessly under pressure.
Part 1: Engineering the Closure – Swimwear Clasps
In a high-stakes environment like a film set, every component must be dependable. The clasp on a bikini top is a primary point of potential failure. Its selection is therefore not just a stylistic choice, but a risk management decision. Your task is to choose a component that can withstand the dynamic forces of performance—diving, dancing, high-impact movement—as well as the chemical challenges of salt or chlorinated water.
The main choice you will face is between metal and plastic clasps. Each has distinct properties that make it suitable for different applications. The article "The Complete Guide to Swimwear Notions" provides a clear breakdown of these materials.
The Complete Guide to Swimwear Notions
This guide from Tortoise Shell Supply outlines the pros and cons of different hardware types. We'll focus on the sections concerning clasps.
Read the section beginning with Clasps and Fasteners. Pay close attention to the contrasting descriptions of metal and plastic clasps. Consider the trade-offs between the perceived quality and durability of metal versus the versatility and lower cost of plastic.
As the article notes, metal clasps offer superior durability and a feel of higher quality, which is often essential for glamorous, high-end Bollywood costumes. However, the risk is corrosion. You must ensure any metal hardware is specified as being made from a corrosion-resistant alloy like zinc, or is specially coated. Plastic is immune to rust and lightweight, but cheaper variants can become brittle with UV exposure or crack under sudden impact.
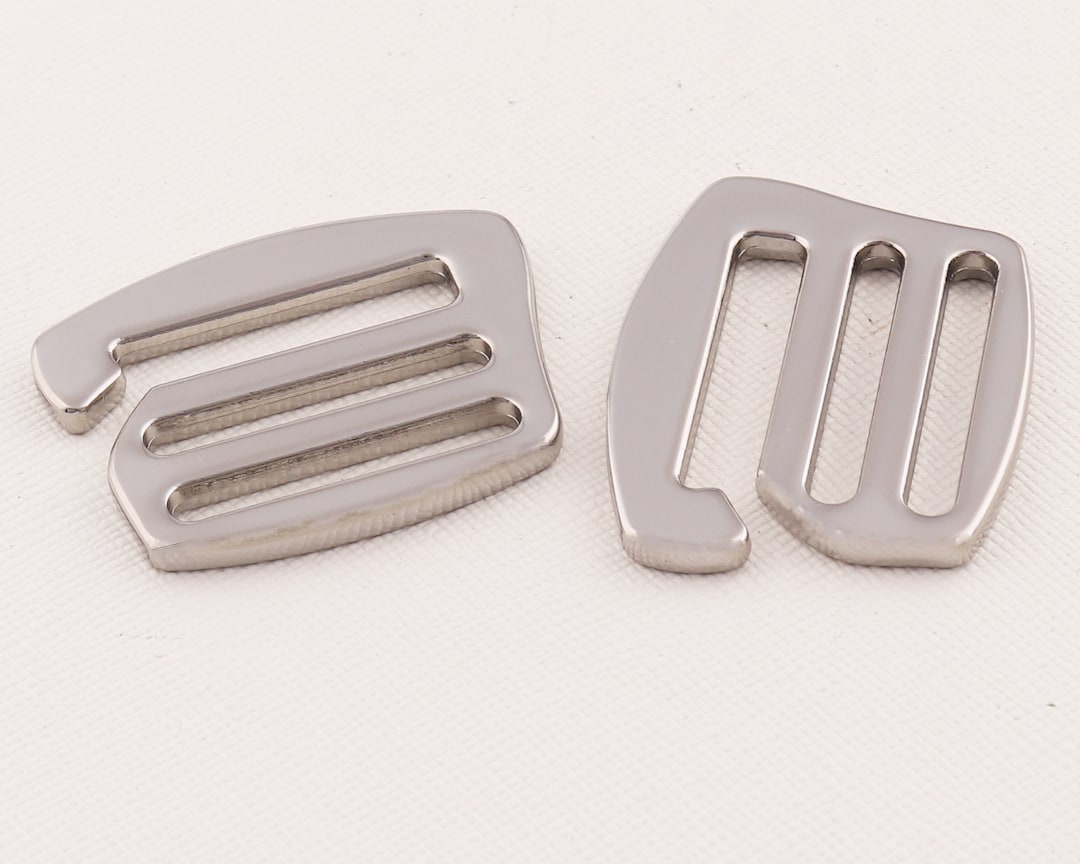
Case Study: The Action Sequence Clasp
Imagine you are designing a bikini top for an actress performing a stunt that involves a five-meter dive into a swimming pool, followed by a swift exit and dialogue.
- Problem: The back closure must survive the impact of hitting the water at speed and remain secure for the subsequent scene. A clasp failure would be catastrophic, halting production.
- Analysis:
- Force Vector: The primary force is a sudden, high-tension pull on the band as water resistance acts on the body during entry.
- Material Risk (Plastic): A standard plastic snap-clasp has a high probability of shearing or popping open under this sharp impact load.
- Material Risk (Metal): A low-quality metal clasp could survive the dive but begin to show signs of corrosion after just one take in the chlorinated pool, making it unsuitable for retakes.
- Solution: The optimal choice is a high-quality metal G-hook or S-hook clasp, like the ones pictured above. These are designed to hold fast under tension; in fact, the more they are pulled, the more securely the hook seats. The material should be specified as saltwater and chlorine-resistant zinc alloy.
Attachment Technique
Attaching the clasp is a critical stress point that requires reinforcement. The standard method is as follows:
- Create the Tab: At the end of the bikini band, create a small fabric tab that will loop through the clasp. This is typically done by folding the end of the band over on itself.
- Measure for Fit: The width of this fabric loop should be precisely sized to the inner dimension of the clasp's attachment bar. A loop that is too wide will bunch up; one that is too narrow will allow the clasp to slide around.
- Reinforce the Seam: Securely stitch the tab down to the band. Do not rely on a single line of stitching. Use a bar tack (a tight, dense zig-zag stitch) or multiple parallel lines of straight stitching. This seam will bear the full tension of the band. You should treat the reinforcement of this point with the same rigor as you would analyze a critical load-bearing joint in a structure.
Part 2: Designing for Adjustability – Tie-String Channels
While clasps offer a clean, fixed closure, tie-strings provide unparalleled adjustability, allowing a single garment to be fitted to different bodies or for the performer to control the degree of support and coverage. The classic triangle bikini top is the prime example of this system. It functions by allowing the bikini cups to slide along a string that passes through channels on the cups' sides.

The image above perfectly illustrates this mechanism. The key is creating the channel itself.
Constructing the Channel and Ties
- The Channel: After you have assembled your lined bikini cup, instead of finishing the side edges flush, you will fold the side edge over towards the lining by about 1-1.5 cm and stitch it down. This creates a fabric tunnel, or channel, running along the edge of the cup. The channel must be wide enough for your finished tie-string to pass through smoothly without friction, but not so loose that the cup feels sloppy or unstable.
- The Tie-String: The string itself is most professionally made as a "rouleau loop." This is a long, thin tube of your swimwear fabric, sewn and then turned inside-out. The goal is to create a strong, dense cord that has the same stretch properties as the rest of the garment. For a typical bikini, you will need two long ties: one for the neck/halter and one for the underbust band.
Part 3: Professional Finishes for Tie-Strings
Simply knotting the end of a tie-string is functional, but for a professional, cinematic-quality garment, the finish matters. An unravelling knot or a raw fabric edge looks amateurish on camera. This is where "stoppers" or "cord ends" come in.
The Complete Guide to Swimwear Notions
Let's return to the swimwear notions guide to explore finishing options for our tie-strings.
Read the section on Stoppers. Pay particular attention to the "Pro Tip for Designers." This directly relates to your goal of creating high-end designs, where metal stoppers would be the appropriate choice.
The choice of stopper—metal for luxury, plastic for budget, or none at all—is a key differentiator in the perceived quality of the final garment. For a featured Bollywood costume, a small, elegant metal cord end is an expected detail. It signals quality craftsmanship and attention to detail.
The application is simple:
- Thread the end of your tie-string through the stopper.
- Tie a small, tight, secure knot at the very end of the string. A double or triple knot is best.
- Trim any excess fabric from the knot.
- Slide the stopper down until it covers the knot entirely. The knot, now hidden inside, prevents the stopper from falling off.
This small step elevates the design from a homemade piece to a professional garment.
Conclusion
Today, we have completed the construction of our bikini top by focusing on its closure and adjustment systems. We have seen that selecting a clasp is an engineering decision, requiring analysis of forces and material properties to prevent failure. We have also detailed the construction of adjustable tie-string channels and the professional finishing techniques that distinguish high-end swimwear.
Key Takeaways:
- Clasp Selection: Your choice of clasp (metal vs. plastic) should be dictated by the performance requirements of the scene, balancing durability, corrosion resistance, and aesthetics.
- Stress Point Reinforcement: The points where clasps and straps attach are critical stress points that must be heavily reinforced with bar tacks or multiple stitch lines.
- Adjustable Channels: Tie-string channels offer essential adjustability and are constructed by creating fabric tunnels along the edges of the garment pieces.
- Professional Finishing: Using stoppers or cord ends to finish tie-strings is a key detail that elevates the quality and durability of the final garment.
Next Lesson Preview
Having now constructed a complete bikini top, from its internal lining to its external hardware, we are prepared to move into the final phase of the design process: Quality Assurance. In the next lesson, we will begin our module on "Quality Assurance and Stress Testing." Drawing on your background in Design of Experiments, we will learn how to define key stress vectors and potential failure points by analyzing acrobatic choreography, laying the groundwork to build robust testing protocols that will guarantee your designs are truly ready for action.