Introduction
In our last session, we installed the underwires, giving the bra its fundamental shape and rigid support structure. We focused heavily on failure prevention, ensuring those wires are securely sealed within their casings to withstand the rigors of performance. With the core structure now in place, our garment is nearly complete.
This lesson addresses the final, crucial steps in constructing a professional bra: creating and attaching the adjustable straps and the hook-and-eye closure. These components are not mere finishing touches; they are the primary interfaces for fit adjustment and security. You will learn the mechanical principles behind an adjustable strap and master the techniques to assemble one using rings and sliders. We will then cover the secure attachment of the hook-and-eye closure, a high-tension point that demands a robust connection. By the end of this lesson, you will have turned your drafted pattern pieces into a fully functional, wearable, and adjustable garment.
Engineering Adjustable Straps
The adjustability of bra straps is essential for accommodating different torso lengths and achieving the perfect balance of lift and comfort. This mechanism relies on a simple but clever interplay between three components: the strap elastic, a ring, and a slider. The slider acts as a friction-based lock, allowing the strap length to be changed and then held securely in place.
The tutorial "How to Sew Shoulder Straps on a Bra" from Madalynne provides a clear, step-by-step guide to this process.
Bra Making Tutorial: How to Sew Shoulder Straps on a Bra
This tutorial walks through the entire process, from preparing the components to the final attachment. It's an excellent guide for mastering the standard method used across the industry.
As you read, focus on these key stages: Components: Read the introduction to understand the relationship between the strap elastic and the rings and sliders. Note the importance of matching their widths. Ring Attachment: See how the ring is attached to the bra first. The tutorial describes attaching it to the front cup apex, creating what's known as a "boutique" strap. This is often done with a small folded piece of the strap elastic, secured with a dense zig-zag stitch called a bar-tack. Threading the Slider: Pay close attention to the instructions for threading the slider. You'll cut your main strap length and weave it through the slider, which functions like a belt buckle. The short end is then folded and bar-tacked to the slider itself. Final Assembly: Follow the steps to complete the adjustable loop by weaving the long end through the ring on the bra and back through the slider. Back Attachment: Finally, see how the end of the adjustable strap is attached to the back band, again using secure bar-tacks.
The entire sequence of threading the strap through the ring and slider can seem confusing at first, but it follows a logical path. The image below provides a complete visual breakdown of this process.
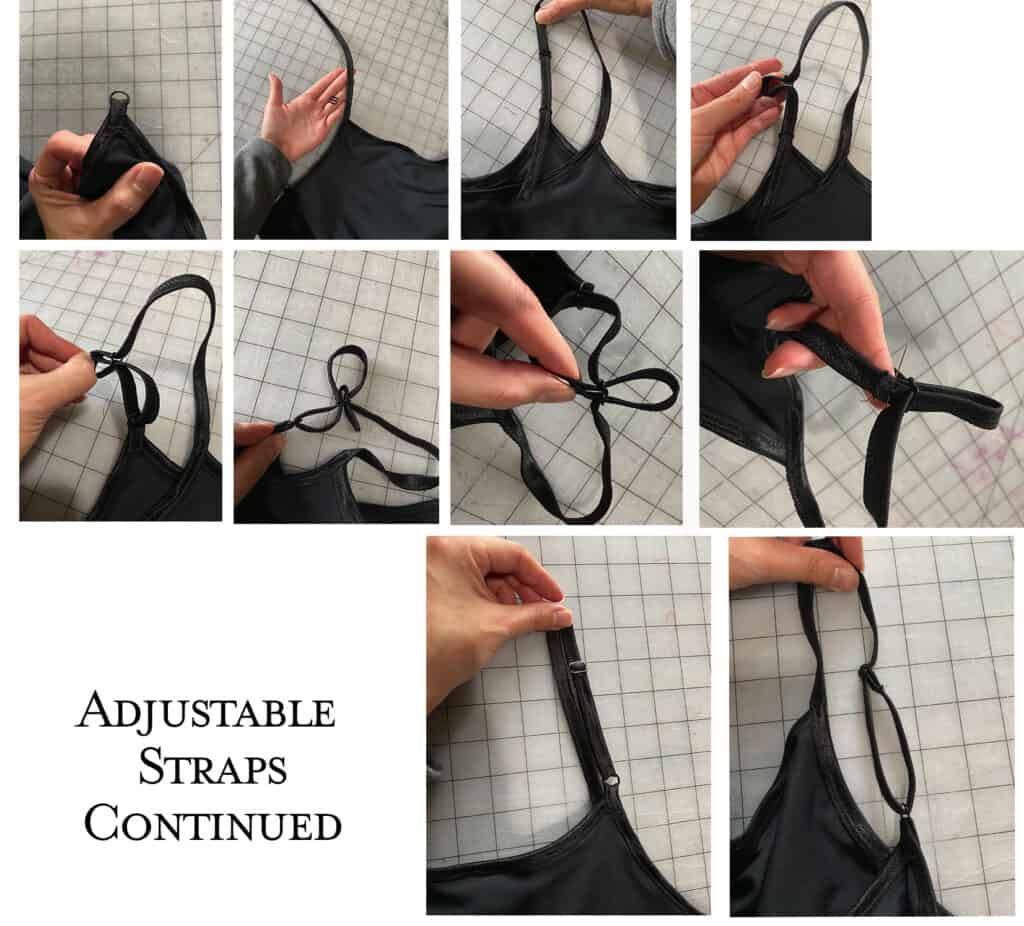
Let's summarize the mechanical flow:
- The ring is the fixed anchor point, attached to a stable part of the bra (usually the cup apex).
- The slider is the locking mechanism, permanently attached to one end of the strap elastic.
- The long, free end of the strap elastic passes through the anchor (ring) and then back through the lock (slider). Pulling this free end shortens the loop, increasing lift. The friction created by the weave through the slider prevents it from slipping back.
Attaching the Hook-and-Eye Closure
The final component is the hook-and-eye closure, which fastens the bra at the back. This closure bears the full tension of the band, making its secure attachment paramount. While often machine-sewn in mass production, knowing how to attach one securely by hand is an essential skill for custom designs, alterations, and on-set repairs.
The key to a durable hand-sewn attachment is using a stitch that protects the thread from abrasion against the metal hardware. The buttonhole stitch (or a similar whip stitch) is ideal for this. It wraps the thread around the loops of the hook and eye, creating a series of knots that are both secure and neat.
The tutorial from MadamSew, "Beautifully Attached Hook and Eye Closures," provides an exceptionally detailed guide to this hand-sewing technique.
Beautifully Attached Hook and Eye Closures - Madam Sew
This guide focuses on the craft of hand-sewing the closure for maximum durability and a clean finish. The large, clear photos make the intricate steps easy to follow.
This tutorial is very thorough. Let's break it down into manageable parts for the hook and the eye separately. Positioning the Hook: First, read the section on positioning the hook. Note the critical advice to place it slightly back from the fabric edge so it remains hidden under tension. Sewing the Hook: Follow the detailed steps in "Attach the Hook Closure." Pay special attention to step 5, which explains the buttonhole stitch method for securing the loops. The logic here is to create a series of knots that lock the thread, providing redundancy and preventing wear. Positioning and Sewing the Eye: Now, move to the section "Attach the Eye Closure." Read how to align the eye with the already-sewn hook for a perfect closure. Then, review the steps for sewing the eye, which use the same buttonhole stitch technique for a consistent and secure finish.
From your background in operations research, you can appreciate the robustness of this system. Each knot in the buttonhole stitch acts as an independent securing point. Unlike a simple running stitch, where the failure of one section can compromise the whole line, here the failure of a single stitch is isolated. This redundancy is precisely what's needed for a high-stress component in a garment designed for performance.
Case Study: A Secure Closure for a High-Impact Dance Sequence
Scenario: You are designing a heavily embellished bra for a vigorous "item number." The choreography involves powerful, repetitive arm and torso movements. The last costume used a standard machine-attached hook-and-eye that failed mid-performance—the stitches unraveled under the strain, causing the bra to come undone. Your brief is to create a closure that will not fail.
Analysis and Solution:
- Component Choice: You select a high-quality hook-and-eye tape with three columns of eyes for maximum adjustability and a wide, plush-backed band for comfort and force distribution.
- Initial Machine Attachment: For efficiency, you first attach the hook-and-eye tape to the bra wings using a sewing machine with a triple stretch stitch, which provides both strength and flexibility.
- Manual Reinforcement (The Critical Step): This is where you apply the principles from today's lesson. Recognizing the machine stitches as a potential weak point under extreme, multi-vector stress, you add manual reinforcement. Using a strong, doubled thread that matches the fabric, you apply the buttonhole stitch by hand around each of the four corners of both the hook tape and the eye tape.
- Stress Distribution: This manual tacking ensures that the highest tension points—the corners where the pulling force is concentrated—are secured with the robust, locking structure of the buttonhole stitch. The machine stitches handle the general attachment, while your hand-sewn reinforcements provide targeted failure-proofing.
This hybrid approach combines the speed of machine sewing with the superior security of a targeted hand-sewn technique, creating a closure system that is optimized for both efficiency in construction and resilience in performance.
Conclusion
Congratulations, you have completed the final steps in constructing a professional underwire bra! Today's lesson equipped you with the skills to create the crucial adjustable and closure elements that make a bra functional and comfortable.
Key Takeaways:
- Adjustable straps are assembled using strap elastic, rings, and sliders, which create a secure, friction-based locking mechanism.
- A bar-tack stitch is the professional standard for creating strong, low-profile attachment points for strap hardware.
- The hook-and-eye closure is a high-tension component requiring an exceptionally secure attachment method.
- A hand-sewn buttonhole stitch is a superior technique for attaching closures, as it creates a series of locking knots that resist wear and prevent catastrophic failure.
- These adjustable elements are critical not only for achieving a perfect individual fit but also for providing on-set versatility for quick costume changes.
Next Lesson Preview
With the full construction of a standard bra now complete, we will pivot to a new environment with unique challenges. The next module, "Designing for Aquatic Scenes: Bikini Tops," begins with a deep dive into materials. In our next lesson, we will explore fabrics, elastics, and hardware specifically designed to resist damage from chlorine, salt, and sunlight. We'll use a case study of a multi-day ocean shoot to analyze the material science required for durable and beautiful swimwear.