Introduction
In our previous lesson, we engineered the primary support system of the bra by applying the band elastics, creating a firm yet comfortable foundation. The garment now has its shape and tension defined, but it's missing the crucial rigid structure that provides lift and separation.
This lesson focuses on inserting that structural core: the underwires. We will cover the complete process, from sliding the wires into their pre-sewn casings to sealing the entry points securely. This step is far more than just assembly; it's a critical point of failure prevention. An improperly secured underwire is one of the most common and dangerous wardrobe malfunctions, especially in the high-impact world of Bollywood choreography. We will explore methods to not only insert the wires but also to seal them in a way that withstands intense movement, ensuring both performer safety and garment longevity.
The Underwire's Role and Casing
Before we begin the physical insertion, let's briefly revisit the mechanical function of the underwire. It serves as the skeleton of the cup, creating a crisp, defined separation between the breast tissue and the bra band. As the underwire is held under tension by the band, it provides lift and projects the breast tissue forward, creating the desired silhouette.
The video "Silk Underwire Bra + Sizes explained" explains this relationship well.
Silk Underwire Bra + Sizes explained 1.1.5
This video by Katerina Ivanova offers an excellent conceptual overview of the underwire's function and its foundational role in bra patterning.
Watch the section from the beginning to understand the underwire's primary function in separating the cup and band. Then, pay close attention to the explanation starting at this point, where the creator describes how the wire is meant to be in a "stressed position" when worn, pulled taut by the band.
The underwire sits inside a soft, plush tube called underwire casing or channeling. In a previous module, we drafted the 'wire line,' and during assembly, this casing is stitched precisely along that seam line on the interior of the bra, creating a tunnel ready to receive the wire.
Inserting the Underwire and Sealing the Casing
The process involves sliding the underwire into its channel and then securely closing off the openings. The two ends of the casing—one at the center gore and one at the underarm—are treated differently and sealed at different stages.
The "Bra-making Sew-Along" article from Cloth Habit provides an excellent step-by-step visual guide for this entire process.
Bra-making Sew-Along: Elastic, Channeling and Finish! - Cloth Habit
This article details the professional method for inserting underwires and, most importantly, for securely sealing the channeling to prevent the wires from escaping.
Focus on the following sections: Start at the heading "Channeling". Read how the casing is attached and, critically, how the center gore end is sealed first with a tight zig-zag or bar-tack stitch before the rest of the bra is finished. Continue to the section "Underarm Elastic". Here, you'll see how to insert the underwires from the open side. Finally, observe how the underarm end is sealed. The author uses another bar-tack stitch to lock the wire in place after it has been inserted.
Let's consolidate this process:
- Seal the Center Gore: Before the underwire is inserted, the end of the casing at the center front is sealed shut. This is done by stitching a very dense, narrow zig-zag stitch, known as a bar-tack, back and forth across the opening. This creates a strong, permanent wall.
- Insert the Underwire: The underwire is then slipped into the open end of the casing at the underarm. The tips of underwires are color-coded or marked to indicate which end goes to the center gore and which to the underarm; always follow the manufacturer's directions.
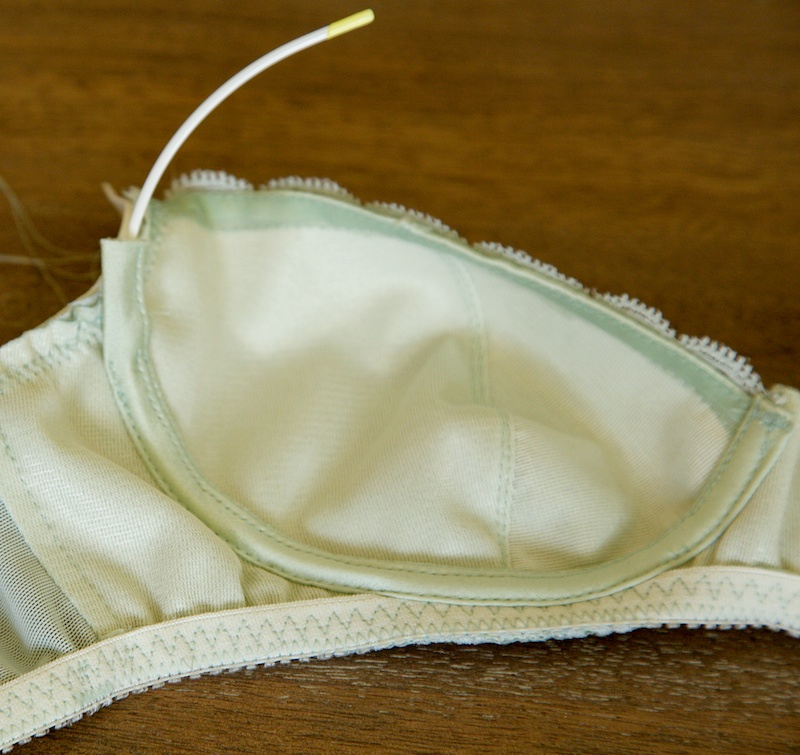
- Seal the Underarm: Once the wire is fully inserted, the open underarm end of the casing must be sealed. Just as with the center gore, a robust bar-tack stitch is used to close the opening, permanently trapping the underwire inside.

Failure Prevention: The Principle of "Wire Play"
A common cause of underwire "poke-through" isn't just a weak stitch, but a design flaw related to stress concentration. If an underwire fits too snugly within its casing, any movement by the wearer forces the end of the wire directly against the seam. Over time, this concentrated force will break either the stitches or the fabric itself.
The solution is a concept called "wire play". This means deliberately leaving a small amount of empty space—about 1/2 inch or 1-1.5 cm—in the casing at the underarm end. This gap allows the wire to shift slightly during movement, distributing the stress along the length of the casing instead of concentrating it at a single failure point. Given your background in operations research, you can think of this as building intentional slack into a system to increase its resilience and prevent catastrophic failure under load.
A discussion in the comments section of the Cloth Habit article highlights the importance of this principle.
Bra-making Sew-Along: Elastic, Channeling and Finish! - Cloth Habit
A reader asks about preventing poke-through, and the author's reply provides a crucial insight into garment engineering.
Find the comment from "Tania" and read the author Amy's detailed response. Focus on her explanation that poke-through can result from a lack of wire play, which causes the wire to break through the fabric under tension.
Advanced Technique: Sealing Custom-Cut Underwire Ends
While store-bought underwires have smooth, coated tips, you will often need to cut wires to a custom length for bespoke designs. A raw, cut metal end is sharp, prone to rust, and will tear through casing fabric in no time. It is absolutely essential to seal these cut ends before insertion.
A highly effective method, borrowed from electronics, is to use heat shrink tubing.
Who Said Sewing Isn’t Hardcore? An Underwire Cutting Tutorial | Miss Maddy Sews
This tutorial from Miss Maddy Sews provides a robust, technical solution for sealing the sharp ends of cut underwires.
Read the entire tutorial. Pay close attention to the first sealing step using heat shrink tubing and the subsequent step of folding the tail and applying a second layer. This double-layer method creates a very smooth, durable, and rounded tip. Also, note the author's mention of alternative methods like specialty caps or even nail polish.
This two-layer heat shrink method creates a professional, factory-grade finish that is both smooth to prevent snagging and tough enough to prevent poke-through from the wire itself.
Case Study: Failure-Proofing for an "Item Number"
Scenario: You are tasked with creating a bra for a lead actress performing a high-energy dance number. The choreography involves acrobatic floor work and rapid torso twists. The previous designer's costume failed during rehearsal when an underwire poked through the underarm, causing a minor injury and halting production. Your brief is to create a replacement that is absolutely failure-proof.
Analysis and Solution:
Applying the principles from this lesson, you would implement a multi-system approach to risk mitigation.
- Wire Preparation: Assume the design requires a custom wire length. After cutting the wire, you would seal the raw end using the two-layer heat shrink tubing method. This eliminates the primary risk factor: a sharp metal edge.
- Insertion and Fit: When inserting the wire, you would ensure there is approximately 1 cm of "wire play" inside the casing at the underarm end. This prevents stress concentration at the closure point.
- Casing Reinforcement: Before closing the casing, you would apply a small drop of a fray-stopping liquid (like Fray Check) to the fabric at the casing's end, as suggested by the action in the "Sealing the casing end" image. This reinforces the fabric fibers.
- Final Sealing: You would close the underarm end of the casing with a dense, wide bar-tack stitch, ensuring the stitches fully encapsulate the reinforced end of the casing.
By combining a sealed wire tip, intentional wire play, fabric reinforcement, and a robust stitch, you create a system with multiple layers of protection. This systematic approach, rooted in failure analysis, guarantees the garment's integrity under the extreme duress of a Bollywood dance sequence.
Conclusion
You have now learned to install the structural skeleton of the bra. This lesson went beyond the simple mechanics of insertion to cover the critical engineering principles that ensure a safe, durable, and professional garment.
Key Takeaways:
- Underwires are inserted into a pre-sewn casing (channeling) and sealed at both the center gore and the underarm.
- A dense bar-tack stitch is the professional standard for securely closing casing ends.
- Incorporating "wire play" (a small gap at the underarm) is crucial for distributing stress and preventing poke-through.
- If you cut an underwire to customize its length, you must seal the sharp metal end using methods like heat shrink tubing or specialty caps to prevent it from tearing the fabric.
Next Lesson Preview
Our bra is now almost complete. The primary structure, support, and finishing are all in place. In our final lesson of this module, we will add the remaining functional hardware. You will learn to create and attach adjustable straps and correctly sew on the hook-and-eye closure, turning our project into a finished, wearable piece of lingerie.