Introduction
Welcome to our next lesson in pattern engineering. In our previous session, we delved into the structural mechanics of the multi-part cup, establishing it as a primary tool for creating superior support, particularly for high-impact dance. Today, we will apply that knowledge to draft one of the most iconic and historically significant silhouettes in South Asian fashion: the traditional choli-cut bra, specifically focusing on the Katori blouse.
The Katori blouse, named after the Hindi word for "cup," is a masterclass in shaping woven fabrics to create a defined and supportive bust without relying on modern stretch materials or underwires. This makes it a cornerstone of design for historical-fiction Bollywood films. Mastering this pattern will not only add a crucial design to your repertoire but also deepen your understanding of how seams can be used to engineer three-dimensional form.
The Anatomy of a Katori Blouse
The Katori blouse is a quintessential example of a multi-part cup design. Its distinctive feature is the separate, shaped cup piece—the katori—that is seamed into the bodice. This construction provides a unique and pronounced silhouette, celebrated for its elegant and form-fitting look.

Unlike a simple darted bra cup, the Katori pattern breaks the front of the garment into three distinct components for each side:
- The Side Panel: The main body piece that connects the front to the back.
- The Katori: The cup piece itself, which provides the primary shaping for the bust.
- The Yoke: The underbust band, which acts as an anchor, providing lift and support from below.
This modular construction will feel familiar after our work with three-part cups, but the drafting method is unique and follows a fascinating two-stage process.
Drafting the Katori: A Two-Stage Process
Drafting a Katori blouse involves first creating a basic block with the pieces laid out in a flat, two-dimensional form, and then transforming the katori piece into its final, three-dimensional shape.
The initial draft looks something like this:
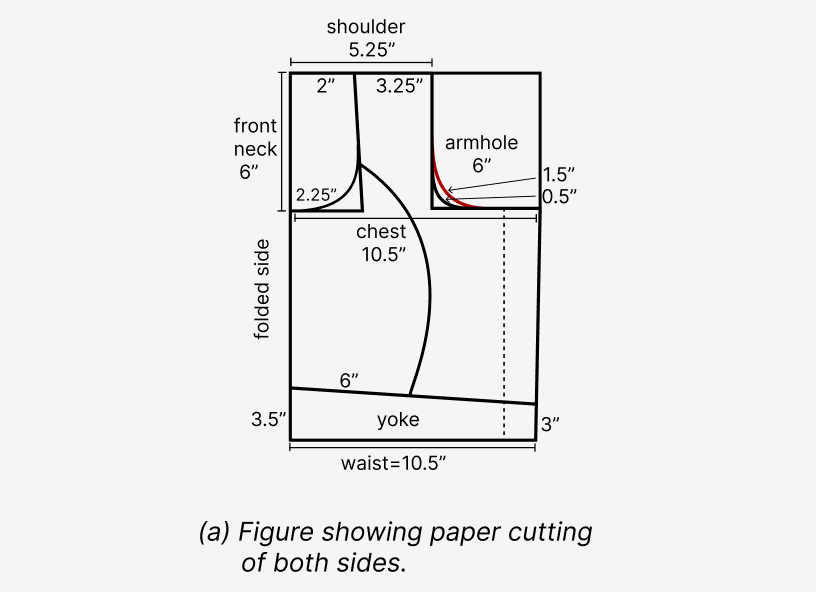
Let's walk through this initial drafting process. We'll use a clear, visual guide that breaks down how to create this first-stage pattern.
Katori Blouse Cutting - Needle Art House
This guide from Needle Art House provides a streamlined, visual method for drafting the Katori blouse. We'll use it to create our initial pattern block before refining the cup shape.
Begin by reading the introduction to understand the unique components of this blouse. Then, follow the process in the "Steps with figure" section for the initial paper cutting. Look over the sample measurements to get a sense of the inputs. Read the description of how the initial pattern is drawn on folded paper. Pay close attention to the diagram in figure(a) and the explanation of how to draw the yoke and initial katori. This establishes the basic placement and proportions of the pieces. Finally, observe how the pattern is separated into the back, and the front is cut into three parts. Crucially, note the instruction to enlarge the yoke by 1 inch at the bottom. This adds a curve, or "smile," which is essential for the band to sit correctly and provide lift under the bust.
The Transformation: Creating the 3D Cup
Now we arrive at the most critical step, and the part that truly defines Katori drafting. The flat katori piece you just cut from your block is merely a template. To create the volume needed to encapsulate the bust, this piece must be "slashed and spread"—a technique that introduces volume in the form of a large dart. This is a sophisticated application of the dart manipulation principles we've discussed before.
Your background in statistics involves understanding how transformations can reshape a dataset to reveal underlying patterns; here, we apply a geometric transformation to a 2D shape to create a functional 3D object.
Katori Blouse Cutting - Needle Art House
This next section of the Needle Art House guide details the transformation of the flat katori piece into a shaped cup. This is the core principle of this design.
Focus on the section that begins after figure(d). Study the instructions and the diagram in figure(e) that illustrate how to convert the initial paper cut-out of the katori into its final shape. Pay attention to: The additions for seam allowances on the curved and straight edges. The addition of width at the bottom. This extra width is what will be consumed by the dart to create volume. The specific instructions for drawing the tuck/dart intake. This set of lines defines the volume and projection of the final cup. Finally, read the crucial instructions at the end of the section regarding fabric grain. The side and yoke pieces are cut on the straight grain, but the katori must be placed on the bias (cross fabric). We will explore why this is so important in our case study.
The Analytical Method: Formula-Based Drafting
While the visual method is intuitive, there is also a more traditional, formula-based approach that may appeal to your analytical mindset. This method uses proportions of the bust measurement to calculate the dimensions of the katori piece directly.
Drafting Details of Katori Blouse Step by Step
For a different perspective, this article by R.S. Balakumar from Textile Learner provides a drafting system based on formulas derived from body measurements.
First, read the introduction to understand the context of this blouse style. Then, skip ahead to the section "Katori Cup Part Cut-4 pieces (B)". You don't need to draft the entire blouse from this system, but focus on this one section. Notice how every line is a calculation based on the bust measurement (e.g., Bust/6 + 1 ½", Bust/12 + ½"). This system builds the final shape, including the dart intake at the bottom, through a sequence of precise, repeatable calculations. Compare the resulting diagram to the one from the visual method; both techniques aim to solve the same geometric problem to arrive at a functional 3D cup.
Case Study: Engineering the Courtesan's Choli for Umrao Jaan
Let's apply these techniques to a classic Bollywood scenario.
Scenario: For a remake of the historical film Umrao Jaan, the costume designer is tasked with creating a series of exquisite cholis for the lead actress. The director demands an authentic 19th-century silhouette, which means a pronounced, pointed bust shape created with non-stretch fabrics like silk brocade and velvet. However, the choreography involves intricate and fluid mujra dance sequences that require a degree of flexibility in the costume.
Design & Engineering Challenge:
- Aesthetics: Achieve the iconic, lifted Katori shape.
- Performance: The garment must support the bust through dance while allowing the actress to execute fluid arm and torso movements without feeling constricted.
- Material: The delicate, non-stretch brocade is unforgiving of fit errors and has no inherent elasticity.
Design Solution using the Katori Pattern:
- Pattern Selection: The Katori pattern is the perfect choice. Its seamed construction is the only way to achieve the desired shaping with a non-stretch woven fabric.
- The Bias-Cut Katori: This is the key engineering insight. By following the instruction to cut the Katori piece (Part B) on the bias (a 45-degree angle to the fabric's grain), the designer introduces mechanical give. Even a rigid brocade will have a small degree of stretch along the bias. This subtle flexibility is the difference between a costume that is a beautiful but rigid shell and one that can move with the performer. It allows the actress to breathe and move, making the garment a piece of performance equipment, not just a costume.
- Structural Dart and Yoke: The large dart at the bottom of the katori creates the apex projection. Its angle and depth are precisely drafted to create the pointed silhouette. The yoke (the underbust band) acts as the foundation, similar to a modern bra band. For this high-end costume, the yoke would be lined with a stable cotton mull to prevent any stretching, ensuring it provides a solid anchor for the entire garment and maintains the upward lift.
Through this combination of precise pattern cutting and a strategic understanding of fabric properties, the designer successfully creates a garment that meets the director's aesthetic demands for historical accuracy and the actress's performance needs for movement and comfort.
Conclusion
Today, we have deconstructed and drafted the Katori blouse, a cornerstone of traditional Indian costume and a sophisticated piece of pattern engineering. You've learned how its unique two-stage drafting process transforms a flat pattern into a structured, three-dimensional cup, providing shape and support with non-stretch fabrics.
Key Takeaways:
- The Katori blouse is a classic multi-part cup design composed of a side panel, a yoke (under-band), and the central katori (cup) piece.
- Drafting is a two-stage process: create an initial flat block, then transform the katori piece by adding dart volume to create a 3D shape.
- The placement of the katori piece on the fabric's bias grain is a critical engineering decision that introduces mechanical stretch for fit and comfort.
- The curved yoke acts as a foundational band, providing the primary lift and support for the structure.
Next Lesson Preview
Having mastered shaping with seams, we will next explore how to create visual drama and intrigue by combining different materials. In our next lesson, we will focus on creating illusion necklines and backless effects by integrating sheer, stabilized fabrics into your patterns, opening up a new range of aesthetic possibilities for your Bollywood designs.