Hello! Welcome back.
In our last lesson, we learned how to expose applications using a NodePort service. While effective for development and testing, you saw its limitations for production environments, such as needing to manage node IPs and manually configure cloud firewall rules. This approach isn't scalable or robust.
Today, we'll address those limitations by exploring the LoadBalancer service type. This is the standard, cloud-native way to expose your applications to the internet. As a Platform Engineer working with AWS, Azure, and GCP, you're already familiar with provisioning external load balancers. This lesson will show you how Kubernetes integrates with those cloud providers to automate that entire process declaratively.
Our goal is to create and verify a LoadBalancer Service to expose an application using an external load balancer. By the end, you'll understand how to make your services publicly accessible with a stable IP address, managed by your cloud provider.
1. The "Why": From NodePort to LoadBalancer
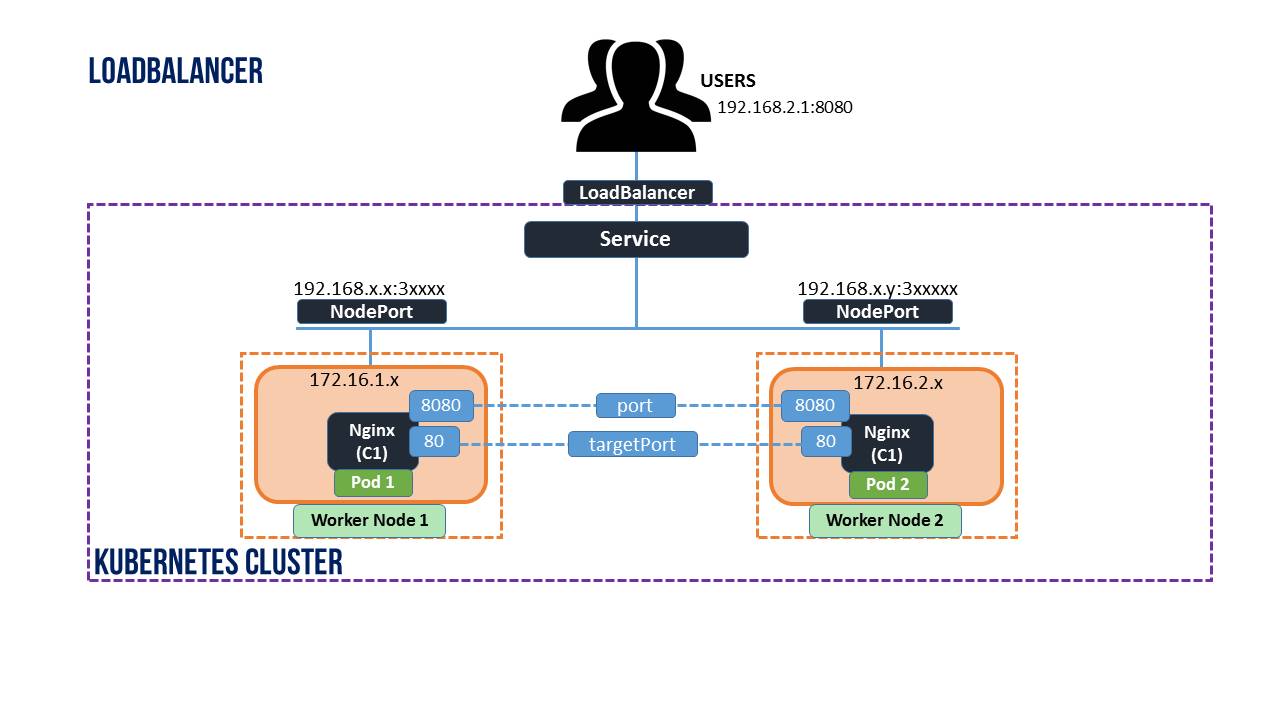
The LoadBalancer service type is a powerful abstraction that builds directly on the concepts we've already covered. When you create a service of type LoadBalancer, Kubernetes does the following:
- It creates a
ClusterIPservice for internal communication. - It creates a
NodePortservice, opening a port on every node. - It communicates with the underlying cloud provider (via a component called the cloud controller manager) to provision an external load balancer (e.g., an AWS Elastic Load Balancer, an Azure Load Balancer, or a Google Cloud Load Balancer).
- It configures this newly created external load balancer to route traffic to the
NodePorton your cluster nodes.
This gives you a single, stable, public IP address or DNS name that external users can hit, without them needing to know the individual IP addresses of your nodes.
Kubernetes Services explained | ClusterIP vs NodePort vs LoadBalancer vs Headless Service
To get a clear conceptual overview of why LoadBalancer is the preferred method for external access in cloud environments, watch this segment from the 'Kubernetes Services explained' video by TechWorld with Nana.
Watch from 21:19 to 23:55. Focus on how this service type leverages the cloud provider's native load balancer functionality and how it extends the NodePort and ClusterIP types.
The key takeaway is that LoadBalancer services are the bridge between your Kubernetes cluster and your cloud provider's networking infrastructure.
2. Anatomy of a LoadBalancer Service Manifest
The beauty of the LoadBalancer service is its simplicity. The manifest is almost identical to a NodePort service, but you just change the type.
apiVersion: v1
kind: Service
metadata:
  name: my-app-lb-service
spec:
  # This is the key field!
  type: LoadBalancer
  selector:
    app: my-app
  ports:
  - protocol: TCP
    port: 80         # The port the service is exposed on
    targetPort: 8080   # The port the container is listening on
spec.type: LoadBalancer: This tells Kubernetes to provision an external load balancer.spec.selector: This must match the labels of the Pods you want to target, just like with other services.spec.ports:port: The port that the external load balancer will listen on.targetPort: The port on your container that the service will forward traffic to.
Kubernetes will automatically assign a nodePort for the intermediate step, so you typically don't need to specify it.
3. Hands-On: Creating and Verifying a LoadBalancer Service
Let's walk through the full lifecycle: deploying an application, exposing it with a LoadBalancer service, and verifying access.
Step 1: Deploy a Sample Application
First, we need an application to expose. We'll use a simple Nginx deployment with three replicas.
Load Balancer Service in Kubernetes
The video 'Load Balancer Service in Kubernetes' from the kubetrain channel provides a great end-to-end demonstration. Let's start by watching how the sample Nginx application is deployed.
Watch from 00:16 to 01:18 to see the deployment manifest being created and applied.
Create a file named nginx-deployment.yaml with the following content and apply it:
apiVersion: apps/v1
kind: Deployment
metadata:
  name: nginx-deployment
spec:
  replicas: 3
  selector:
    matchLabels:
      app: nginx
  template:
    metadata:
      labels:
        app: nginx
    spec:
      containers:
      - name: nginx
        image: nginx
        ports:
        - containerPort: 80
Apply it with kubectl apply -f nginx-deployment.yaml and verify the Pods are running with kubectl get pods -l app=nginx.
Step 2: Create and Apply the Service Manifest
Now, we'll create the LoadBalancer service.
Load Balancer Service in Kubernetes
Next, let's examine the service manifest and see it in action.
Watch from 01:18 to 04:16. Pay close attention to the YAML definition, especially type: LoadBalancer. The video then shows how to apply the manifest and, crucially, how to check the service status while the EXTERNAL-IP is being provisioned.
Create a file named nginx-lb-service.yaml with this content:
apiVersion: v1
kind: Service
metadata:
  name: nginx-lb-service
spec:
  type: LoadBalancer
  selector:
    app: nginx
  ports:
  - protocol: TCP
    port: 80
    targetPort: 80
Apply it using kubectl apply -f nginx-lb-service.yaml.
Step 3: Verify the Service and External IP
Immediately after applying the manifest, if you run kubectl get service nginx-lb-service, you'll see the EXTERNAL-IP is <pending>:
NAME               TYPE           CLUSTER-IP      EXTERNAL-IP   PORT(S)        AGE
nginx-lb-service   LoadBalancer   10.108.140.28   <pending>     80:31548/TCP   15s
This is because Kubernetes is communicating with your cloud provider in the background to provision the load balancer and assign it a public IP. This can take a minute or two.
Run the command again after a minute:
NAME               TYPE           CLUSTER-IP      EXTERNAL-IP      PORT(S)        AGE
nginx-lb-service   LoadBalancer   10.108.140.28   20.198.12.34     80:31548/TCP   2m
Success! The cloud provider has assigned the public IP 20.198.12.34. You can also see the automatically assigned NodePort (31548).
The traffic flow is visualized well in this diagram:
Step 4: Test External Access
Now you can access your Nginx application from anywhere on the internet using the external IP.
Load Balancer Service in Kubernetes
Finally, let's confirm that our service is accessible from the outside.
Watch from 04:16 to 05:53 to see the service being accessed via curl and a web browser using the external IP.
You can test this yourself with curl http://<EXTERNAL_IP>. For our example, it would be curl http://20.198.12.34. You should see the "Welcome to nginx!" HTML page.
Test your understanding!
You have a deployment named api-gateway managing Pods with the label component: gateway. The application containers listen on port 8080. You need to expose this deployment to the internet via a LoadBalancer service that listens on the standard HTTPS port 443.
Write the YAML manifest for the service.
Show answer
apiVersion: v1
kind: Service
metadata:
  name: api-gateway-service
spec:
  type: LoadBalancer
  selector:
    component: gateway
  ports:
  - protocol: TCP
    port: 443
    targetPort: 8080
4. Cloud-Specific Considerations
Your experience with AWS, Azure, and GCP is directly relevant here. While the Kubernetes manifest is cloud-agnostic, you can use provider-specific annotations to customize the load balancer's behavior.
For example, when using AKS (Azure Kubernetes Service), you can request a specific static public IP address for your load balancer instead of an ephemeral one.
Use a Public Standard Load Balancer in Azure Kubernetes ...
The official Microsoft documentation for AKS provides an excellent example of this. Take a quick look at how you can specify a static IP.
Read the section titled 'Specify the load balancer IP address'. Note the use of annotations like service.beta.kubernetes.io/azure-load-balancer-ipv4. This is a common pattern for cloud-specific configurations and a key concept for a Platform Engineer.
This ability to influence the underlying cloud resource (the load balancer) directly from your Kubernetes manifest is a powerful feature that streamlines infrastructure management.
Conclusion
Congratulations! You have now mastered the three fundamental Kubernetes service types: ClusterIP for internal traffic, NodePort for basic external access, and LoadBalancer for robust, cloud-integrated public exposure.
Key Takeaways:
- A service with
type: LoadBalancerautomatically provisions an external load balancer from your cloud provider. - It provides a single, stable public IP address, making it the standard choice for exposing services to the internet.
- It builds on top of
NodePortandClusterIPservices, handling the entire traffic chain from the internet to your Pods. - The provisioning process is asynchronous; the
EXTERNAL-IPwill be in a<pending>state for a short time.
While LoadBalancer services are powerful, they can be costly as they typically provision one load balancer per service. For complex applications with many services, this can become expensive and unwieldy.
In an upcoming lesson, we will introduce Ingress, a more advanced L7 routing object that can manage external access for multiple services through a single load balancer, providing capabilities like host and path-based routing. But before that, we need to understand how services find each other inside the cluster without using hardcoded IP addresses.
Next Up: In our next lesson, we will dive into DNS-based service discovery, which is the magic that allows Pods to reliably communicate with services using stable, human-readable names.