Welcome back!
In our previous lesson, we explored how to use ClusterIP services to enable reliable communication within a Kubernetes cluster. We learned that ClusterIP provides a stable internal IP address, perfect for backend services that shouldn't be exposed to the outside world.
But what happens when you need to grant external access to your application? This is a common requirement for web frontends, APIs, or any service that needs to be reached from outside the cluster. Today, we'll take the next step in our networking journey by learning how to create and verify a NodePort Service, one of the fundamental ways to expose your application externally.
1. From Internal to External: Introducing NodePort
A NodePort service is a simple way to expose an application on a static port on each of your cluster's nodes. When you create a service of type NodePort, Kubernetes allocates a port from a default range (typically 30000-32767) and opens this port on every node in the cluster. Any traffic sent to <Node_IP>:<NodePort> is then forwarded to the service, which in turn routes it to one of the target Pods.
It's important to understand that a NodePort service is built on top of a ClusterIP service. When you create a NodePort service, Kubernetes automatically creates a ClusterIP service as well. This means your service is accessible both internally via its ClusterIP and externally via the NodePort.

When to use NodePort?
- Development & Testing: It's great for quickly exposing an application during development or for demo purposes without setting up complex load balancers.
- Non-Cloud Environments: In on-premises or bare-metal clusters where cloud-provider load balancers aren't available.
However, as we'll discuss, it has limitations in production environments, such as security concerns and the need to manage node IPs.
2. Anatomy of a NodePort Service Manifest
Creating a NodePort service is very similar to creating a ClusterIP service, with one key change in the manifest and an additional port to understand.
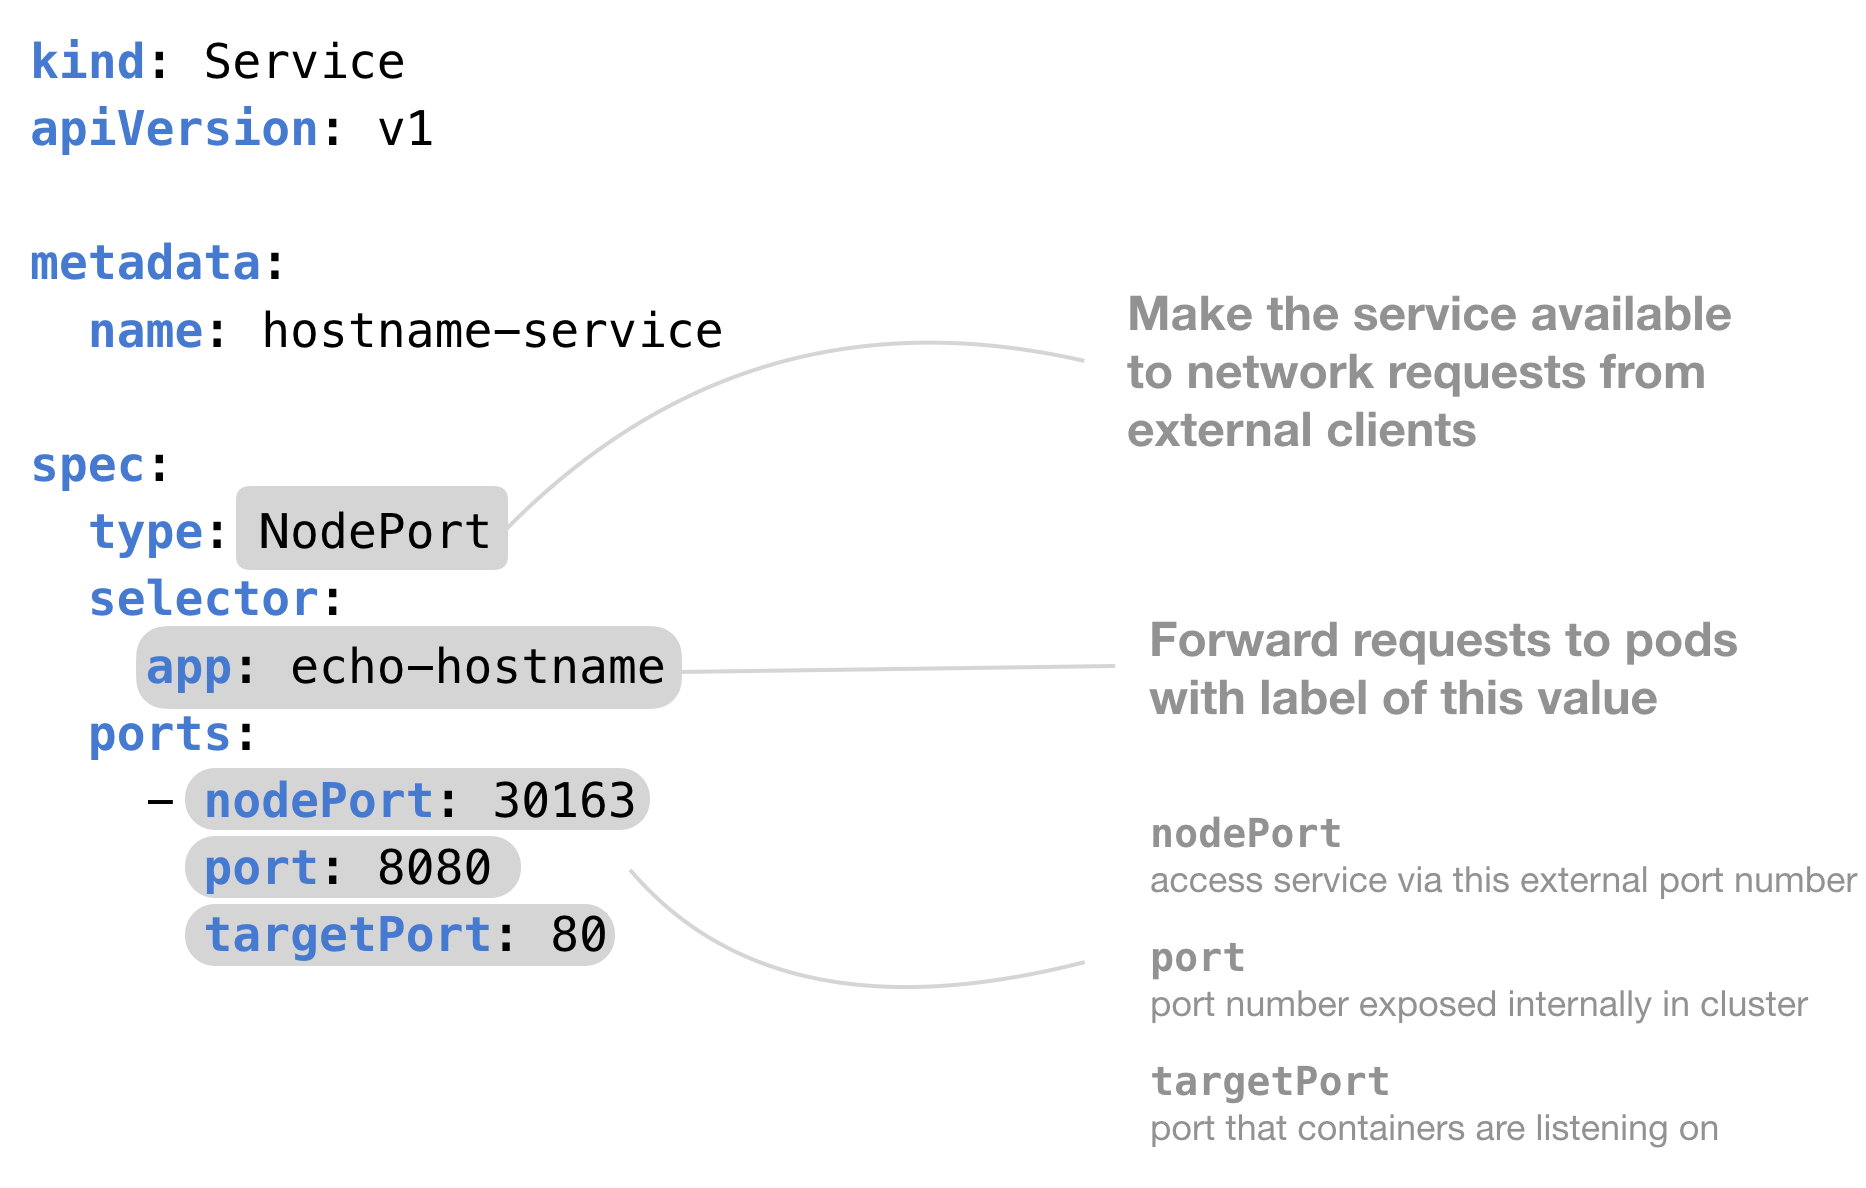
Let's clarify the ports:
targetPort: The port on your container that the application is listening on (e.g., 80 for Nginx). The service sends traffic here.port: The port that the service's internalClusterIPexposes. Other Pods in the cluster can communicate with the service on this port.nodePort: The static port (30000-32767) opened on every node's IP address. This is the port you use for external access. If you omit this field, Kubernetes will assign a random available port from the range.
3. Hands-On: Creating and Accessing a NodePort Service
Let's walk through the process of deploying an application and exposing it with a NodePort service. We will use a simple Apache httpd deployment for this exercise.
NodePort Service in Kubernetes
The video 'NodePort Service in Kubernetes' from the kubetrain channel provides a clear, step-by-step demonstration. First, let's watch how to set up the sample application we'll be exposing.
Starting at around 19 seconds in, watch the deployment creation. This section shows the creation of an Apache server Deployment which will serve as the backend for our service.
To follow along, create a file named httpd-deployment.yaml with the content below and apply it:
apiVersion: apps/v1
kind: Deployment
metadata:
  name: apache-deployment
spec:
  replicas: 3
  selector:
    matchLabels:
      app: httpd
  template:
    metadata:
      labels:
        app: httpd
    spec:
      containers:
      - name: httpd
        image: httpd:2.4
        ports:
        - containerPort: 80
Apply it using kubectl apply -f httpd-deployment.yaml. You can verify the Pods are running with kubectl get pods -l app=httpd.
Now that we have a running application, let's create the NodePort service.
NodePort Service in Kubernetes
Next, let's examine the service manifest and apply it.
About a minute in, watch the service creation. Pay close attention to the YAML definition, especially type: NodePort, port, and targetPort. The video then shows how to apply the manifest and verify its creation with kubectl get svc.
Create a file named httpd-nodeport-service.yaml and apply it:
apiVersion: v1
kind: Service
metadata:
  name: apache-nodeport-service
spec:
  type: NodePort
  selector:
    app: httpd
  ports:
  - protocol: TCP
    port: 8080       # Service's internal port
    targetPort: 80   # Container's port


    # nodePort: 30007 # Optional: You can specify a port, or let K8s choose one.
After applying this with kubectl apply -f httpd-nodeport-service.yaml, run kubectl get svc apache-nodeport-service. The output will look something like this:
NAME                      TYPE       CLUSTER-IP      EXTERNAL-IP   PORT(S)          AGE
apache-nodeport-service   NodePort   10.101.42.123   <none>        8080:31468/TCP   25s
Notice a few things:
- The
TYPEisNodePort. - It still has a
CLUSTER-IPfor internal communication. - The
PORT(S)column shows the mapping8080:31468. This means the service is listening on port8080internally and is exposed on port31468on the nodes.
4. Verifying External Access
To access the service, you need two pieces of information:
- A Node's IP address: You can get this by running
kubectl get nodes -o wide. Use theINTERNAL-IPif you are accessing from a machine on the same network (like in Minikube), orEXTERNAL-IPfor public cloud nodes. - The
NodePort: From thekubectl get svcoutput above, this is31468.
You can now access the application using curl http://<NODE_IP>:<NODE_PORT>.
For example: curl http://192.168.49.2:31468. You should see the "It works!" message from the Apache server.
Test your understanding!
You have a Deployment managing Pods with the label app: my-api. The containers inside these Pods are listening on port 5000. You need to expose this application externally so you can access it for a quick test. You want to use the static NodePort 30100.
Write the YAML manifest for a NodePort service named api-service that accomplishes this. The service's internal port should be 80.
Show answer
apiVersion: v1
kind: Service
metadata:
  name: api-service
spec:
  type: NodePort
  selector:
    app: my-api
  ports:
  - protocol: TCP
    port: 80
    targetPort: 5000
    nodePort: 30100
A Note on Cloud Environments and Firewalls
In your role as a Platform Engineer, you often work with cloud providers like AWS, Azure, and GCP. A common "gotcha" when using NodePort is that cloud provider firewalls or security groups will block traffic to the high-numbered port range by default. You must explicitly create a firewall rule to allow inbound traffic on the specific NodePort (or the entire NodePort range) for your nodes.
NodePort Service in Kubernetes
The same video from kubetrain demonstrates this exact scenario on Google Cloud.
About seven minutes into the video, watch the firewall configuration. Notice how the curl command to the external IP fails initially and only succeeds after a firewall rule is created using the gcloud CLI. This is a critical real-world step that connects directly to your experience managing cloud infrastructure.
Conclusion
You have now successfully exposed an application to external traffic using a NodePort service. This is a significant step up from the purely internal ClusterIP service.
Key Takeaways:
- A
NodePortservice exposes an application on a static port on every node in the cluster. - It is defined by setting
spec.type: NodePortin the service manifest. - It uses three ports:
targetPort(container),port(internal service), andnodePort(external access). - Access is via
<Node_IP>:<NodePort>. - In cloud environments, you must configure firewall rules to allow traffic to the
NodePort.
While NodePort is useful, it has drawbacks for production use. You have to manually track node IPs, which can change, and directly exposing ports on nodes can be a security risk. This begs the question: is there a more robust, cloud-native way to expose services?
The answer is yes. In our next lesson, we will explore the LoadBalancer service type, which integrates with cloud providers to automatically provision and configure an external load balancer for your application.