Hello! Welcome back to your Kubernetes crash course.
In our last few lessons, we've focused on getting applications running and configured inside the cluster using Pods, Deployments, ConfigMaps, and Secrets. Now that our application is running, a new question arises: how do other parts of our application, or even our developers, find and communicate with it?
Pods are ephemeral; they can be created and destroyed, and their IP addresses change. Relying on direct Pod IPs is not a stable solution. This is the fundamental networking problem that Kubernetes Services solve.
Today, we'll start our journey into Kubernetes networking by focusing on the most fundamental service type: ClusterIP. This lesson will teach you how to create a stable, internal network endpoint for your applications, enabling reliable communication within the Kubernetes cluster.
1. The Problem: Ephemeral Pods
Before we create a Service, it's crucial to understand why we need one. Pods in a Deployment can be scaled, restarted, or rescheduled to different nodes. Each time a Pod is created, it gets a new IP address.
This dynamic nature makes direct communication challenging. Imagine a frontend application trying to talk to a backend API. If the backend Pods are constantly changing IPs, the frontend has no reliable address to send requests to.
This is where Kubernetes Services come in. A Service provides a single, stable virtual IP address and a DNS name that other applications in thecluster can use. The Service automatically tracks the healthy Pods that belong to it and load-balances traffic among them.
How load balancing and service discovery works in Kubernetes
To get a clear overview of this problem and the high-level solution, watch the first part of the video 'How load balancing and service discovery works in Kubernetes' by That DevOps Guy.
Watch from the beginning to nearly the four-minute mark, covering the introduction to Services. Focus on understanding the challenges of IP-based communication in a dynamic environment and how Kubernetes uses labels and selectors to create a stable service endpoint.
As the video explained, the magic lies in the combination of Labels and Selectors.
- Labels: You apply key-value pairs (e.g.,
app: my-backend,tier: api) to your Pods. - Selector: Your Service definition includes a selector that specifies which labels to look for.
The Service continuously scans for Pods with matching labels and automatically updates its list of endpoints. This decouples the client application from the backend Pods, providing the stability we need.
2. The ClusterIP Service Type
A ClusterIP service is the default and most common type of service. It provides a stable IP address that is only reachable from within the Kubernetes cluster.
This makes it perfect for internal, multi-tier applications where different components need to communicate with each other, but shouldn't be exposed to the outside world. For example:
- A web frontend communicating with a backend API.
- A backend API communicating with a database or a caching layer like Redis.
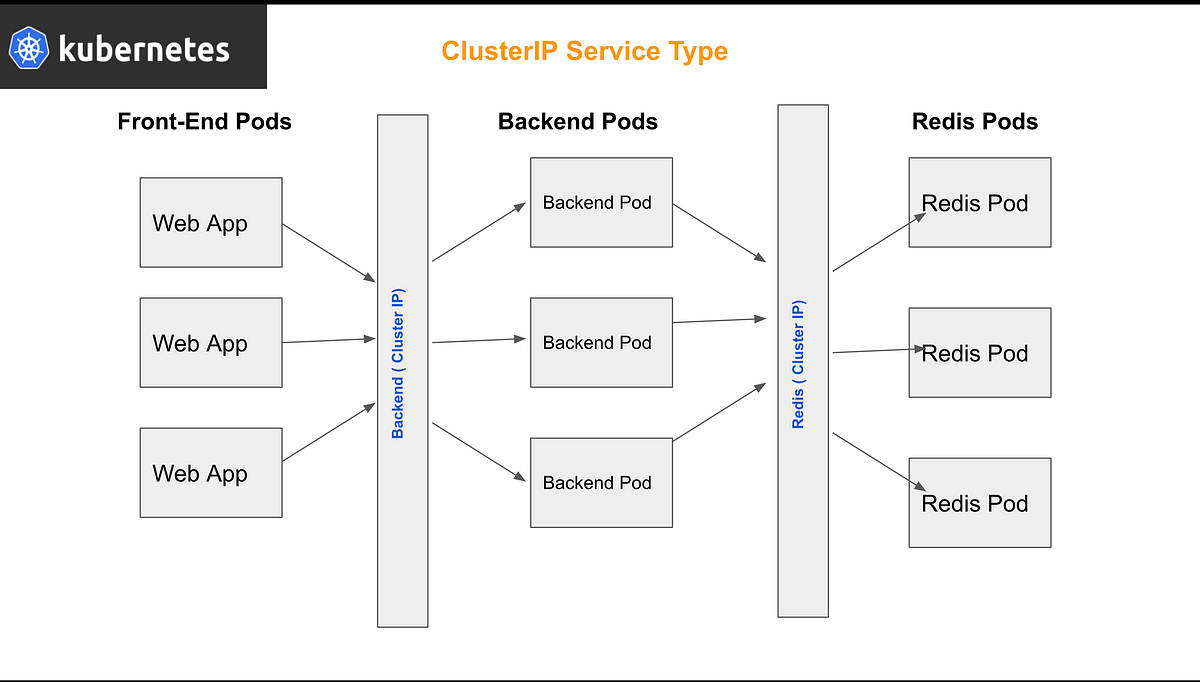
3. Hands-On: Exposing an Application with ClusterIP
Now, let's get practical. We'll deploy a simple Nginx web server and then expose it internally using a ClusterIP Service.
Kubernetes Services: The Practical Guide | by Arie Bregman
The article 'Kubernetes Services: The Practical Guide' by Arie Bregman provides an excellent, self-contained walkthrough. We'll follow its steps to deploy an application and then expose it.
In the section 'Deploying a web server', follow the deployment instructions. This involves creating a namespace and applying a manifest for a Deployment and a ConfigMap. This will give us a running application to work with.
Now that you have a running Nginx Pod, let's create the ClusterIP Service to expose it.
A Service manifest is quite simple. The key fields are:
spec.selector: This must exactly match the labels on the Pods you want to target. A mismatch here is the most common cause of service issues.spec.ports: This defines the port mapping.port: The port that the Service itself will expose.targetPort: The port on the container that the Service should forward traffic to.
spec.type: For this lesson, we'll explicitly set it toClusterIP, though it is the default if omitted.
Now, let's create and verify the service.
Kubernetes Services: The Practical Guide | by Arie Bregman
Continuing with the same article, let's create and verify our service.
Locate the sections 'Kubernetes Services' and 'ClusterIP Service'. Read through the service concepts and instructions. First, use the cat <<EOF | kubectl apply ... command provided to create the webserver-service. Then, follow the steps to verify its creation and, most importantly, test that it works by running a temporary busybox pod and accessing the service using its DNS name (http://webserver-service:80).
The final step in that guide is crucial: verifying connectivity from another Pod. Since the ClusterIP is internal, you can't curl it from your local machine. By running a temporary Pod with kubectl run, you simulated another application inside the cluster and proved that:
- The Service's DNS name (
webserver-service) resolves correctly to its ClusterIP. - The Service correctly routes traffic to one of the backend Nginx Pods.
To see this same process demonstrated in a video, you can watch the following clip.
Day 9/40 - Kubernetes Services Explained - ClusterIP vs NodePort vs Loadbalancer vs External
This video from 'Tech Tutorials with Piyush' provides a live demonstration of creating a ClusterIP service and checking its endpoints, which will reinforce what you just did.
About 34 minutes into the video, watch the ClusterIP demonstration. Pay attention to the commands used (kubectl apply, kubectl get svc, kubectl describe svc) and how the speaker inspects the Endpoints to confirm the service is correctly linked to the Pods.
The kubectl describe svc <service-name> command is your best friend for debugging. If the Endpoints field is empty (<none>), it almost always means your Service's selector does not match the labels of your Pods.
Test your understanding!
You have a Deployment with the following Pod template metadata:
# ... inside the Deployment manifest ...
spec:
  replicas: 2
  selector:
    matchLabels:
      app: api-server
  template:
    metadata:
      labels:
        app: api-server
        version: v1.2
    spec:
      containers:
      - name: api
        image: my-api:1.2
        ports:
        - containerPort: 8000
You need to create a ClusterIP Service named backend-api that exposes the service on port 80 and forwards traffic to the running containers on port 8000. Write the complete YAML manifest for this Service.
Show answer
apiVersion: v1
kind: Service
metadata:
  name: backend-api
spec:
  type: ClusterIP
  selector:
    app: api-server
  ports:
  - protocol: TCP
    port: 80
    targetPort: 8000
- The
selectormust beapp: api-serverto match the labels on the Pods. - The service
portis80. - The container's
targetPortis8000.
Conclusion
Congratulations! You've successfully created and verified your first Kubernetes Service. You now understand how to provide a stable, internal endpoint for your applications, which is a foundational skill for building robust systems in Kubernetes.
Key Takeaways:
- Services solve the problem of ephemeral Pod IPs by providing a stable abstraction.
- The link between a Service and its Pods is made using Labels and Selectors.
ClusterIPis the default service type and provides an IP address that is only accessible from within the cluster.- You can verify a
ClusterIPservice by checking its endpoints withkubectl describe svcand by accessing it from another Pod inside the cluster (e.g., usingkubectl runorkubectl exec). - Service DNS (
<service-name>.<namespace>.svc.cluster.local, or just<service-name>within the same namespace) is the standard way for Pods to communicate.
So far, we've only dealt with internal communication. But what if you need to expose your application to traffic from outside the cluster? In our next lesson, we'll address that by learning about the NodePort Service.