Introduction
Welcome back! In our previous lesson, we established the foundational principles of layered firmware architecture. We discussed why separating your code into Application, Middleware, and Driver/HAL layers is critical for creating maintainable, portable, and testable embedded systems. We focused on the theory—the "what" and the "why."
Today, we transition from theory to practice. This lesson is designed to meet the learning outcome: Refactor a monolithic project into a layered architecture with a distinct driver layer for a peripheral. We will take a simple, functional but poorly structured "monolithic" project and transform it into a clean, professional, multi-file structure. This hands-on process is a fundamental skill that separates hobbyist coding from professional firmware engineering and is a crucial step in building your portfolio.
1. From Architecture to Directory Structure
A good software architecture is physically represented by a well-organized file and folder structure. Before we start moving code, let's decide on a logical layout for our project. A common professional practice is to separate source files based on their architectural layer.
The BEST Project Structure for C/C++/MCU | Embedded System Project Series #7
The video 'The BEST Project Structure for C/C++/MCU' from Artful Bytes builds directly on the architectural concepts from our last lesson. It shows how to translate the layers into a practical directory structure.
Please watch from 02:57 to 05:15. The presenter explains his rationale for creating 'app', 'drivers', and 'common' subdirectories within the main source folder. Pay close attention to how this folder structure mirrors the layered architecture we discussed.
As the video explains, creating distinct folders for app (application logic) and drivers (hardware-specific code) makes the project's intent clear.
In a standard STM32CubeIDE project, you already have a Core folder with Inc (headers) and Src (sources), and a Drivers folder containing the STM32 HAL. We will apply this principle by creating our own driver within our project's Core directory. For this exercise, we'll create:
Core/Src/Drivers/for our custom device driver C file.Core/Inc/Drivers/for our custom device driver H file.
This keeps our own drivers separate from the application code in Core/Src/main.c and the vendor-provided HAL in the top-level Drivers folder.
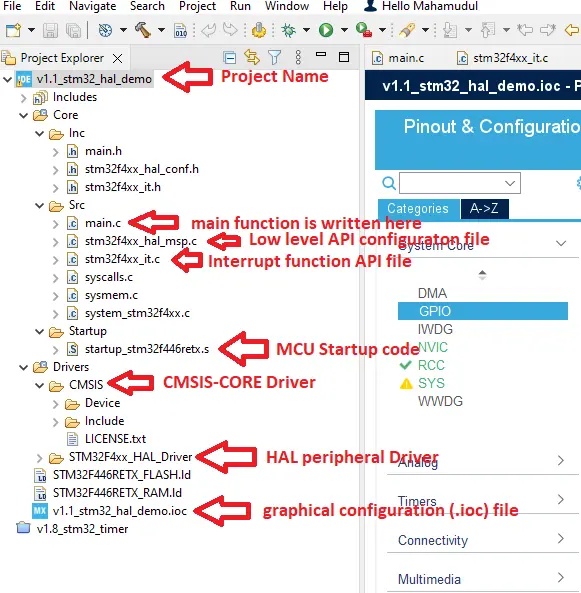
2. The Starting Point: A Monolithic I2C LCD Project
Let's start with a functional but monolithic project. Imagine you have a main.c file that initializes and writes to an I2C LCD. All the code—I2C peripheral initialization, low-level LCD command functions, and high-level application logic—is mixed together in main.c.
Here is what the core of such a main.c file might look like:
/* main.c - MONOLITHIC VERSION */


#include "main.h"

// I2C handle
I2C_HandleTypeDef hi2c1;

// LCD specific definitions


#define SLAVE_ADDRESS_LCD 0x4E // Change this to your LCD's address

// Low-level LCD command functions
void lcd_send_cmd (char cmd) {
    char data_u, data_l;
    uint8_t data_t[4];
    data_u = (cmd & 0xf0);
    data_l = ((cmd << 4) & 0xf0);
    data_t[0] = data_u | 0x0C;  // en=1, rs=0
    data_t[1] = data_u | 0x08;  // en=0, rs=0
    data_t[2] = data_l | 0x0C;  // en=1, rs=0
    data_t[3] = data_l | 0x08;  // en=0, rs=0
    HAL_I2C_Master_Transmit(&hi2c1, SLAVE_ADDRESS_LCD, (uint8_t *) data_t, 4, 100);
}

void lcd_send_data (char data) {
    char data_u, data_l;
    uint8_t data_t[4];
    data_u = (data & 0xf0);
    data_l = ((data << 4) & 0xf0);
    data_t[0] = data_u | 0x0D;  // en=1, rs=1
    data_t[1] = data_u | 0x09;  // en=0, rs=1
    data_t[2] = data_l | 0x0D;  // en=1, rs=1
    data_t[3] = data_l | 0x09;  // en=0, rs=1
    HAL_I2C_Master_Transmit(&hi2c1, SLAVE_ADDRESS_LCD, (uint8_t *) data_t, 4, 100);
}

// Higher-level LCD functions
void lcd_init (void) {
    // 4-bit mode initialization sequence
    HAL_Delay(50);
    lcd_send_cmd(0x30);
    HAL_Delay(5);
    // ... more initialization commands
    lcd_send_cmd(0x0C); // Display on, cursor off
}

void lcd_send_string (char *str) {
    while (*str) lcd_send_data(*str++);
}

int main(void) {
    HAL_Init();
    SystemClock_Config();
    MX_GPIO_Init();
    MX_I2C1_Init(); // This function is in main.c as well

    // --- APPLICATION LOGIC ---
    lcd_init();
    lcd_send_string("Monolithic Code");

    while (1) {
        // Main application loop
    }
}
This code works, but it has several problems:
- Low Reusability: To use this LCD code in another project, you'd have to copy and paste large chunks of
main.c. - Poor Readability: The application logic in
main()is obscured by low-level hardware details. - Difficult Maintenance: If you switch to a different LCD or an SPI-based display, you have to perform major surgery on
main.c.
Now, let's fix this by refactoring.
3. The Refactoring Process: Creating a Driver
Our goal is to create a self-contained "I2C LCD Driver" that separates the hardware control from the application.
Step 1: Create the Driver Files
- In your STM32CubeIDE project explorer, navigate to
Core/Inc. - Right-click and create a new folder named
Drivers. - Inside
Core/Inc/Drivers, create a new header file:lcd_i2c.h. - Navigate to
Core/Src, create a new folder namedDrivers. - Inside
Core/Src/Drivers, create a new source file:lcd_i2c.c.
Step 2: Define the Public API in lcd_i2c.h
The header file defines the "public interface" of our driver. This is the set of functions the application layer (main.c) is allowed to use. Ask yourself: what does the application need to do with the LCD?
Open lcd_i2c.h and add the following code:
// Core/Inc/Drivers/lcd_i2c.h


#ifndef INC_DRIVERS_LCD_I2C_H_
#define INC_DRIVERS_LCD_I2C_H_


#include "stm32f1xx_hal.h" // For HAL types

// Public Function Prototypes
void lcd_init(void);
void lcd_send_string(char *str);
void lcd_clear(void);
void lcd_set_cursor(uint8_t row, uint8_t col);


#endif /* INC_DRIVERS_LCD_I2C_H_ */
This API is clean and abstract. The application doesn't need to know about I2C addresses or 4-bit command sequences; it just wants to print strings.
Step 3: Implement the Driver in lcd_i2c.c
Now, we move the implementation details from main.c into our new driver file.
- Cut all the LCD-related code from
main.c: the#definefor the address, thelcd_send_cmd,lcd_send_data, and the higher-level functions. - Paste this code into
lcd_i2c.c. - Include the new header file at the top:
#include "Drivers/lcd_i2c.h". - Crucially, make the internal helper functions
static. This is the principle of encapsulation. These functions are implementation details of the driver and should not be accessible from outside this file.
Your lcd_i2c.c should now look like this:
// Core/Src/Drivers/lcd_i2c.c


#include "Drivers/lcd_i2c.h"

// External I2C handle defined in main.c
extern I2C_HandleTypeDef hi2c1;


#define SLAVE_ADDRESS_LCD 0x4E

// --- PRIVATE (STATIC) HELPER FUNCTIONS ---
static void lcd_send_cmd (char cmd) {
    // ... implementation from old main.c ...
    HAL_I2C_Master_Transmit(&hi2c1, SLAVE_ADDRESS_LCD, ...);
}

static void lcd_send_data (char data) {
    // ... implementation from old main.c ...
    HAL_I2C_Master_Transmit(&hi2c1, SLAVE_ADDRESS_LCD, ...);
}

// --- PUBLIC API FUNCTIONS ---
void lcd_init (void) {
    // 4-bit mode initialization sequence
    HAL_Delay(50);
    lcd_send_cmd(0x30);
    // ... etc ...
}

void lcd_send_string (char *str) {
    while (*str) lcd_send_data(*str++);
}

void lcd_clear (void) {
    lcd_send_cmd(0x01); // Clear display command
    HAL_Delay(2);
}

void lcd_set_cursor(uint8_t row, uint8_t col) {
    uint8_t address;
    switch (row) {
        case 0: address = 0x80 + col; break;
        case 1: address = 0xC0 + col; break;
        default: address = 0x80;
    }
    lcd_send_cmd(address);
}
Step 4: Clean Up the Application (main.c)
Finally, update main.c to use the new driver. It will become significantly shorter and cleaner.
/* main.c - REFACTORED VERSION */


#include "main.h"
#include "Drivers/lcd_i2c.h" // Include our new driver's API

I2C_HandleTypeDef hi2c1; // I2C handle is still here

// All LCD-specific functions are GONE from main.c

int main(void) {
    HAL_Init();
    SystemClock_Config();
    MX_GPIO_Init();
    MX_I2C1_Init();

    // --- APPLICATION LOGIC ---
    // Now we just use the clean API from our driver
    lcd_init();

    lcd_set_cursor(0, 0);
    lcd_send_string("Hello, Layered");

    lcd_set_cursor(1, 2);
    lcd_send_string("Architecture!");

    while (1) {
        // The main application loop is now clean
    }
}
The result is a thing of beauty. main.c now only contains application logic. The responsibility for controlling the LCD is neatly encapsulated in its own driver. If you need an LCD in your next project, you just copy the lcd_i2c.h and lcd_i2c.c files and include the header.
4. Advanced Abstraction: The Role of a True HAL
What we have built is a device driver. It abstracts the details of the LCD module. This driver, however, still directly calls the STM32-specific I2C functions (HAL_I2C_Master_Transmit). This couples our driver to the ST HAL.
What if you wanted to port this LCD driver to a completely different microcontroller, like one from NXP or Microchip? You would have to go into lcd_i2c.c and replace all the HAL_I2C_... calls.
Professional-grade architectures often add another layer of abstraction to solve this. This is where the concept of a true Hardware Abstraction Layer (HAL) comes in. Let's explore this professional technique.
Creating a Hardware Abstraction Layer (HAL) in C
The article 'Creating a Hardware Abstraction Layer (HAL) in C' by Jacob Beningo is an excellent resource that explains how to take decoupling a step further. It demonstrates how to create a generic interface that makes your drivers independent of the underlying hardware vendor.
Please read the introduction and the sections 'The purpose of hardware abstraction layers', 'Defining an I2C hardware abstraction layer', and 'Mapping the HAL to a driver'. Focus on the I2C_t struct defined with function pointers. This is the key mechanism for decoupling.
As the article explains, you can define a generic interface for a peripheral, like I2C, using a struct of function pointers:
// A generic I2C interface
typedef struct {
    bool (*Init)(void);
    bool (*Write)(uint16_t addr, uint8_t *data, uint32_t len);
    bool (*Read)(uint16_t addr, uint8_t *data, uint32_t len);
} I2C_Interface_t;
Your lcd_i2c.c driver would then not call HAL_I2C_Master_Transmit directly. Instead, it would be given a pointer to an I2C_Interface_t object and would call its functions, for example i2c->Write(...).
This technique, known as dependency injection, completely decouples the LCD driver from the specific I2C implementation. You could then provide an "STM32 I2C implementation," an "NXP I2C implementation," or even a "PC simulator implementation" without ever changing the LCD driver code. This is a powerful concept used extensively in production-quality firmware.
Conclusion
In this lesson, you moved from architectural theory to concrete implementation. By refactoring a monolithic project into a layered structure, you've taken a significant step toward writing professional, scalable, and maintainable firmware.
Key Takeaways:
- Refactoring is the process of restructuring code without changing its external behavior.
- A layered architecture is implemented by organizing code into separate files and folders (e.g.,
app,drivers). - A driver's public API is defined in its header file (
.h), providing a clean interface for the application. - Encapsulation is achieved by making internal driver functions
static, hiding implementation details. - Advanced abstraction using function pointers and dependency injection allows drivers to be fully decoupled from specific hardware, maximizing portability and testability.
This process of identifying logical blocks of functionality, defining clean interfaces, and hiding implementation details is the very essence of good software engineering.
Preview of the Next Lesson:
Now that we have a well-structured project with clean separation of concerns, the next logical step is to place it under version control. In the next lesson, "Initialize a Git repository for a firmware project and use a feature-branching workflow," we will learn how to manage our project's history, collaborate with others, and safely experiment with new features—all essential skills for a professional developer.