Introduction
Welcome to the eleventh module of our course. In the previous lesson, we focused on low-level optimization, learning how to use compiler flags and analyze memory maps to make our firmware smaller and faster. We were working at the level of machine code and memory addresses.
Today, we move from the microscopic details of implementation to the macroscopic view of software design. As firmware projects grow in complexity—especially in demanding fields like automotive systems—simply writing functional code is not enough. The code must also be well-organized, maintainable, and adaptable. This is the domain of software architecture.
This lesson addresses the learning outcome: Explain the principles of layered firmware architecture (HAL, Drivers, Application). We will explore the "what" and "why" behind structuring your projects into logical layers, a practice that is fundamental to professional embedded systems engineering. This conceptual foundation is the first step towards writing code that is not only correct but also clean, scalable, and portable.
1. The "Why" of Software Architecture
Before we dive into specific layers, let's address a fundamental question: why should we bother with architecture at all? Why not just write all our code in a few files and get the job done? For a simple LED blinker, that might be fine. But for a system that reads multiple sensors, communicates over a CAN bus, and runs a complex control algorithm, this approach quickly becomes unmanageable.
A good architecture provides a blueprint for managing complexity. To understand the powerful benefits of a well-designed structure, let's start with a video that explains the core motivations.
How to Create a Software Architecture | Embedded System Project Series #6
The video 'How to Create a Software Architecture' from the Artful Bytes channel provides an excellent overview of the reasons for organizing software. It sets the stage for our discussion on layered architecture by focusing on the practical benefits.
Please watch the segment from 01:25 to 05:56. As you watch, pay close attention to the list of benefits the presenter discusses, such as making code easier to reason about, maintain, test, and port.
As the video highlights, the core principle is divide and conquer. By breaking a large problem into smaller, well-defined pieces, we can create software that is:
- Maintainable & Extensible: Changes in one part of the system don't break other unrelated parts. Adding new features is straightforward.
- Portable: The main logic of your application can be moved to a new microcontroller with minimal changes. This is critical in the automotive industry, where supply chain issues can force hardware changes.
- Testable: Each part can be tested in isolation, which is crucial for building reliable and safe systems (a key requirement for ISO 26262 compliance in automotive).
- Reusable: Well-designed components, like a driver for a specific sensor, can be reused across different projects.
A layered architecture is one of the most common and effective ways to achieve these goals in embedded systems.
2. Defining the Layers
Layered architecture works by separating the code based on its level of abstraction, from the high-level application logic down to the low-level hardware control.
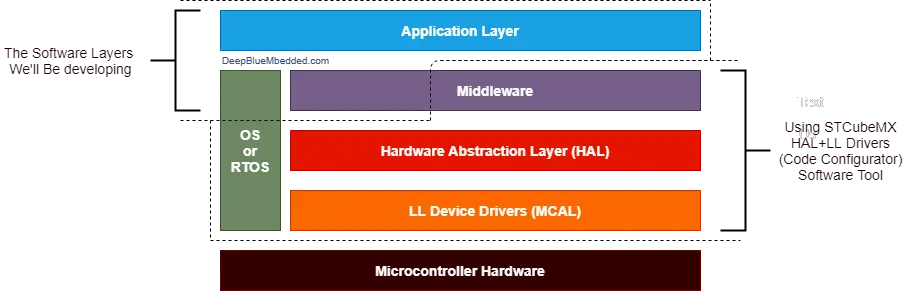
Let's examine the primary layers, starting from the bottom up. The following article provides concise, professional definitions.
Layered Architecture Definitions
The article 'Layered Embedded Architecture' from RAPIDSEA and the academic paper 'Firmware architecture paradigms' offer clear definitions of the standard layers. We will use them to formalize our understanding.
Please read the sections titled 'Application Layer', 'Middleware layer', and 'Hardware Abstraction Layer (HAL)' in the 'Layered Embedded Architecture' article. These provide excellent summaries of each layer's role.
Here is a breakdown of the layers, incorporating insights from the resources:
| Layer | Primary Function | Key Responsibilities & Characteristics |
|---|---|---|
| Application | Implements the product's unique features | - Contains the "business logic" (e.g., control algorithms, state machines). - Makes decisions based on sensor data. - Should never directly access hardware registers. - Calls APIs provided by Middleware and HAL. - Highly portable. |
| Middleware | Provides common, reusable services | - Sits between the Application and HAL. - Examples: Real-Time Operating System (FreeRTOS), communication stacks (CAN, TCP/IP), file systems. - Abstracts complex functionalities that are not specific to the application or hardware. |
| Driver / HAL | Provides a standardized interface to the hardware | - Hides the complex, register-level details of the microcontroller's peripherals (GPIO, UART, SPI, ADC, etc.). - Translates generic function calls (e.g., uart_send(data)) into specific register writes.- This layer makes the upper layers portable. |
| Hardware | The physical microcontroller and peripherals | - The silicon itself (CPU, memory, peripherals). - This is what the Driver/HAL layer directly interacts with. |
This structure is a core concept in the AUTOSAR (Automotive Open System Architecture) standard, where the lowest layer is called the MCAL (Microcontroller Abstraction Layer)—it serves the exact same purpose as a HAL. Your familiarity with this concept is directly relevant to your automotive career goals.
The terms Driver and Hardware Abstraction Layer (HAL) are often used together.
- A HAL can be seen as the entire layer that abstracts all hardware. STMicroelectronics provides its own HAL (the
HAL_functions you've been using). - A Device Driver is often more specific. It's the code to control a particular peripheral (e.g., an I2C driver) or an external device (e.g., a driver for a specific Bosch temperature sensor that uses the I2C peripheral). A device driver would typically use the underlying HAL.
The fundamental rule of layered architecture is that dependencies must only point downwards. The Application layer can know about and call functions in the Middleware and HAL, but the HAL should know nothing about the Application. This strict separation is what provides the benefits of portability and maintainability.
3. A Concrete Example of Layered Design
Theory is essential, but seeing it applied makes it click. Let's revisit the Artful Bytes video, this time focusing on the architecture of the sumo robot project. This will serve as a practical example of how these layers are realized in a real project.
How to Create a Software Architecture | Embedded System Project Series #6
Now we'll watch how the theoretical layers are implemented in a real-world project. The presenter explicitly divides his code into hardware-dependent 'drivers' and hardware-independent 'application' modules.
Please watch from 06:06 to 13:28. As you watch, try to map the modules he describes to the layers we just defined: Which modules belong in the Application Layer (e.g., State Machine, Enemy Detection)? Which modules belong in the Driver/HAL Layer (e.g., UART Driver, I2C Driver, PWM module)? Notice how the Application modules provide simplified concepts ('enemy is to the left') while the Driver modules deal with hardware details (PWM signals, I2C messages).
This example clearly demonstrates the separation of concerns. The State Machine doesn't need to know how to generate a PWM signal to run a motor; it just needs to call a function like drive_forward(). The drive module in the application layer then translates this high-level command into a specific duty cycle for the PWM driver. If you were to change to a different motor controller, you would only need to update the low-level driver modules, leaving the application logic untouched.
4. Implementing Interfaces Between Layers
While this lesson focuses on the high-level principles, it's worth briefly touching on how these layers are implemented in C. As you'll see in the next lesson, the "boundary" between layers is defined by an Application Programming Interface (API), which is typically a set of functions declared in a header file (.h).
For example, a driver for our I2C LCD might have a header file lcd_driver.h that looks like this:
// lcd_driver.h - Public API for the LCD Driver


#ifndef LCD_DRIVER_H
#define LCD_DRIVER_H


#include <stdint.h>

void lcd_init(void);
void lcd_send_string(char *str);
void lcd_set_cursor(uint8_t row, uint8_t col);
void lcd_clear(void);


#endif
The application code (main.c) would simply #include "lcd_driver.h" and call these functions. The application has no knowledge of the I2C addresses, commands, or timing delays happening inside lcd_driver.c. This is encapsulation in practice.
More advanced techniques exist to create truly abstract and polymorphic interfaces, but a well-defined API in a header file is the first and most important step.
Conclusion
In this lesson, we moved up from code optimization to software architecture. You have learned the foundational principles of organizing firmware into logical layers, a practice that separates professional engineers from hobbyists.
Key Takeaways:
- Layered Architecture organizes firmware into an Application Layer, Middleware, and a Driver/HAL Layer to manage complexity.
- The core principle is Separation of Concerns: application logic is kept separate from hardware-dependent code.
- This separation provides critical benefits: improved maintainability, portability, testability, and reusability.
- Dependencies flow in one direction: downwards. Higher-level layers can use lower-level layers, but not the other way around.
- This architectural pattern is central to industry standards like AUTOSAR, making it a vital concept for your career in automotive embedded systems.
Preview of the Next Lesson:
Theory is powerful, but practice is where skills are built. In our next lesson, "Refactor a monolithic project into a layered architecture with a distinct driver layer for a peripheral," you will apply what you've learned today. We will take a simple, single-file project and transform it into a clean, professional, multi-file layered structure. This hands-on exercise will be your first step toward building projects with a robust and scalable architecture.