Hello! In our last lesson, we successfully set up a professional C development environment. You now have the GNU toolchain (GCC, GDB, Make) and a configured VS Code editor ready to go.
Today, we're going to use that environment to write our first C program and, more importantly, peel back the curtain on the compilation process. This lesson directly addresses your goal of understanding how C code is translated into machine instructions. By the end of our session, you'll be able to write, compile, and run a basic C program and explain the four distinct stages of the compilation pipeline: preprocessing, compilation, assembly, and linking.
Your extensive experience with JavaScript (V8 engine) and PHP (Zend Engine) has given you a strong foundation in interpreted and Just-In-Time (JIT) compiled languages. C operates on a different model: Ahead-Of-Time (AOT) compilation. Let's start by visualizing this difference.
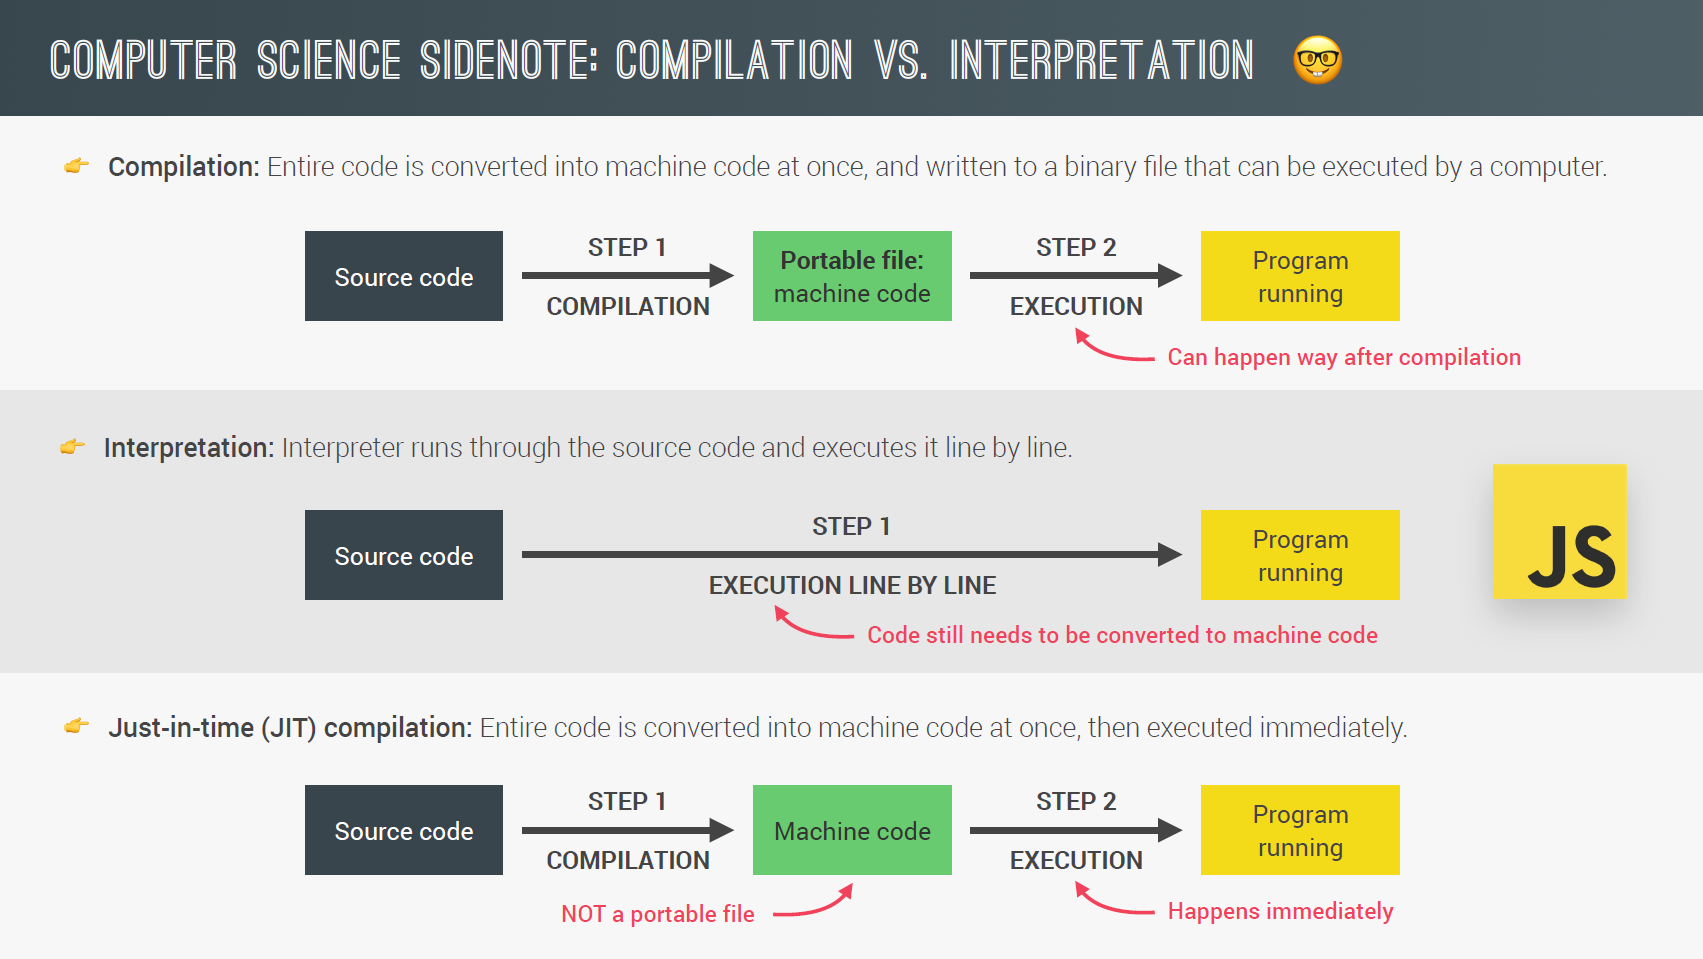
In C, the compiler (like GCC) does all the work ahead of time to create a native executable. This is a key reason for C's performance. Let's dive into how this happens.
The Journey from Source Code to Executable
At a high level, turning a .c file into a runnable program seems like a single step:
gcc hello.c -o hello
However, GCC is actually a driver program that coordinates a sequence of four tools to get the job done.
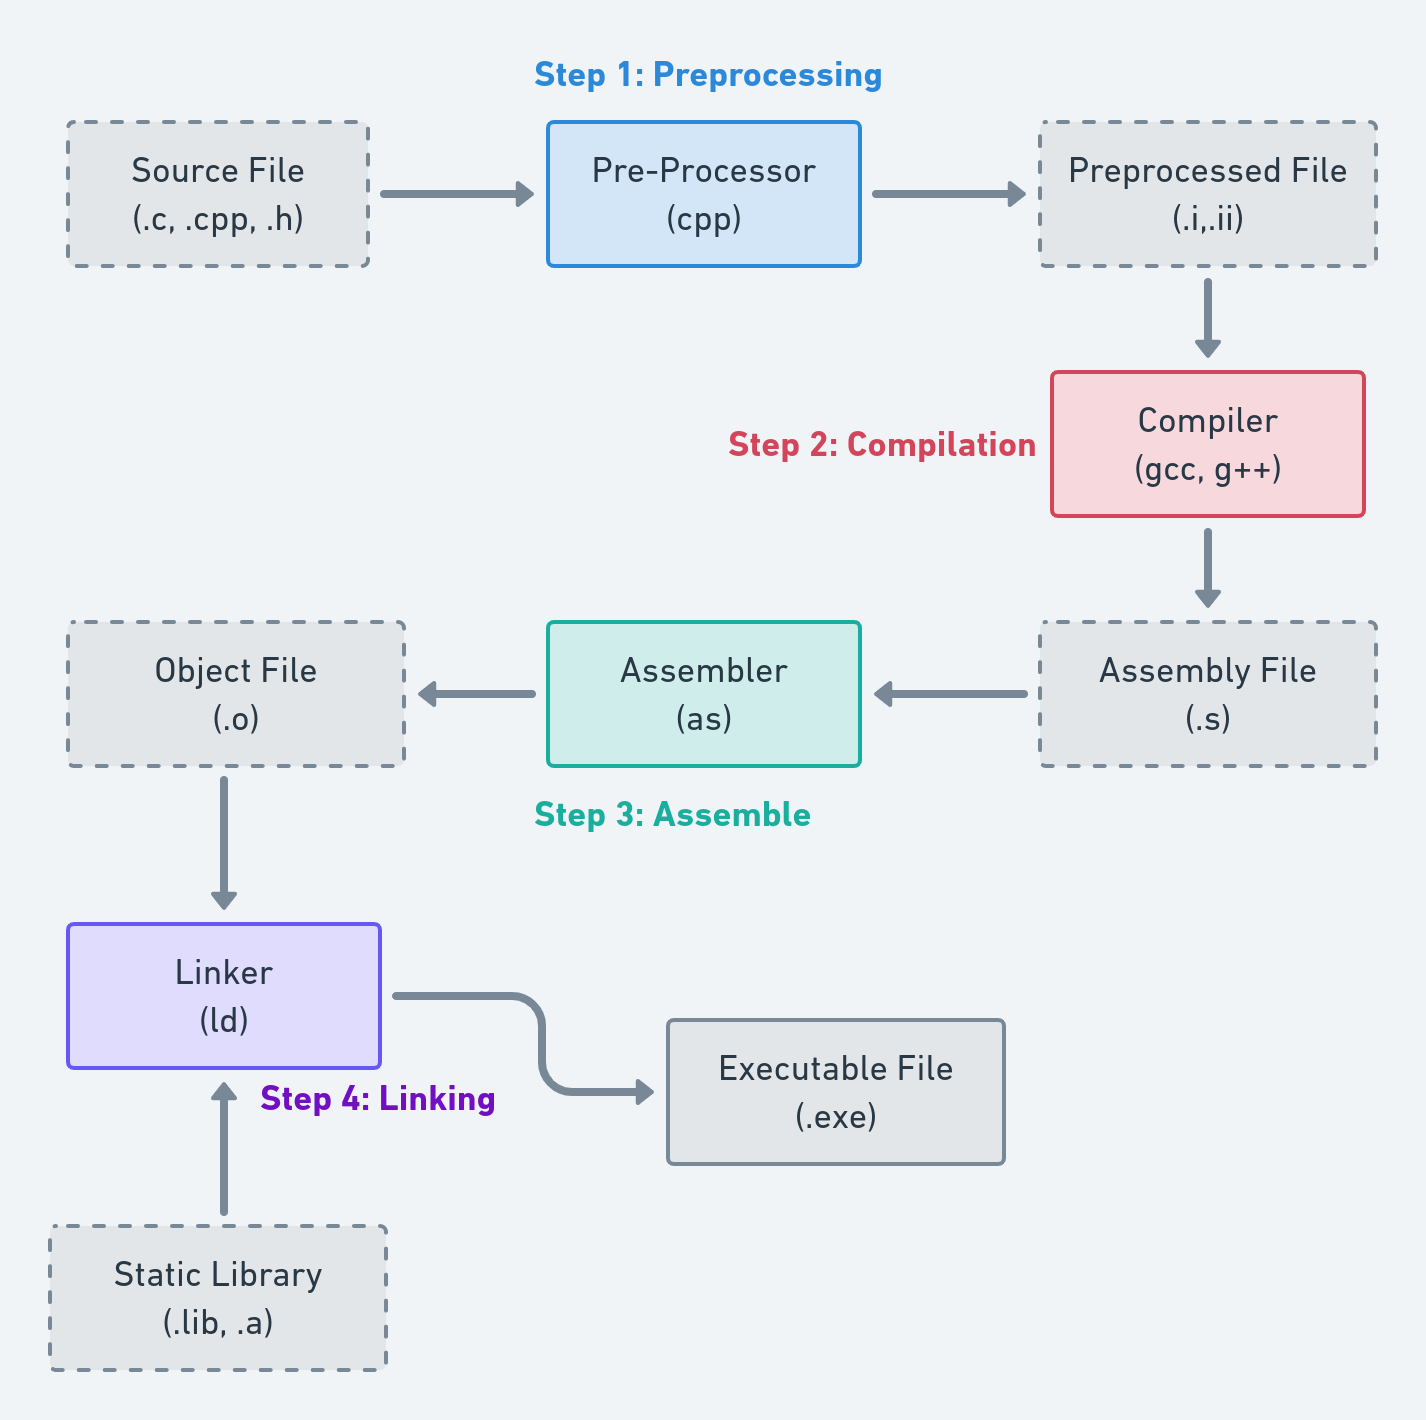
We are going to walk through each of these stages manually.
Step-by-Step Breakdown of the Compilation Pipeline
To best illustrate the entire process, especially the linking stage, we'll use a small project with two source files and one header file. This is a common structure for any non-trivial program.
Create a new project directory and add the following three files:
my_math.h (The header file, or interface)
#ifndef MY_MATH_H
#define MY_MATH_H

int add(int a, int b);

#endif
my_math.c (The implementation for our math functions)
#include "my_math.h"

int add(int a, int b) {
    return a + b;
}
main.c (The main program entry point)
#include <stdio.h>
#include "my_math.h"

int main() {
    int sum = add(10, 20);
    printf("The sum is %d\n", sum);
    return 0;
}
Now, let's explore how GCC processes these files. For a detailed walkthrough that mirrors what we're about to do, the following article is an excellent resource.
Understanding the Compilation Process in C: A Step by Step ...
This article, 'Understanding the Compilation Process in C' from Deus In Machina, breaks down the four stages with the same multi-file example we are using. It's a great reference to have open as we go through each step.
Skim through the sections from 'Breaking down the compilation steps' to 'Linking'. Notice the GCC flags used for each stage (-E, -S, -c) and the resulting file types (.i, .s, .o).
1. Preprocessing
The first stage is handled by the C Preprocessor. It performs text-based operations on your source code before the actual compilation begins. Its main jobs are:
- Expanding
#includedirectives: It literally copy-pastes the content of header files (likestdio.handmy_math.h) into your source file. - Expanding
#definemacros: It replaces symbolic constants and macros with their values. - Handling conditional compilation: It includes or excludes code based on
#ifdef,#ifndef, etc. (We see this with the#ifndef MY_MATH_H...#endifblock, which is called an "include guard" and prevents the header from being included multiple times). - Stripping comments.
We can tell GCC to stop after this stage using the -E flag.
Command:
gcc -E main.c -o main.i
This command processes main.c and outputs the result to main.i. Open main.i. You'll see it's a huge file! At the top, you'll find the entire contents of stdio.h (and the files it includes). At the very bottom, you'll see our original main function, with the my_math.h content pasted in.
2. Compilation
In this stage, the compiler takes the preprocessed source code (.i file) and translates it into assembly language. This is a human-readable, low-level language that is specific to your CPU architecture (e.g., x86-64, ARM). This is the core "translation" step where the compiler analyzes your C code for syntactic correctness and converts its logic into processor instructions.
We can tell GCC to stop after this stage using the -S flag.
Command:
gcc -S main.i -o main.s
This takes main.i and produces main.s. Open the .s file. You don't need to understand every line, but you can recognize parts of your program. You'll see labels like main:, instructions like movl (move), addl (add), and call (call a function), and the string "The sum is %d\n". This is the assembly representation of your program.
3. Assembly
The assembler takes the assembly code (.s file) and translates it into machine code, also known as object code. This code is in a binary format that the CPU can directly execute. The output of this stage is an object file (usually with a .o extension).
An object file contains the compiled code but isn't a complete program yet. For example, our main.o will contain a call to the add function, but the actual code for add isn't there yet. The file contains a placeholder, noting that the add function's address needs to be filled in later.
We can tell GCC to stop after this stage using the -c flag.
Command:
# Let's create object files for both of our .c files
gcc -c my_math.c -o my_math.o
gcc -c main.c -o main.o
You now have my_math.o and main.o. If you try to open them in a text editor, you'll see mostly gibberish because they are binary files.
4. Linking
This is the final stage. The linker's job is to take one or more object files and "link" them together to create a single executable program. It performs two key tasks:
- Resolves symbols: It looks at the object files and connects function calls to function definitions. In our case, it sees that
main.ocallsadd, finds the definition ofaddinsidemy_math.o, and replaces the placeholder inmain.owith the actual memory address of theaddfunction. - Links libraries: It also links in any required code from libraries. The call to
printfis resolved by linking against the C Standard Library.
To run just the linking stage, we give GCC the object files.
Command:
gcc main.o my_math.o -o my_app
This command tells GCC to link main.o and my_math.o together and produce the final executable file named my_app. You can now run it:
./my_app
Output:
The sum is 30
Test your understanding!
You've successfully compiled my_app. Now, you run the command gcc main.o -o failed_app. What kind of error will you get, and why?
Show answer
You will get a linker error. The message will be something like undefined reference to 'add'.
This happens because the linker is trying to build failed_app from main.o alone. While processing main.o, it sees a call to the add function but has not been given any object file (my_math.o) that contains the definition of add. The linker cannot resolve this symbol, so it reports an error and fails.
A Deeper Look with Mike Shah
To tie all these concepts together and hear them explained from another perspective, the following video provides a very thorough walkthrough of the entire compilation pipeline. It's a fantastic resource for reinforcing what we've just done.
In 54 Minutes, Understand the whole C and C++ compilation process
The video 'In 54 Minutes, Understand the whole C and C++ compilation process' by Mike Shah is an excellent deep dive. We'll watch the key segments that map to the stages we just discussed.
Please watch the following segments: 00:00 - 06:04 (Overview): This provides a great high-level summary of the entire pipeline, which will reinforce the diagram we saw earlier. 10:52 - 20:13 (Preprocessor): Focus on how #include is just a copy-paste operation and how you can view the preprocessed output with -E. 20:13 - 27:58 (Compiler & Assembly): This section explains how the compiler generates assembly and shows the -S flag in action. 27:58 - 34:30 (Assembler & Linker): This covers creating object files with -c and the final linking step. It also introduces the objdump tool to inspect object files, which directly aligns with your interest in low-level details.
Conclusion
Congratulations on building and dissecting your first C program! This lesson was a foundational dive into the mechanics of compilation, a process that is often hidden by modern IDEs but is crucial for understanding C.
You should now be able to:
- Describe the four stages of the C compilation pipeline: Preprocessing, Compilation, Assembly, and Linking.
- Explain the purpose of each stage and the type of file it produces (
.i,.s,.o). - Use the GCC flags
-E,-S, and-cto stop the compilation process at each intermediate stage. - Understand that linker errors like "undefined reference" occur when the linker cannot find the definition for a function that has been called.
In our next lesson, we will begin our exploration of the C language itself. We'll cover fundamental data types, operators, and control flow structures, drawing comparisons to their equivalents in JavaScript and PHP to leverage your existing knowledge.
Practice Exercises
To solidify your understanding of the compilation pipeline, complete the following exercises. Create a new directory for this work.
- Recreate the Pipeline: Using the
main.c,my_math.c, andmy_math.hfiles, run the commands for each of the four stages one by one. After each stage, uselsto see the new files created andcator a text editor to inspect the contents of the.iand.sfiles. - Causing a Linker Error: Compile
main.candmy_math.cto their respective object files (.o). Then, try to link onlymain.ointo an executable. Observe the linker error. Now, link both.ofiles to fix it. - The Role of a Header: Rename
my_math.htomy_math_backup.h. Try to compilemain.c(gcc -c main.c -o main.o). What error do you get? Why does the compiler complain even though the definition ofaddis still inmy_math.c? (Hint: Think about what information the compiler needs when it sees theadd(10, 20)call). - Inspecting Symbols: Use the
objdump -t main.ocommand. Look for theaddsymbol. You should see it marked as*UND*(undefined). Now runobjdump -t my_math.o. You should seeaddlisted in the.textsection, meaning it's defined here. This visually confirms what the linker does. - Single Command Compilation: Go back to the original three files. Now, compile the entire project with a single command:
gcc main.c my_math.c -o my_app. Recognize that this single command is just telling GCC to run all four stages for you automatically.