Hello! Welcome to the next module in our course. In our previous lessons, we designed and implemented decoupled, resilient services using task queues like Celery. Now that we have our application logic, the next critical step is to package it for deployment. This is where Docker comes in.
This lesson marks our first hands-on dive into containerization. We'll move beyond simply running existing images, which you're already familiar with, and learn to author our own. Our goal is to write a production-ready Dockerfile for an async Python microservice. This means we'll focus not just on making it work, but on making it efficient, secure, and small—all hallmarks of a professional, production-grade container image.
1. From a Basic to a Production-Ready Dockerfile
A Dockerfile is a text document that contains all the commands a user could call on the command line to assemble an image. Let's start with a simple, yet inefficient, Dockerfile for a typical FastAPI application.
A Naive Dockerfile
# Stage 1: The "it-works-on-my-machine" Dockerfile
FROM python:3.11

WORKDIR /app

COPY . .

RUN pip install -r requirements.txt

EXPOSE 8000

CMD ["uvicorn", "app.main:app", "--host", "0.0.0.0", "--port", "8000"]
This Dockerfile is simple and it works, but it has several problems for production use:
- Large Image Size: It's based on the full
python:3.11image, which includes many build tools and libraries unnecessary for running the application. - Inefficient Caching: The
COPY . .command copies all project files. Any change, even to a README file, will cause Docker to re-install all Python dependencies, making builds slow. - Security Risks: It runs the application as the
rootuser by default, which is a significant security vulnerability. - Bloat: It copies everything from your project directory into the image, including development files, test suites, or even local secrets if you're not careful.
Let's fix these issues one by one by applying industry best practices.
2. Best Practice: Optimize Your Base Image and Dependencies
The foundation of your Docker image is the FROM instruction. Choosing the right base image has the biggest impact on size and security.
A common progression is from a general-purpose OS to a minimal, language-specific image:
ubuntu:latest: Very large, contains many tools you don't need.python:3.11: Better, but still large as it includes compilers and development headers.python:3.11-slim-bookworm: Much better. This is a "slim" variant that removes unnecessary files, resulting in a significantly smaller image.python:3.11-alpine: The smallest, but can sometimes lead to longer build times if your Python packages need to compile C extensions, as Alpine usesmusl libcinstead of the more commonglibc.
For most Python applications, slim is the best starting point.
The following video from TechWorld with Nana explains why selecting a specific, lean base image is a critical first step for creating predictable and secure images.
Top 8 Docker Best Practices for using Docker in Production
Watch this section from "Top 8 Docker Best Practices for using Docker in Production" to understand the importance of base image selection.
Focus on the discussion about using official and verified images, why you should avoid the latest tag and instead use specific version tags, and the benefits of using leaner distributions like Alpine or slim variants for size and security.
3. Best Practice: Leverage the Build Cache
Docker builds images in layers, and it caches each layer. If nothing has changed in a layer, Docker reuses it from the cache, speeding up builds dramatically. A layer is invalidated if its contents change, and all subsequent layers are also rebuilt.
Our naive Dockerfile COPY . . before RUN pip install. This means any code change invalidates the cache for the dependency installation step, even if requirements.txt hasn't changed.
The correct approach is to order commands from least to most frequently changing:
- Copy only the dependency file (
requirements.txt). - Install the dependencies. This layer will now only be rebuilt if
requirements.txtchanges. - Copy the rest of the application code.
Improved Dockerfile (Leveraging Cache)
FROM python:3.11-slim

WORKDIR /app


# Copy only the requirements file first
COPY requirements.txt .


# Install dependencies
RUN pip install -r requirements.txt


# Now copy the rest of the application code
COPY . .

EXPOSE 8000

CMD ["uvicorn", "app.main:app", "--host", "0.0.0.0", "--port", "8000"]
This simple change has a massive impact on your development workflow speed.
4. Best Practice: Use a .dockerignore File
The COPY . . command copies everything from your project folder (the "build context") into the image. This can include:
.gitfolder__pycache__directories- Virtual environment folders (
.venv) - Test files and local configuration
This not only bloats your image but can also leak sensitive information. To prevent this, create a .dockerignore file in your project root, which works just like .gitignore.
Example .dockerignore
# Git
.git
.gitignore


# Python
__pycache__/
*.pyc
*.pyo
.venv/


# Docker
Dockerfile
docker-compose.yml


# IDE files
.vscode/
.idea/
5. Best Practice: Use Multi-Stage Builds
This is the cornerstone of a truly production-ready Dockerfile. A multi-stage build allows you to use one stage with all the build tools (like compilers) to prepare your application, and then copy only the necessary artifacts into a clean, minimal final image.
Think of it like our restaurant analogy: you have a large, fully-equipped "prep kitchen" (the builder stage) where you do all the messy work like chopping vegetables and making sauces. Then, you only move the finished, plated meal to the "serving line" (the final stage), leaving all the heavy equipment and mess behind.
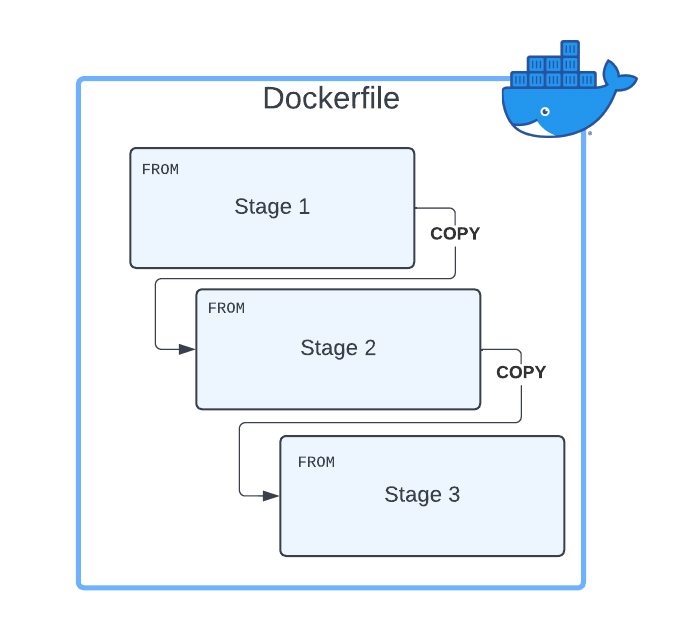
The following video provides an excellent, step-by-step walkthrough of converting a single-stage Dockerfile into an efficient multi-stage one.
This Is How You Write an Efficient Python Dockerfile
This segment from ArjanCodes' "This Is How You Write an Efficient Python Dockerfile" is a masterclass in implementing multi-stage builds.
Watch how he introduces the concept of a multi-stage build to separate the build process from the final runtime image. Pay close attention to the code as he defines a builder stage and a production stage, and then uses COPY --from=builder to move only the created virtual environment into the final, lean image. The results in build time and image size are dramatic.
6. Best Practice: Run as a Non-Root User
By default, containers run processes as the root user. If an attacker finds a vulnerability in your application, they could gain root access inside the container, which presents a serious risk of escalating privileges to the host machine.
The best practice is to create a dedicated, unprivileged user inside the container and run your application as that user.
This involves three steps in your Dockerfile:
- Create a new user and group (
RUN groupadd ... && useradd ...). - Use the
USERinstruction to switch to that user. - When copying your application code, use the
--chownflag to set the correct ownership.
Top 8 Docker Best Practices for using Docker in Production
This segment from TechWorld with Nana clearly explains the security implications of running as root and how to mitigate them.
Watch the explanation of the security risks of running as the default root user. Then, see how to create and switch to a dedicated non-root user in the Dockerfile.
Putting It All Together: A Production-Ready Dockerfile
Now, let's combine all these best practices into a single, robust Dockerfile. This example uses a multi-stage build where the builder stage pre-compiles Python packages into "wheels" for a fast and clean installation in the final stage.
This article from OneUptime provides a complete, production-ready Dockerfile that we will analyze.
Read through the Dockerfile provided under the "Service Dockerfile" section. Don't worry about understanding every single detail yet. We will break it down together in the next section. Just familiarize yourself with its structure.
Let's analyze that Dockerfile step-by-step, seeing how it applies everything we've learned:
# services/user-service/Dockerfile


# ----------------- BUILDER STAGE -----------------
# Use a slim image that still has build tools
FROM python:3.11-slim as builder
WORKDIR /app


# Install build-time system dependencies (e.g., gcc for compiling packages)
RUN apt-get update && apt-get install -y --no-install-recommends \
    gcc \
    libpq-dev \
    && rm -rf /var/lib/apt/lists/*


# Copy only the requirements file (leverages cache)
COPY requirements.txt .


# Build wheels for all dependencies. This pre-compiles them.
# The wheels will be installed in the final stage without needing compilers.
RUN pip wheel --no-cache-dir --no-deps --wheel-dir /app/wheels -r requirements.txt


# ----------------- PRODUCTION STAGE -----------------
# Start from a fresh, clean slim image for the final stage
FROM python:3.11-slim


# Create a non-root user for security
RUN groupadd -r appuser && useradd -r -g appuser appuser
WORKDIR /app


# Install only runtime system dependencies (e.g., libpq5 to connect to postgres)
RUN apt-get update && apt-get install -y --no-install-recommends \
    libpq5 \
    && rm -rf /var/lib/apt/lists/*


# Copy the pre-compiled wheels from the builder stage
COPY --from=builder /app/wheels /wheels


# Install the dependencies from the local wheels. This is very fast and doesn't require network access.
RUN pip install --no-cache /wheels/*


# Copy application code, setting ownership to the non-root user
# Note: This assumes a project structure where code is in services/user-service/app/
COPY --chown=appuser:appuser services/user-service/app/ /app/app/


# Switch to the non-root user
USER appuser


# Expose the port the application runs on
EXPOSE 8001


# Command to run the application
CMD ["uvicorn", "app.main:app", "--host", "0.0.0.0", "--port", "8001"]
This Dockerfile is a professional template for containerizing a Python service. It is small, secure, and builds efficiently.
Hands-on Exercise: Refactor a Dockerfile
Here is an inefficient Dockerfile. Your task is to identify the issues and rewrite it using the best practices we've discussed.
"Bad" Dockerfile:
FROM python:3.11
RUN pip install "fastapi[all]"
WORKDIR /code
COPY ./src /code/app
CMD ["uvicorn", "app.main:app", "--host", "0.0.0.0", "--port", "80"]
Think about these questions:
- What's wrong with the base image?
- How are the dependencies being installed? Is there a better way?
- Is the layer caching being used effectively?
- Is it secure? Who is running the process?
- How would a multi-stage build improve this?
Click to see a possible solution
"Good" Dockerfile:
# Build stage
FROM python:3.11-slim as builder
WORKDIR /app
COPY requirements.txt .
RUN pip install --user --no-cache-dir -r requirements.txt


# Production stage
FROM python:3.11-slim
RUN groupadd -r appuser && useradd -r -g appuser -d /app appuser
WORKDIR /app


# Copy Python dependencies from builder
COPY --from=builder /root/.local /root/.local


# Copy application code
COPY --chown=appuser:appuser ./src ./app


# Set PATH to include user's local bin
ENV PATH="/root/.local/bin:${PATH}"


# Switch to non-root user
USER appuser

EXPOSE 80
CMD ["uvicorn", "app.main:app", "--host", "0.0.0.0", "--port", "80"]
Note: This solution uses a different multi-stage technique (--user install) than the pip wheel example, but it achieves the same goal of separating build from runtime. The core principles remain the same.
Conclusion
You've now learned the essential best practices for creating production-ready Dockerfiles for your Python services. This skill is fundamental to the microservices architecture, as it allows you to create standardized, portable units of deployment for your code.
Key Takeaways:
- Choose Small, Specific Base Images: Start with
*-slimvariants and pin to a specific version (e.g.,python:3.11-slim-bookworm). - Optimize Layer Caching: Copy dependency files and install them before copying your application code.
- Use
.dockerignore: Keep your build context clean and your images lean. - Embrace Multi-Stage Builds: Separate build-time dependencies from your final runtime image to drastically reduce its size and attack surface.
- Run as a Non-Root User: Create and switch to an unprivileged user to enhance security.
Preview of the Next Lesson
Now that you can package a single service into a professional Docker image, how do you run it alongside its dependencies, like a database or a Redis cache? In the next lesson, we will dive into docker-compose. You'll learn how to define and run a multi-service application locally, setting the stage for orchestrating your entire microservices system.