Hello! In our previous lesson, we designed a conceptual event-driven workflow for an e-commerce order, discussing patterns like choreography and sagas. We mapped out how services could communicate asynchronously by publishing and subscribing to events. Now, it's time to move from that high-level design to a practical implementation of one of its most crucial components: the background task processor.
Today's lesson focuses on a cornerstone of modern backend development: offloading work to a distributed task queue. You will learn how to configure Celery, the de facto standard for background job processing in Python, using Redis as its high-speed message broker. This is a fundamental skill for building scalable and responsive applications, and it directly sets you up for implementing the event-driven patterns we just discussed.
By the end of this 60-minute lesson, you will be able to configure Celery with Redis to process background jobs triggered from a web application.
1. The "Why": Offloading Heavy Tasks
In your experience with monolithic frameworks like Django, a web request might trigger a long-running task—like generating a report or sending a batch of emails—directly within the request-response cycle. This blocks the web server process, making the application feel slow and unresponsive.
The solution is to offload these tasks to a separate process. Let's revisit our restaurant analogy. A synchronous API is like a single chef who takes an order, cooks the entire meal, serves it, and only then moves to the next customer. It's inefficient. A background task queue is like the head chef taking an order and immediately handing off the complex, time-consuming parts (like baking a cake) to a specialized pastry team. The head chef is now free to handle more orders, making the whole kitchen more efficient.
The following video provides a great visual explanation of this concept, distinguishing between an asynchronous API (handling many requests quickly) and a background job (handling one heavy task over time).
FastAPI Tutorial #12: Background Jobs From Base to Production with Celery, Redis & Docker
This video by Code Goat starts by clarifying the difference between an async API and a background job.
Watch the initial segment from the beginning to understand the core problem that background jobs solve. Focus on the simulation that shows how a background job immediately returns a response to the user while the heavy work continues separately.
2. The Architecture: Client, Broker, Worker, Backend
To implement this, we need a few key components working together. This is the core architecture of a Celery-based system.
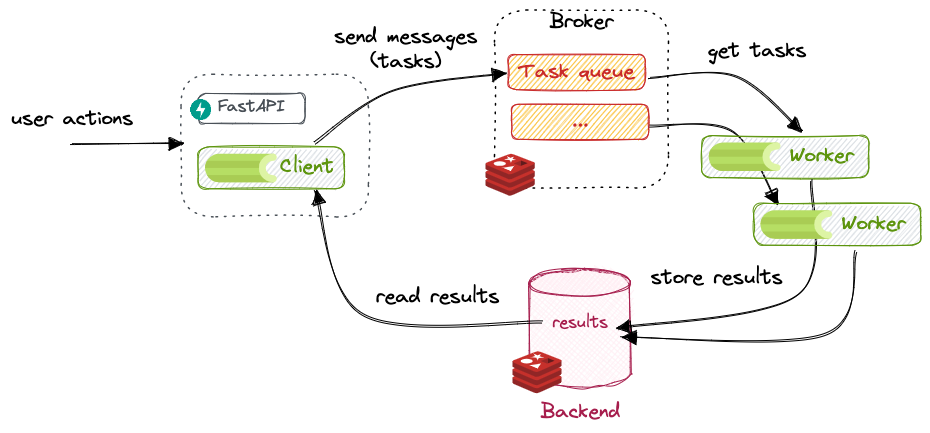
Let's break down the roles:
- Client (Producer): This is our FastAPI application. When an API endpoint needs to run a long task, it doesn't execute it. Instead, it creates a "task message" and sends it to the broker.
- Message Broker: This is a message queue that holds the task messages until a worker is ready to process them. We will use Redis for this. It acts as a temporary inbox for jobs.
- Celery Worker (Consumer): This is a separate Python process that is constantly watching the message broker for new tasks. When a task appears, the worker picks it up, executes the corresponding function, and reports the result. You can run multiple workers to process jobs in parallel.
- Result Backend: This is a database where the worker stores the results and status of completed tasks (e.g.,
SUCCESS,FAILURE, return value, or error). We will also use Redis for this, making it a convenient all-in-one solution.
A common point of confusion is the difference between the broker and the backend. The following article explains this distinction perfectly.
Broker vs Backend — The Cleanest Explanation Ever
This section from the "Celery + Redis + FastAPI" guide provides a crystal-clear definition of the two key roles Redis plays in a Celery setup.
Read the section titled "Broker vs Backend — The Cleanest Explanation Ever" and study the table that compares their responsibilities. The key takeaway is simple: the broker transports tasks, and the backend stores results.
3. Configuring Celery and Redis
Now, let's configure the components in code. The process involves creating a Celery application instance and telling it where to find the broker and backend.
Since you're building a production-oriented system, a good practice is to centralize your Celery configuration.
Step 1: Create the Celery App Instance
In your project structure, you'll typically have a file dedicated to initializing the Celery app, for example, app/core/celery_app.py.
Here's how you define it:
# In a file like app/core/celery_app.py

from celery import Celery


# Define the Redis URLs for broker and backend
# The format is redis://<host>:<port>/<db_number>
# Using "redis" as the hostname assumes you are running in Docker with a service named "redis".
CELERY_BROKER_URL = "redis://redis:6379/0"
CELERY_RESULT_BACKEND = "redis://redis:6379/1" # Use a different DB for results


# Create the Celery application instance
celery_app = Celery(
    "worker",  # A name for the Celery app, used in logging and management.
    broker=CELERY_BROKER_URL,
    backend=CELERY_RESULT_BACKEND,
    include=['app.tasks'] # List of modules to import when the worker starts.
)


# Optional: Add more production-ready configurations
celery_app.conf.update(
    task_serializer='json',
    accept_content=['json'],  # Avoid pickle for security
    result_serializer='json',
    timezone='UTC',
    enable_utc=True,
    broker_connection_retry_on_startup=True, # Retry connecting to broker on startup
)
In this setup:
- We point both the
brokerandbackendto our Redis service. It's a common practice to use different database numbers (e.g.,/0for the broker and/1for the backend) to keep concerns separate. includetells Celery where to find your task definitions.
Step 2: Define a Celery Task
In a separate file, like app/tasks/example_task.py, you define the functions that your workers will execute.
# In a file like app/tasks/example_task.py

from app.core.celery_app import celery_app
import time

@celery_app.task
def process_data(x: int, y: int) -> int:
    """A simple task that simulates a long-running process."""
    print(f"Processing a task with inputs {x} and {y}...")
    time.sleep(10)  # Simulate a 10-second task
    result = x + y
    print("Task finished.")
    return result
The @celery_app.task decorator registers this function as a task that Celery workers can execute.
Step 3: Trigger the Task from FastAPI
Finally, in your FastAPI application, you import the task and call it using the .delay() method. This is the non-blocking call that sends the task message to the broker.
# In a file like app/api/routes.py

from fastapi import APIRouter
from app.tasks.example_task import process_data

router = APIRouter()

@router.post("/process")
async def trigger_processing(x: int, y: int):


    # This is the non-blocking call.
    # It immediately returns an AsyncResult object, which has a `task_id`.
    task = process_data.delay(x, y)


    # The API responds instantly.
    return {"message": "Processing started in the background", "task_id": task.id}
This .delay() method is the magic that decouples your API from the heavy lifting. Your API endpoint can return a response in milliseconds, while the 10-second process_data task runs on a separate worker process.
4. Running the System with Docker Compose
Now that we have the code, how do we run all these pieces together? As you have some familiarity with Docker, this is the perfect time to use docker-compose to manage our multi-container application.
Here’s a simplified docker-compose.yml file to orchestrate our services:
version: "3.9"

services:


  # The Redis service for our broker and backend
  redis:
    image: redis:7-alpine
    container_name: redis
    ports:
      - "6379:6379"


  # The FastAPI web application
  backend:
    build: . # Assumes Dockerfile is in the root directory
    container_name: backend
    command: uvicorn app.main:app --host 0.0.0.0 --port 8000
    ports:
      - "8000:8000"
    depends_on:
      - redis # Ensures Redis starts before the backend app


  # The Celery worker
  worker:
    build: .
    container_name: worker


    # The command to start a celery worker
    command: celery -A app.core.celery_app.celery_app worker --loglevel=info
    depends_on:
      - redis # The worker also needs Redis to be running
With this file, a single docker compose up command will:
- Start a Redis container.
- Build and start your FastAPI application container.
- Build and start your Celery worker container.
5. A Practical, End-to-End Walkthrough
Let's watch a detailed video that walks through a very similar setup from start to finish. This video is excellent because it not only shows the "happy path" but also dives into critical real-world details, such as handling synchronous database calls from an otherwise async application and debugging common container networking issues.
FastAPI Tutorial #12: Background Jobs From Base to Production with Celery, Redis & Docker
This video by Code Goat provides a production-focused walkthrough of integrating Celery, Redis, and FastAPI.
First, review the architectural flow to solidify your understanding of how the components interact. Next, watch the configuration of the Celery worker and tasks. Pay close attention to the discussion around creating a synchronous database session for the Celery task. This is a critical point when integrating with an async framework. Celery tasks are typically synchronous functions. See how the FastAPI endpoint is built to trigger the Celery task via .delay(). Follow the detailed guide on setting up Redis and the Celery worker with Docker. The explanation of container networking (host.docker.internal) is invaluable for local development on Windows/macOS. Finally, watch the full end-to-end test and debugging session. Seeing how to diagnose and fix connection errors is an extremely practical skill.
Conclusion
Congratulations! You've just configured the core components of a distributed task processing system—a fundamental building block for scalable microservices and event-driven architectures.
Key Takeaways:
- Celery Offloads Work: Celery allows you to run long-running tasks in background worker processes, keeping your web application responsive.
- Broker vs. Backend: Redis serves two distinct roles: as a broker to queue tasks and as a backend to store their results.
- The
.delay()Method: This is the key to asynchronous execution. It sends the task to the broker and returns immediately. - Docker Compose is Essential: It simplifies managing the multiple services (app, worker, Redis) required for a complete system.
- Sync vs. Async: Be mindful that standard Celery tasks are synchronous functions. If they need to interact with services like a database from an async application, you must use a synchronous connector/driver.
Preview of the Next Lesson
Our current setup works, but it's not yet resilient. What happens if a task fails due to a temporary network glitch or a database deadlock? Right now, it would simply fail. In the next lesson, we will address this by learning how to "Implement task retries with exponential backoff in Celery to handle transient failures." This will add a crucial layer of robustness to our background jobs.