Hello! In our last lesson, we successfully configured Celery with Redis as a message broker and result backend. We established the fundamental architecture: a FastAPI client producing tasks, Redis brokering them, and a Celery worker consuming them.
Today, we will build directly on that foundation. This lesson is all about putting that architecture to work by implementing a complete, practical workflow. You will learn how to define a "long-running" job, trigger it asynchronously from a FastAPI endpoint, and monitor its execution. This is the core mechanism for decoupling heavy work from your API, ensuring it remains fast and responsive.
By the end of this lesson, you will be able to implement a long-running background job with Celery and trigger it from an asynchronous FastAPI endpoint, fulfilling a crucial requirement for building scalable systems.
1. The Full Asynchronous Workflow
Let's quickly revisit the workflow. When a client requests an operation that takes significant time (e.g., processing a large file, sending a complex email), our FastAPI application shouldn't wait. Instead, it hands the job off and immediately responds to the client.
This sequence diagram provides a great visual summary of the entire process, from the initial request to the final result retrieval.
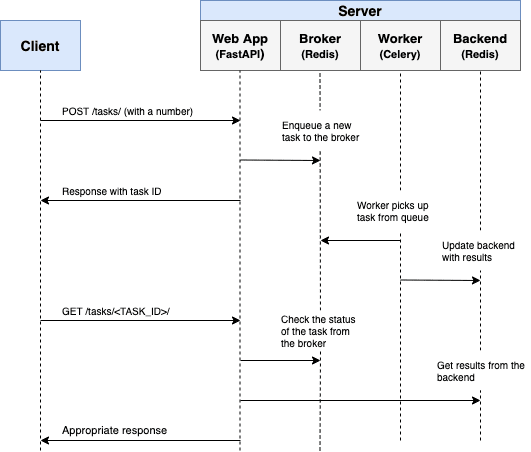
Our focus today is on correctly implementing the connections between these components: the "Create Task" arrow from FastAPI to Redis, and the "Process Task" step within the Celery worker.
2. Defining a Long-Running Celery Task
First, we need a function for our worker to execute. In a real-world scenario, this might be a function that processes an image, generates a PDF report, or calls a slow third-party API. For our purposes, we can simulate a long-running process using time.sleep().
A well-structured Celery task should be defined in its own module, which Celery's "autodiscover" feature can find. Based on your preference for production-oriented practices, the following resource shows a clean way to define a task.
This section from the "Celery + Redis + FastAPI" guide provides an excellent template for a production-style Celery task.
Read the section titled "Production-Ready Celery Task". For now, focus on the basic structure: the @celery.task decorator and the use of time.sleep() to simulate work. We will cover the bind=True, max_retries, and self.retry parts in our next lesson on resilience.
As you've seen, the core of a Celery task is a standard Python function decorated with @celery.task. Here’s a simplified version of that example for clarity:
# In a file like app/tasks/example_task.py
from app.core.celery_app import celery
import time
import logging

logger = logging.getLogger(__name__)


# The @celery.task decorator registers this function as a task
@celery.task
def generate_report(user_id: int):
    """
    A mock task that simulates generating a report for a user.
    """
    logger.info(f"Starting report generation for user {user_id}...")


    # Simulate a long-running process (e.g., database queries, file generation)
    time.sleep(15)

    report_content = f"This is the report for user {user_id} generated at {time.ctime()}."

    logger.info(f"Finished report generation for user {user_id}.")
    return report_content
This function is now ready to be executed by a Celery worker.
3. Triggering the Task from FastAPI
Now for the critical link: how does our async FastAPI application trigger this synchronous Celery task without blocking? The answer is the .delay() method.
When you call my_task.delay(arg1, arg2), Celery does two things:
- It serializes the function name and its arguments into a message.
- It sends this message to the configured message broker (our Redis instance).
Crucially, it does not wait for the task to finish. It returns an AsyncResult object almost instantly, which contains the task_id. Your FastAPI endpoint can then immediately return a response to the client.
The following tutorial provides a clear, step-by-step guide to integrating this into a FastAPI route.
Trigger a Task and Check Status
This guide from TestDriven.io walks through the practical steps of wiring up a FastAPI endpoint to a Celery task.
First, read the short section "Trigger a Task". It shows exactly how to import your task and call it with .delay() inside a POST endpoint. Notice how it immediately returns a JSONResponse with the task_id. Next, read "Task Status". This shows the other side of the coin: how to use the task_id with AsyncResult to check on the job's progress. This is a vital part of the user experience for long-running jobs.
Here's how this looks in our generate_report example:
# In a file like app/api/routes.py
from fastapi import APIRouter
from celery.result import AsyncResult
from app.tasks.example_task import generate_report
from app.core.celery_app import celery # Import your celery instance

router = APIRouter()

@router.post("/reports")
async def create_report(user_id: int):
    """
    Triggers a background task to generate a report.
    """


    # This non-blocking call sends the task to the queue
    task = generate_report.delay(user_id)


    # The API responds instantly with the task ID
    return {"message": "Report generation started", "task_id": task.id}


@router.get("/reports/{task_id}")
async def get_report_status(task_id: str):
    """
    Fetches the status and result of a background task.
    """
    task_result = AsyncResult(task_id, app=celery)

    result = {
        "task_id": task_id,
        "status": task_result.status,
        "result": task_result.result if task_result.ready() else None
    }
    return result
This two-endpoint pattern (one to start, one to check status) is extremely common and provides a robust way for frontends or other services to interact with background jobs.
4. An End-to-End Walkthrough
Let's now watch a detailed video that ties everything together. This resource is particularly valuable because it demonstrates the entire setup and addresses a subtle but critical challenge you'll face when working with an async stack: calling async code from within a synchronous Celery task.
Background Tasks with FastAPI Background Tasks and Celery + Redis - FastAPI Beyond CRUD (Part 20)
This video from the "FastAPI Beyond CRUD" series shows a complete Celery implementation, including a crucial technique for async compatibility.
Start by watching the section on defining a Celery task. The example is about sending an email with an async library. Pay close attention to how asgiref.sync.async_to_sync is used. This is a key pattern for bridging Celery's synchronous world with Python's async world. Next, watch how the FastAPI endpoint is modified to call this new Celery task using the .delay() method. This reinforces the code pattern we discussed above.
5. Running and Monitoring with Flower
With the code in place, the final step is to run the system and observe it in action. You will need at least three separate terminal processes:
- Redis:
redis-server - FastAPI App:
uvicorn app.main:app --reload - Celery Worker:
celery -A app.core.celery_app.celery worker --loglevel=info
While you can watch the worker's terminal logs, a much better way to monitor your tasks in development and production is with Flower, a real-time web UI for Celery.
The following video provides a concise demonstration of starting a task and watching its lifecycle in the Flower dashboard.
FastAPI Celery, Flower and Docker
This clip from Very Academy demonstrates using curl to trigger a task and then monitoring it in the Flower dashboard.
Watch the segment from sending a request to the endpoint. Observe how the task first appears as "Active" in Flower while it's running its time.sleep() simulation, and then moves to "Succeeded" upon completion. This visual feedback is invaluable for debugging and monitoring.
Conclusion
You have now successfully implemented the full lifecycle of a long-running background job. This is a significant step towards building robust, scalable, and responsive backend systems.
Key Takeaways:
- Asynchronous Trigger: The
.delay()method is the non-blocking entry point for sending a job to the Celery queue from your FastAPI application. - Task ID is the Key: The API immediately returns a
task_id, which acts as a ticket to check the job's status and retrieve its result later. - Sync Worker, Async World: Standard Celery workers run tasks synchronously. If a task needs to call an
asyncfunction, you must use a bridge likeasgiref.sync.async_to_sync. - Monitoring is Crucial: Tools like Flower provide essential visibility into your task queues and workers, helping you monitor the health and performance of your background processing system.
Preview of the Next Lesson
Our system now works, but it's not yet resilient. If the generate_report task failed due to a temporary network issue while accessing a database, the task would permanently fail. This is not ideal for production.
In our next lesson, we will tackle this head-on by learning how to implement task retries with exponential backoff in Celery to handle transient failures. This will make our background jobs significantly more robust and reliable.