Hello! Welcome to your fifth lesson in our course.
In the last lesson, we uncovered the critical difference between a tensor view and a copy, and how memory contiguity determines the behavior of reshape(). We saw that operations like transpose() are a common way for a tensor to become non-contiguous.
Today, we'll master these dimension-reordering operations. Our goal is to use transpose() and permute() to reorder tensor axes. This is a fundamental skill for data manipulation in machine learning, such as preparing image data for a convolutional network or aligning tensors for advanced matrix operations.
1. Transposing Tensors: Swapping Two Axes
You're likely familiar with matrix transposition from basic linear algebra—it's the process of flipping a matrix over its main diagonal, effectively turning rows into columns and vice-versa. Tensor transposition extends this concept.
The simplest way to transpose a 2D tensor in PyTorch is with the .T attribute, which works just like in NumPy.
Tensor Transposition — Topic 11 of Machine Learning Foundations
For a quick visual refresher on 2D matrix transposition, watch the beginning of this video from Jon Krohn.
Watch from the start until 00:02:05. The video explains the concept of flipping axes over the main diagonal and shows how to do it in NumPy, TensorFlow, and PyTorch using the .T attribute.
While .T (and its method equivalent, .t()) is convenient, it only works for 2D tensors. For tensors with more than two dimensions, we need a more general tool: torch.transpose().
The transpose(dim0, dim1) function swaps the two dimensions you specify, leaving all other dimensions unchanged. Think of it as picking two axes and having them trade places.
The numpy.swapaxes() function, which you may have encountered, is a perfect conceptual equivalent. The following video explains swapaxes using NumPy, but the logic is identical to torch.transpose().
Array Manipulation | transpose and swapaxes | NumPy Tutorials | Python Programming
This video from Amulya's Academy explains how to interchange two specific axes. Although it's a NumPy tutorial, the swapaxes function it demonstrates works exactly like PyTorch's transpose.
Please watch the segment from 00:11:04 to 00:14:45. Focus on how swapaxes(array, axis1, axis2) is used to interchange two specific dimensions in 2D and 3D arrays. This is the core functionality of torch.transpose(tensor, dim1, dim2).
Here is how you would apply this in PyTorch with a 3D tensor representing a batch of small images:
import torch


# Shape: (batch_size, height, width)
# Let's say we have a batch of 10 images, each 32x32
images = torch.randn(10, 32, 32)
print("Original shape:", images.shape) # torch.Size([10, 32, 32])


# Let's swap the height and width dimensions (dim 1 and dim 2)
images_transposed = images.transpose(1, 2)
print("Transposed shape:", images_transposed.shape) # torch.Size([10, 32, 32])


# The shape is the same, but the height and width axes have been swapped for each of the 10 images.


# Let's swap the batch and height dimensions (dim 0 and dim 1)
images_transposed_2 = images.transpose(0, 1)
print("Second transposed shape:", images_transposed_2.shape) # torch.Size([32, 10, 32])
As you can see, transpose() is precise but limited—it can only swap two axes at a time.
2. Permuting Tensors: The General-Purpose Tool
What if you want to perform a more complex reordering? For instance, changing a tensor from (batch, height, width, channels) to the PyTorch standard (batch, channels, height, width) requires moving multiple axes at once.
This is where permute() comes in. It allows you to reorder all of a tensor's dimensions in any way you choose by specifying the new order of the original axes.
This resource provides a clear, code-first introduction to the .permute() method in PyTorch.
Read the short section titled 'Permutation'. It shows the basic syntax for .permute() and how it changes the tensor's shape.
Let's illustrate with a common machine learning task. An image is often loaded as a tensor with shape (height, width, channels). For processing in PyTorch, we need it to be (channels, height, width).
# A single 64x64 RGB image
# Original dimensions: 0=height, 1=width, 2=channels
image = torch.randn(64, 64, 3)


# We want the new order to be: channels, height, width
# This corresponds to the original dimensions 2, 0, 1
image_permuted = image.permute(2, 0, 1)

print("Original shape:", image.shape)       # torch.Size([64, 64, 3])
print("Permuted shape:", image_permuted.shape) # torch.Size([3, 64, 64])
The image below gives a great visual for how permute() reorders the data "slabs" of a 3D tensor.

transpose() is a special case of permute(). A transpose(dimA, dimB) operation is equivalent to a permute() operation that swaps dimA and dimB while keeping all other dimensions in their original places.
3. The Practical Impact: Data Order and Memory
In our last lesson, we learned that transpose() creates a non-contiguous view of a tensor. The same is true for permute(). These operations do not move the data in memory; they only change the tensor's strides to alter how the data is accessed. This makes them very fast and memory-efficient.
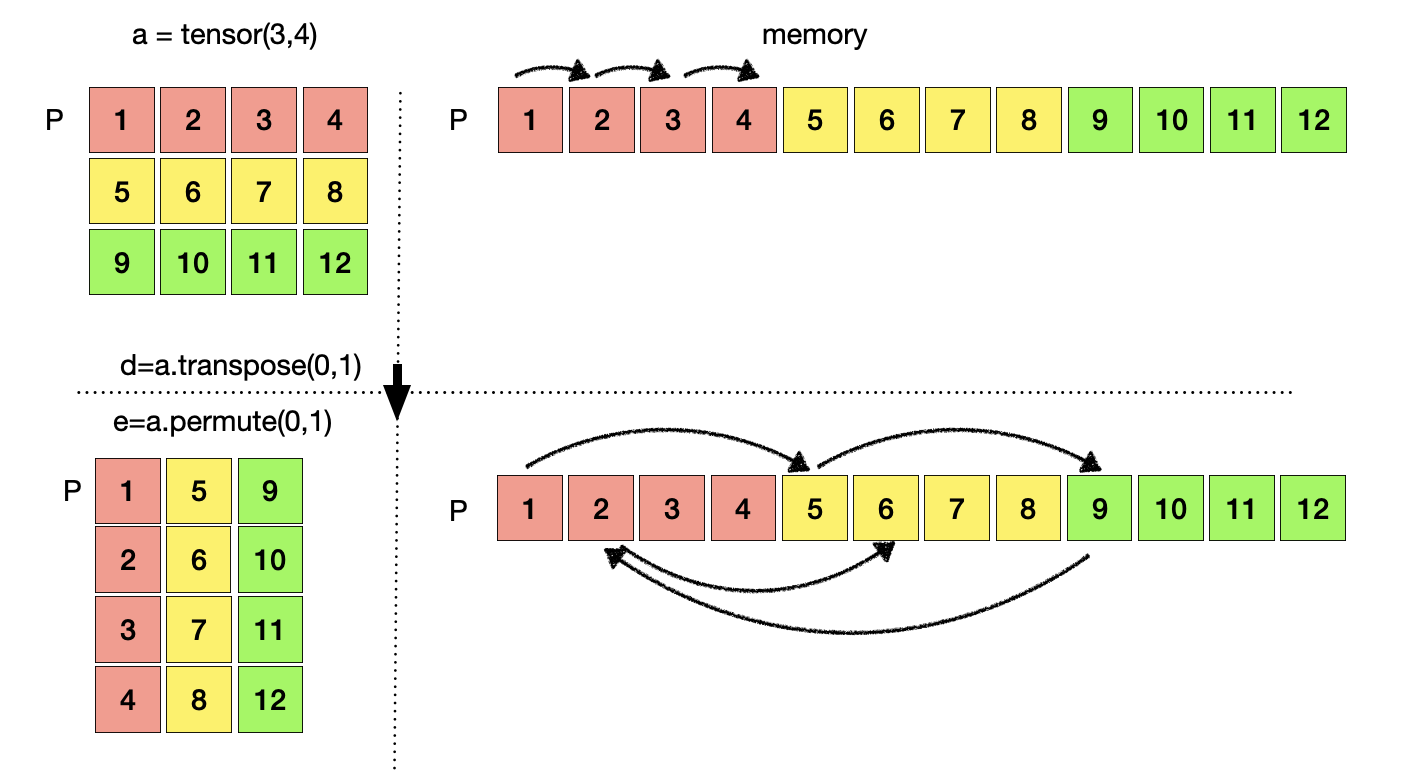
This efficiency, however, can lead to a classic pitfall for developers. Because the logical order of elements changes while the physical memory layout does not, combining these operations with view() or reshape() can produce unexpected results.
This is best understood with a practical example, which is perfectly captured in the following Stack Overflow discussion.
Pytorch different outputs between with transpose - Stack Overflow
This Stack Overflow thread addresses a common point of confusion: why transposing a tensor before reshaping it gives a different result than just reshaping it directly. This is a critical concept for writing correct code.
Please read the second answer on the page (by user 'Shai'). Focus on the code example that uses torch.arange(). It creates a tensor with easily traceable numbers, making it obvious how transpose changes the logical order of the elements before the view operation is applied.
Let's walk through the core of that example. We create a tensor where we can easily track the elements:
# Shape: (batch=1, length=9, channels=2)
A = torch.arange(18).view(1, 9, 2)
print("Original Tensor A:\n", A)
The first channel contains even numbers [0, 2, ..., 16] and the second contains odd numbers [1, 3, ..., 17]. Imagine we want to reshape this into a (1, 2, 3, 3) tensor, representing two 3x3 "images".
The Correct Way: First, permute the axes to bring the channels dimension forward, then reshape.
# Swap dimensions 1 (length) and 2 (channels)
# New shape is (1, 2, 9)
B = A.permute(0, 2, 1)


# Now reshape this into two 3x3 tensors
B_reshaped = B.view(1, 2, 3, 3)
print("\nCorrectly Transposed and Reshaped:\n", B_reshaped)
Notice how the first 3x3 matrix contains only the even numbers, and the second contains only the odd numbers. This is the logically correct outcome.
The Incorrect Way: Reshape directly without transposing.
# Incorrectly reshaping the original tensor
C_reshaped = A.view(1, 2, 3, 3)
print("\nIncorrectly Reshaped directly:\n", C_reshaped)
Here, the even and odd numbers are mixed together within each 3x3 matrix because we didn't reorder the elements logically before applying the view. The view operation simply laid out the original contiguous block of memory [0, 1, 2, 3, ...] into the new shape.
To avoid this, if you need to use view() after a transpose() or permute(), you can first force the tensor to become contiguous in memory by calling .contiguous():
# This forces a memory copy to make the tensor contiguous before viewing
# It produces the same correct result as B_reshaped
B_contiguous_view = B.contiguous().view(1, 2, 3, 3)
Conclusion
You now have the tools to confidently reorder tensor dimensions for any situation.
Key Takeaways:
tensor.transpose(dim0, dim1)swaps exactly two specified axes and is a view operation.tensor.permute(dims)reorders all axes according to the specified new order and is also a view operation.transpose()is a specialized version of the more generalpermute().- Because these operations create non-contiguous views, they change the logical order of elements. Applying
reshape()orview()afterwards can lead to unexpected results if this is not accounted for. - When in doubt, use
.contiguous().view(...)after a transpose/permute to ensure the memory layout matches the logical layout before applying a view, though be aware this may create a data copy.
Preview of the Next Lesson:
We have one final topic in this module on manipulating tensor shapes: flattening. In the next lesson, we will explore flatten() and ravel(), two methods for collapsing a tensor into one dimension. We'll examine their subtle differences, particularly regarding their view vs. copy behavior, which will complete your toolkit for tensor shape manipulation.