Welcome back. In our previous lesson, we professionalized our local development stack by separating configuration from our service definitions using a .env file. With our PostgreSQL, Airflow, and Kafka services now running and configured securely, the next logical step is to verify that we can actually communicate with them.
This lesson focuses on the heart of our data persistence layer: the PostgreSQL database. Our goal is to connect a local SQL client to the running container, confirm that it's accessible, and learn how to inspect its internal structure. This is a fundamental skill for any data engineer—a quick "health check" to ensure the foundation of your pipeline is solid before you start building on top of it. Given your proficiency with PostgreSQL, this process will feel familiar, with the main new element being how we target a service running inside a Docker container.
Understanding Container Networking and Port Mapping
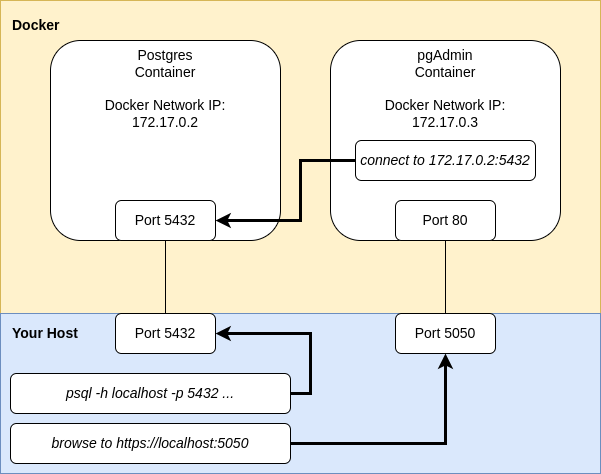
Before we connect, let's quickly revisit how Docker networking allows us to access our database. In our docker-compose.yml, we have a ports section for our postgres-db service:
services:
  postgres-db:


    # ... other config ...
    ports:
      - "${POSTGRES_PORT}:5432"
This line is the bridge between your host machine (your laptop) and the isolated network inside Docker.
- The number on the right (
5432) is the port that PostgreSQL is listening on inside the container. This is the standard, default port for PostgreSQL. - The variable on the left (
${POSTGRES_PORT}) is the port on your host machine that Docker will forward traffic from. We defined this in our.envfile, likely as5432.
When you connect from a client on your host machine (like a GUI tool), you target localhost and the host port. However, when services inside the Docker network need to communicate (e.g., Airflow connecting to Postgres), they use the service name (postgres-db) and the container port (5432).
The diagram below illustrates this concept perfectly. Your local tools connect via localhost and the mapped port, while containers on the same Docker network communicate directly using service names.
Connecting with a SQL Client
You're already familiar with using SQL clients, so we'll focus on the specific connection parameters for our containerized database. You can use any client you prefer, such as DBeaver, DataGrip, TablePlus, or pgAdmin. The settings will be the same across all of them.
Here are the details you'll need, which correspond to the variables in your .env file:
- Host:
localhost(or127.0.0.1) - Port: The value of
POSTGRES_PORTfrom your.envfile (e.g.,5432). - Database: The value of
POSTGRES_DB(e.g.,pipeline_db). - Username: The value of
POSTGRES_USER(e.g.,postgres). - Password: The value of
POSTGRES_PASSWORD(e.g.,postgres).
The following image shows an example of this configuration in a typical SQL client, alongside the docker-compose.yml file that defines the port mapping.

For a visual guide on setting this up, the following video provides a clear demonstration using pgAdmin. The principles are identical regardless of the specific client you use.
Run Postgres in a Docker Container (Easiest PostgreSQL Setup)
This video from Caleb Curry demonstrates how to connect to a containerized PostgreSQL database using a GUI tool.
Watch the segment from the demonstration, where the presenter configures a new server connection in pgAdmin, paying close attention to the host, port, username, and password fields.
If you prefer a text-based walkthrough, the following article provides a step-by-step guide.
PostgreSQL in Docker: A Step-by-Step Guide for Beginners
This article from DataCamp provides clear instructions for connecting to a PostgreSQL container. We'll focus on the GUI client section.
Read the section titled "Connecting using a GUI tool". It walks through setting up the connection in pgAdmin, which serves as a great example for any graphical client.
What If It Doesn't Work? Troubleshooting Connectivity
Sometimes connections fail. This is a normal part of development, and knowing how to debug it is a crucial skill. If you can't connect, work through this checklist methodically:
-
Is the container actually running?
Open your terminal in the project directory and rundocker compose ps. You should see thepostgres-dbservice with a status ofrunningorup. If not, it may have failed to start. -
Check the container logs for errors.
If the container isn't running, or if you suspect a problem, check its logs:docker compose logs postgres-db. Look for any error messages, especially ones related to password variables or initialization. -
Verify the port mapping.
Confirm which host port is mapped to the container's port 5432 by running:docker compose port postgres-db 5432. The output should be something like0.0.0.0:5432, confirming the port is exposed. -
Double-check your connection settings.
Carefully review the host, port, database, username, and password in your SQL client. A simple typo is a very common cause of connection failure. Make sure they exactly match what's in your.envfile.
The article we just looked at also has an excellent section on troubleshooting. It's a valuable resource to have on hand.
PostgreSQL in Docker: A Step-by-Step Guide for Beginners
This section of the DataCamp article provides a practical guide to diagnosing and fixing common connection problems.
Please read the subsection titled "Resolving connectivity issues". Focus on the commands provided to check the container status (docker ps), port mapping (docker port), and connection parameters.
Inspecting Database Objects with information_schema
Once connected, you can, of course, browse schemas and tables using your client's UI. However, as a data engineer who is proficient in SQL, you have a more powerful and scriptable method at your disposal: the information_schema.
The information_schema is a standard, read-only schema that exists in all SQL-compliant databases, including PostgreSQL and MySQL. It contains a set of views that provide metadata about the database itself—its schemas, tables, columns, constraints, and more. Querying the information_schema is an essential skill for automating database documentation, generating validation scripts, or simply exploring a database programmatically.
How to Use PostgreSQL’s Information Schema to Explore Your Database Structure in Depth
This article from Cybrosys gives an excellent overview of the information_schema and why it's so useful.
Start by reading the introductory section What is information_schema?. Then, review the summary of its benefits in the section Why Use information_schema? and the short Conclusion.
Now, let's put this into practice. Run these queries in your SQL client to explore our currently empty database.
1. List all schemas:
The information_schema.schemata view lists all schemas in the database. You'll see public and system schemas like pg_catalog and information_schema itself.
SELECT schema_name
FROM information_schema.schemata;
2. List all tables:
The information_schema.tables view contains information about all tables and views. At this point, you won't see any user-defined tables, but this query will be essential later on.
SELECT table_schema, table_name, table_type
FROM information_schema.tables
WHERE table_schema = 'public';
3. List columns for a (future) table:
The information_schema.columns view describes all columns in all tables. While we don't have tables yet, this is the query you would use to inspect a table's structure. For example, to inspect a hypothetical users table:
SELECT column_name, data_type, is_nullable, column_default
FROM information_schema.columns
WHERE table_schema = 'public' AND table_name = 'users';
Since you have a strong SQL background, you can see how these queries form the building blocks for more complex introspection, such as finding all tables without a primary key or identifying all columns of a specific data type.
Conclusion
In this lesson, we successfully bridged the gap between our local machine and the services running inside Docker. You've verified your ability to connect to the containerized PostgreSQL database and learned a powerful, SQL-native way to inspect its structure.
Here are the key takeaways:
- Connections from your host machine use
localhostand the port mapped in yourdocker-compose.ymlfile. - A systematic troubleshooting checklist (
docker compose ps,logs,port, and checking credentials) can solve most connectivity issues. - The
information_schemaprovides a standardized, queryable interface for exploring database metadata, a crucial tool for data engineering tasks.
Now that we've confirmed we can talk to our database from the outside, our next step is to ensure our services can talk to each other on the inside. In the following lesson, we will focus on managing the connections and secrets that our Airflow service will use to communicate with both PostgreSQL and Kafka, setting the stage for orchestrating our first data pipeline.