Welcome back! In our last lesson, we successfully assembled a docker-compose.yml file to launch our entire local data engineering stack. While functional, our current setup has a significant flaw: we've hardcoded sensitive information, such as database credentials, directly into our configuration file. This is a practice we must avoid.
This lesson tackles that problem head-on. We will refactor our configuration to separate secrets and environment-specific settings from our core service definitions. You will learn how to use a .env file to manage these variables, a fundamental practice for creating secure, flexible, and portable applications. By the end, our docker-compose.yml will be clean of sensitive data, and you'll have a robust method for managing configuration that you can apply to any project.
The Problem with Hardcoded Secrets
Before we change our files, it's crucial to understand why hardcoding configuration is so problematic. When you commit a file with passwords, API keys, or other credentials to a version control system like Git, those secrets become part of the project's history. Anyone with access to the repository, now or in the future, can see them.
This creates a major security risk. Automated tools constantly scan public repositories on sites like GitHub for accidentally committed secrets. Even in private repositories, it exposes sensitive data to a wider group of people than necessary. A small mistake, like a debugging page that displays environment variables, can lead to a catastrophic leak of credentials.
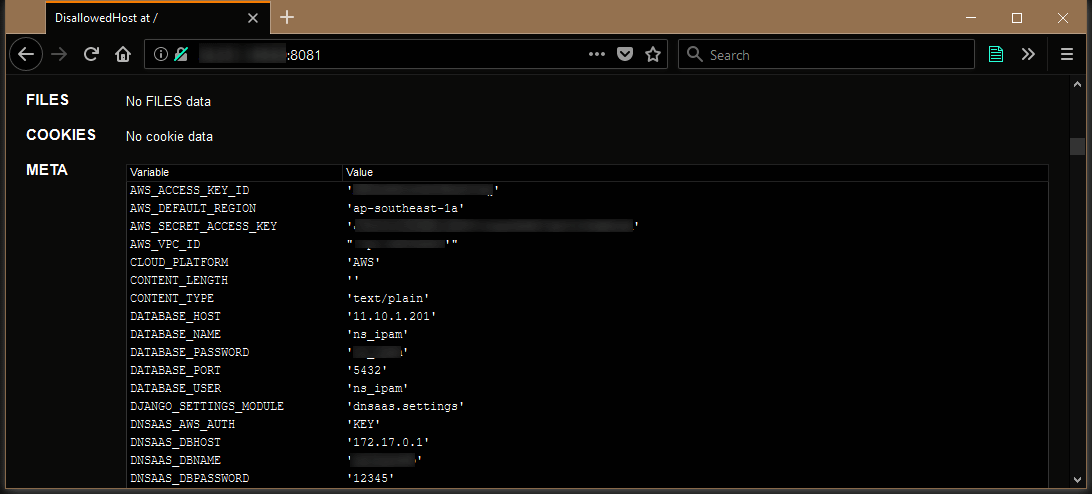
An example of how a web application error can inadvertently expose sensitive environment variables, including database and cloud service credentials, if they are not managed securely.
The video below explains this problem clearly and sets the stage for the solution we're about to implement.
Environment Variables in Docker Compose: Secure Your Secrets!
Watch the beginning of this video from "Environment Variables in Docker Compose" by Oluwaseun Alausa.
Pay close attention to the speaker's explanation of the risks associated with hardcoding passwords in the docker-compose.yml file, especially in the context of using a version control system like GitHub. Watch from the start until the end of the introduction.
The solution is to decouple configuration from our code. For our local development stack, the standard tool for this is the .env file.
Introducing the .env File
A .env file (short for "environment") is a simple text file used to define environment variables for your application. By default, Docker Compose looks for a file named .env in the root of your project directory and makes the variables defined within it available for use in your docker-compose.yml file.
The core principles are:
- Centralize Configuration: All environment-specific variables are in one place.
- Isolate Secrets: The
.envfile contains sensitive data. - Keep it Local: The
.envfile is never committed to version control. It should always be listed in your project's.gitignorefile.
Let's create our .env file now. In the root of your project directory (the same place as your docker-compose.yml), create a new file named .env.
The syntax is straightforward: KEY=VALUE, with one variable per line. Lines starting with # are comments.
# .env

# PostgreSQL Configuration
POSTGRES_DB=pipeline_db
POSTGRES_USER=postgres
POSTGRES_PASSWORD=postgres
POSTGRES_PORT=5432

# Airflow Configuration
AIRFLOW_UID=1000 # Use your local user ID to avoid permission issues
AIRFLOW_WEB_PORT=8080

# Kafka UI Port
KAFKA_UI_PORT=8081
A quick note on AIRFLOW_UID: In Unix-like systems, files have user and group ownership. When we mount local directories (like dags, logs) into a Docker container, permission issues can arise if the user inside the container doesn't have the same User ID (UID) as your user on the host machine. By setting this as a variable, we can configure the Airflow container to run with your UID, ensuring it can write logs without problems. You can find your UID by running the id -u command in your terminal. For most single-user Linux or macOS systems, this is 1000.
Refactoring docker-compose.yml with Variable Substitution
Now that we have our variables defined, we can replace the hardcoded values in docker-compose.yml with references to these variables. This process is called variable substitution or interpolation. Docker Compose uses the ${VARIABLE_NAME} syntax for this.
Let's refactor our postgres-db service first.
Before:
services:
  postgres-db:
    image: postgres:15
    environment:
      - POSTGRES_USER=postgres
      - POSTGRES_PASSWORD=postgres
      - POSTGRES_DB=pipeline_db
    ports:
      - "5432:5432"
After:
services:
  postgres-db:
    image: postgres:15
    environment:
      - POSTGRES_USER=${POSTGRES_USER}
      - POSTGRES_PASSWORD=${POSTGRES_PASSWORD}
      - POSTGRES_DB=${POSTGRES_DB}
    ports:
      - "${POSTGRES_PORT}:5432"
Notice how much cleaner and more abstract the "After" version is. It no longer contains any specific values. Instead, it references the variables we defined in .env.
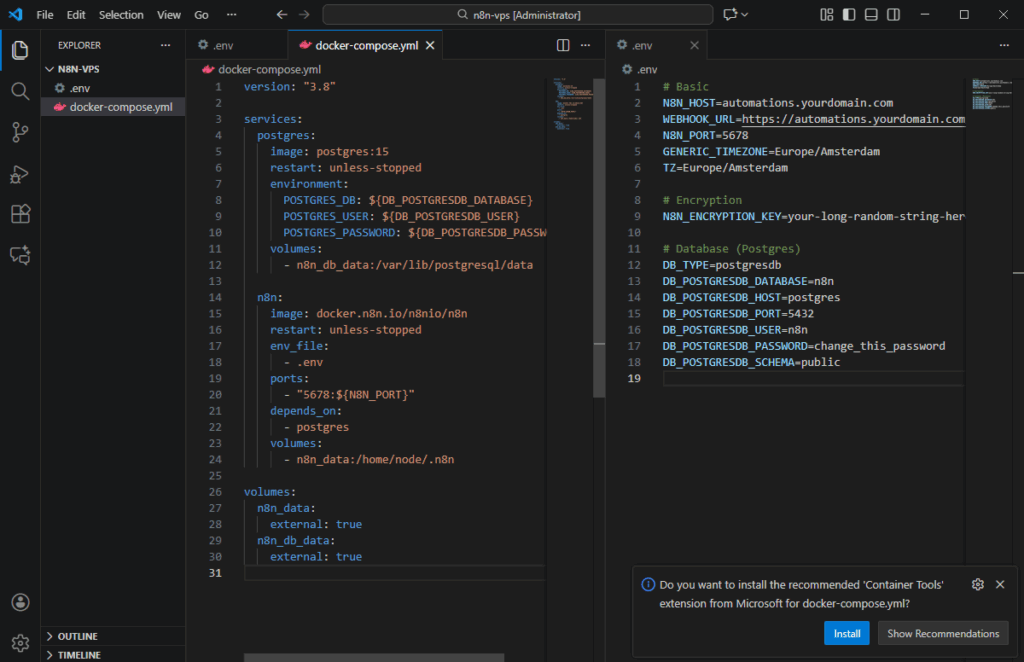
This image illustrates how a docker-compose.yml file (left) references variables like ${DB_POSTGRESDB_DATABASE} which are defined with their actual values in a separate .env file (right). This separates configuration from the service definition.
Now, let's apply this to our Airflow services. The most important change is the database connection string. Instead of a long, hardcoded string, we can construct it dynamically from our Postgres variables.
Update the environment section for both airflow-webserver and airflow-scheduler services like this:
# In airflow-webserver, airflow-scheduler, and airflow-init services
    environment:
      - AIRFLOW__DATABASE__SQL_ALCHEMY_CONN=postgresql+psycopg2://${POSTGRES_USER}:${POSTGRES_PASSWORD}@postgres-db:5432/${POSTGRES_DB}
      - AIRFLOW__CORE__EXECUTOR=LocalExecutor
      - AIRFLOW__CORE__LOAD_EXAMPLES=False
In the airflow-webserver service, also update the ports mapping:
# In airflow-webserver service
    ports:
      - "${AIRFLOW_WEB_PORT}:8080"
And finally, update the kafka-ui port:
# In kafka-ui service
    ports:
      - "${KAFKA_UI_PORT}:8080"
The following video provides a great walkthrough of this entire process.
Environment Variables in Docker Compose: Secure Your Secrets!
Watch this segment from "Environment Variables in Docker Compose" to see the refactoring in action.
Focus on how the speaker creates the .env file with key-value pairs and then modifies the docker-compose.yml to use the ${VARIABLE} syntax. Note the emphasis on adding the .env file to .gitignore. Watch the clip from this timestamp.
Verifying Your Configuration
Before launching your services, you can check if Docker Compose is correctly interpreting your variables using the config command:
docker compose config
This command will parse your .env and docker-compose.yml files, perform the substitutions, and print the resulting configuration to the terminal. It's a fantastic way to debug your setup without having to start any containers. You should see the actual values from your .env file printed in the output.
Expanding Your Toolkit: Default and Required Variables
Docker Compose offers more powerful interpolation syntax that can make your configurations even more robust. While we won't implement all of them now, it's good to be aware of two particularly useful patterns.
-
Default Values:
${VARIABLE:-default}
This syntax provides a fallback value. IfVARIABLEis not set in the.envfile or is empty,defaultwill be used instead. This is great for non-critical values like ports.
Example:ports: - "${AIRFLOW_WEB_PORT:-8080}:8080" -
Required Values:
${VARIABLE:?error message}
This syntax enforces that a variable must be set and non-empty. If it isn't, Docker Compose will stop and print the customerror message. This is essential for critical secrets like passwords, preventing the application from starting in an insecure or broken state.
Example:POSTGRES_PASSWORD=${POSTGRES_PASSWORD:?Error: POSTGRES_PASSWORD is not set. Please check your .env file.}
To learn more about these and other substitution options, the official Docker documentation is the best resource.
Set, use, and manage variables in a Compose file with interpolation
This official Docker documentation provides a comprehensive guide to variable substitution.
First, review the Interpolation syntax section to see the full range of supported formats, including the default and required value syntaxes we just discussed. Then, read the section titled .env file syntax to understand the rules for formatting your .env file, such as how comments and quotes are handled.
The Final, Crucial Step: .gitignore
We've mentioned this several times, but it bears repeating: your .env file should never be committed to version control.
To ensure this, you must add it to your project's .gitignore file. If you don't have this file in your project root yet, create it now. Then, add the following line:
# .gitignore

.env
This tells Git to ignore the .env file, preventing you from accidentally committing it.
As a best practice, you can create a template file, often called .env.example, that is committed to version control. This file lists all the required environment variables but with placeholder or empty values. It serves as documentation for anyone (including your future self) setting up the project.
.env.example (Committed to Git):
# .env.example
# Copy this file to .env and fill in the values.

POSTGRES_DB=
POSTGRES_USER=
POSTGRES_PASSWORD=
POSTGRES_PORT=5432
AIRFLOW_UID=1000
AIRFLOW_WEB_PORT=8080
KAFKA_UI_PORT=8081
Conclusion
In this lesson, we took a critical step towards a professional development workflow. By separating configuration from our service definitions, we've made our setup more secure, flexible, and easier to manage.
Here are the key takeaways:
- Never hardcode secrets: Committing passwords or API keys to version control is a major security vulnerability.
- Use
.envfiles for configuration: Docker Compose automatically loads variables from a.envfile in the project root. - Use variable substitution: The
${VARIABLE}syntax allows you to inject configuration into yourdocker-compose.ymlfile. - Always
.gitignoreyour.envfile: This is a non-negotiable rule to prevent secrets from leaking. - Provide a
.env.examplefile: This documents the required configuration for other developers.
With your services now securely configured, it's time to interact with them. In the next lesson, we will connect a SQL client to our running PostgreSQL container, allowing us to directly inspect the database, create tables, and verify that our pipeline's foundation is solid.