Hello! Welcome back.
In our last lesson, we laid out the complete "blueprint" for our project by creating a logical directory structure. We now have a designated home for our Airflow DAGs, dbt models, and Python ingestion scripts. However, a blueprint is just a plan. Today, we will start building the house.
This lesson is all about breathing life into our project structure with Docker Compose. We will write the docker-compose.yml file that defines and configures the core services of our data pipeline: a PostgreSQL database for storage, Apache Kafka for streaming, and Apache Airflow for orchestration. By the end of this lesson, you will have a single command that can launch your entire local data engineering stack, turning our static folder structure into a dynamic, running environment.
The Role of Docker Compose
Before we start writing code, let's clarify what Docker Compose is and why it's essential for our project. As you know, our pipeline requires several independent software components to work together. We need a database, a message broker, and an orchestrator. Running each of these manually on your local machine would be complex and prone to conflicts.
Docker Compose solves this by allowing us to define and manage a multi-container application in a single YAML file. It handles the creation of containers, the configuration of services, and the networking between them. This declarative approach ensures that your development environment is reproducible, portable, and isolated.
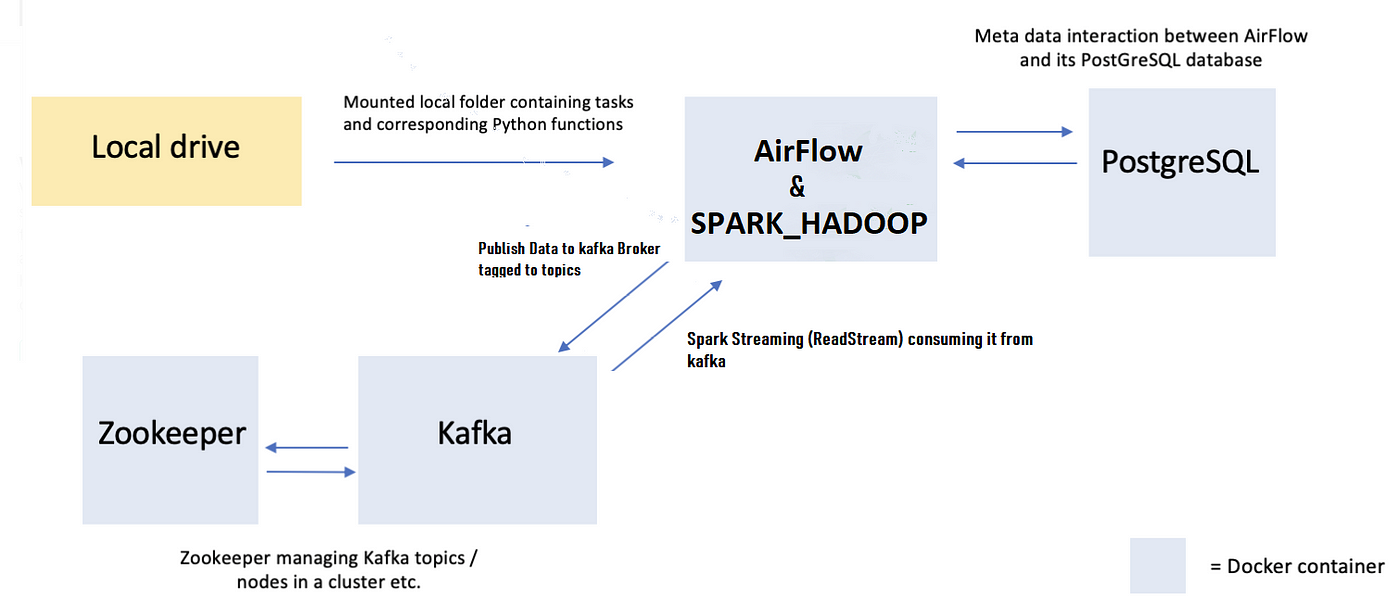
At a high level, a Docker Compose file is structured around three key concepts:
services: These are the individual containers that make up your application (e.g.,postgres,airflow-webserver).networks: These define the communication channels that allow services to discover and talk to each other.volumes: These are used to persist data generated by containers (like database files) or to mount local files into a container (like your Airflow DAGs).
You can get a great overview of these concepts in the article "Building a Real-Time Data Pipeline".
Building a Real-Time Data Pipeline with Kafka, Spark, Airflow, and S3 | by Jason O. | Medium
This article provides an excellent breakdown of a similar data stack. We'll be referencing it for some of the more complex service definitions.
To start, please read the section titled "4. Docker Compose". Focus on the high-level explanation of how the file is organized into service groups and the role of networks and volumes. Don't worry about the specific Spark or S3 details for now.
Now, let's build our docker-compose.yml file, service by service.
1. The PostgreSQL Service
We'll start with the most straightforward component: our PostgreSQL database. Since you're already familiar with PostgreSQL, you'll find this configuration intuitive. We are simply telling Docker to run a standard PostgreSQL image and configuring it with the necessary credentials and a persistent storage location.
Here is what the service definition looks like in docker-compose.yml:
version: '3.8'

services:
  postgres-db:
    image: postgres:15
    container_name: postgres-db
    restart: always
    environment:
      - POSTGRES_USER=postgres
      - POSTGRES_PASSWORD=postgres
      - POSTGRES_DB=pipeline_db
    ports:
      - "5432:5432"
    volumes:
      - postgres_data:/var/lib/postgresql/data
Let's break this down:
image: postgres:15: This tells Docker to pull version 15 of the official PostgreSQL image from Docker Hub.environment: This section sets environment variables inside the container. Thepostgresimage uses these to initialize the database with a default user, password, and database name.ports: - "5432:5432": This maps port 5432 on your host machine to port 5432 inside the container, allowing you to connect to the database from a local client likepsqlor DBeaver.volumes: - postgres_data:/var/lib/postgresql/data: This is critical for data persistence. It tells Docker to create a named volume calledpostgres_dataand mount it to the directory where PostgreSQL stores its data. Without this, you would lose all your data every time you stopped the container.
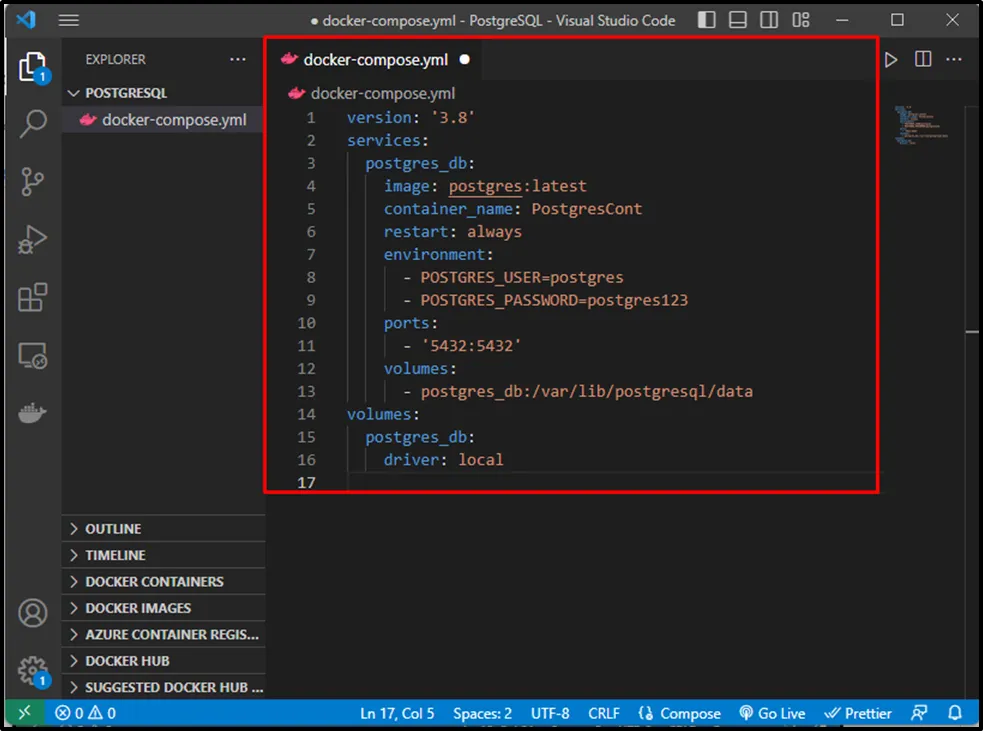
For a practical demonstration of setting up this service, the following video clip is very helpful.
How to build an automated data pipeline using Airflow, dbt, Postgres, and Superset (Windows 11 WSL)
This video walks through building a similar pipeline and includes a clear, step-by-step guide to writing the Docker Compose file.
Watch the segment from this clip where the author defines the database service. Note how they specify the image, ports, environment variables, and volumes, just as we have.
Finally, to make the postgres_data volume work, we need to declare it at the bottom of our docker-compose.yml file:
volumes:
  postgres_data:
    driver: local
2. The Kafka Service
Next up is Apache Kafka. Setting up Kafka can be complex due to its distributed nature. Historically, it required a separate component called Zookeeper for coordination. However, modern versions can run in a "KRaft" mode, which simplifies the setup significantly. That is the approach we will take.
We will also add a web-based user interface for Kafka, which will be incredibly useful for inspecting topics and messages during development.
Here are the service definitions for Kafka and its UI:
services:


  # ... postgres-db service from above

  kafka:
    image: 'bitnami/kafka:3.6'
    container_name: kafka
    ports:
      - "9092:9092"
    environment:
      - KAFKA_ENABLE_KRAFT=yes
      - KAFKA_CFG_PROCESS_ROLES=broker,controller
      - KAFKA_CFG_CONTROLLER_LISTENER_NAMES=CONTROLLER
      - KAFKA_CFG_LISTENERS=PLAINTEXT://:9093,CONTROLLER://:9094,EXTERNAL://:9092
      - KAFKA_CFG_ADVERTISED_LISTENERS=PLAINTEXT://kafka:9093,EXTERNAL://localhost:9092
      - KAFKA_CFG_LISTENER_SECURITY_PROTOCOL_MAP=CONTROLLER:PLAINTEXT,EXTERNAL:PLAINTEXT,PLAINTEXT:PLAINTEXT
      - KAFKA_CFG_INTER_BROKER_LISTENER_NAME=PLAINTEXT
      - KAFKA_CFG_NODE_ID=1
      - KAFKA_CFG_CONTROLLER_QUORUM_VOTERS=1@kafka:9094
    volumes:
      - kafka_data:/bitnami/kafka

  kafka-ui:
    image: provectuslabs/kafka-ui:latest
    container_name: kafka-ui
    ports:
      - "8081:8080"
    depends_on:
      - kafka
    environment:
      KAFKA_CLUSTERS_0_NAME: local-cluster
      KAFKA_CLUSTERS_0_BOOTSTRAPSERVERS: kafka:9093
This looks more complicated, so let's focus on the key parts:
image: 'bitnami/kafka:3.6': We use a popular and well-maintained image from Bitnami.KAFKA_ENABLE_KRAFT=yes: This is the magic flag that tells Kafka to run without Zookeeper.- Listeners Configuration: The
KAFKA_CFG_LISTENERSandKAFKA_CFG_ADVERTISED_LISTENERSvariables are the most crucial and often confusing part. They configure how Kafka communicates. We define two listeners:- An
EXTERNALlistener on port9092for your host machine to connect to (e.g., from a Python script on your laptop). - A
PLAINTEXTlistener on port9093for other Docker containers to connect to (e.g., from Airflow or our future streaming consumer). The hostnamekafkawill be resolvable within our Docker network.
- An
kafka-uiservice: This simple service runs a web UI. Its environment variableKAFKA_CLUSTERS_0_BOOTSTRAPSERVERS: kafka:9093tells it how to find the Kafka broker on the internal Docker network.
Don't forget to declare the new kafka_data volume at the bottom of the file.
3. The Airflow Services
This is the most intricate part of our setup. A functional Airflow installation consists of multiple components that work together:
- Metadata Database: Stores all of Airflow's state. We will use our
postgres-dbservice for this. - Webserver: The user interface where you can monitor and manage your DAGs.
- Scheduler: The daemon process that triggers DAG runs and orchestrates tasks.
- Init Service: A one-time container that initializes the database schema and creates an admin user.
We will define three services in our docker-compose.yml for Airflow: airflow-init, airflow-webserver, and airflow-scheduler. They will all be based on the official apache/airflow image.
services:


  # ... postgres and kafka services

  airflow-init:
    image: apache/airflow:2.8.1
    container_name: airflow-init
    depends_on:
      - postgres-db
    environment:
      - AIRFLOW__DATABASE__SQL_ALCHEMY_CONN=postgresql+psycopg2://postgres:postgres@postgres-db:5432/pipeline_db
      - AIRFLOW__CORE__EXECUTOR=LocalExecutor
    command: >
      bash -c "
        airflow db init &&
        airflow users create \
          --username admin \
          --password admin \
          --firstname Anonymous \
          --lastname User \
          --role Admin \
          --email admin@example.com
      "
    restart: on-failure

  airflow-webserver:
    image: apache/airflow:2.8.1
    container_name: airflow-webserver
    restart: always
    depends_on:
      - airflow-init
    ports:
      - "8080:8080"
    volumes:
      - ./airflow/dags:/opt/airflow/dags
      - ./airflow/logs:/opt/airflow/logs
      - ./airflow/plugins:/opt/airflow/plugins
    environment:
      - AIRFLOW__DATABASE__SQL_ALCHEMY_CONN=postgresql+psycopg2://postgres:postgres@postgres-db:5432/pipeline_db
      - AIRFLOW__CORE__EXECUTOR=LocalExecutor
      - AIRFLOW__CORE__LOAD_EXAMPLES=False
    command: airflow webserver

  airflow-scheduler:
    image: apache/airflow:2.8.1
    container_name: airflow-scheduler
    restart: always
    depends_on:
      - airflow-init
    volumes:
      - ./airflow/dags:/opt/airflow/dags
      - ./airflow/logs:/opt/airflow/logs
      - ./airflow/plugins:/opt/airflow/plugins
    environment:
      - AIRFLOW__DATABASE__SQL_ALCHEMY_CONN=postgresql+psycopg2://postgres:postgres@postgres-db:5432/pipeline_db
      - AIRFLOW__CORE__EXECUTOR=LocalExecutor
      - AIRFLOW__CORE__LOAD_EXAMPLES=False
    command: airflow scheduler
Key points here:
depends_on: This ensures services start in the correct order. Theairflow-initjob waits for Postgres, and the webserver/scheduler wait for theinitjob to complete.AIRFLOW__DATABASE__SQL_ALCHEMY_CONN: This is the connection string Airflow uses to find its metadata database. Notice it points topostgres-db:5432—this is service name discovery in action!volumes: This is where we link our local project structure to Airflow. We mount our local./airflow/dagsfolder into the container's/opt/airflow/dagsdirectory. Any.pyfile you save in your localdagsfolder will now be automatically picked up by the Airflow scheduler.command: Each service has a different command to run the corresponding Airflow process (db init,webserver,scheduler).
4. Tying It Together with a Network
Finally, to allow all these services to communicate using their names (e.g., postgres-db, kafka), we need to connect them to a shared network.
First, we define the network at the bottom of the file:
networks:
  data-pipeline-net:
    driver: bridge
Then, we add a networks key to every single service we've defined:
services:
  postgres-db:


    # ... other properties
    networks:
      - data-pipeline-net

  kafka:


    # ... other properties
    networks:
      - data-pipeline-net


  # ... and so on for all other services
This creates a private network where containers can find each other by their service name, which is a much more robust solution than relying on IP addresses.
Conclusion
Congratulations! We've just assembled the core of our local development environment. You now have a complete docker-compose.yml file that defines our three essential services—PostgreSQL, Kafka, and Airflow—and configures them to work together.
Here are the key takeaways:
- Docker Compose is Declarative: We describe the desired state of our application (services, networks, volumes) in a YAML file.
- Services Communicate via Networks: A shared Docker network allows services to discover each other using their names, like
postgres-db. - Volumes Ensure Persistence: We use volumes to persist our PostgreSQL data and to sync our local
dagsfolder with the Airflow container. - Configuration is Key: Environment variables are used extensively to configure the behavior of each service, from database credentials to Airflow's executor.
You can now place this complete docker-compose.yml file in the root of your project directory. Running docker-compose up from your terminal will build and start all the services.
Next time
While our current setup is functional, you might have noticed we've hardcoded sensitive information like database passwords directly into the docker-compose.yml file. This is not ideal. In our next lesson, we will address this by learning how to manage configurations and secrets cleanly using a .env file, making our setup more secure and flexible.