Welcome back! In our last lesson, you successfully authored a self-contained Python script to handle data ingestion from an API. This script represents a crucial piece of our pipeline's logic, encapsulating the extract, transform, and load steps for a single source.
Today, we'll take that functional script and elevate it into a managed, orchestrated workflow. This lesson's goal is to create your first Apache Airflow DAG (Directed Acyclic Graph). You will learn how to use the PythonOperator to take your standalone API and CSV ingestion scripts and make them tasks within a larger, cohesive pipeline that Airflow can monitor, schedule, and execute. This step is the very essence of orchestration and a major milestone in building your data engineering pipeline.
From Script to Orchestrated Task
In the previous lesson, we created our ingestion logic in a separate Python file. This was a deliberate design choice. Airflow's philosophy encourages separating the "what" (the business logic in your Python functions) from the "how" and "when" (the orchestration and scheduling defined in the DAG).
A DAG is simply a Python file that defines your workflow's structure. It doesn't contain the core business logic itself; rather, it defines the tasks and the dependencies between them. The primary tool we'll use to bridge the gap between our DAG and our Python code is the PythonOperator.
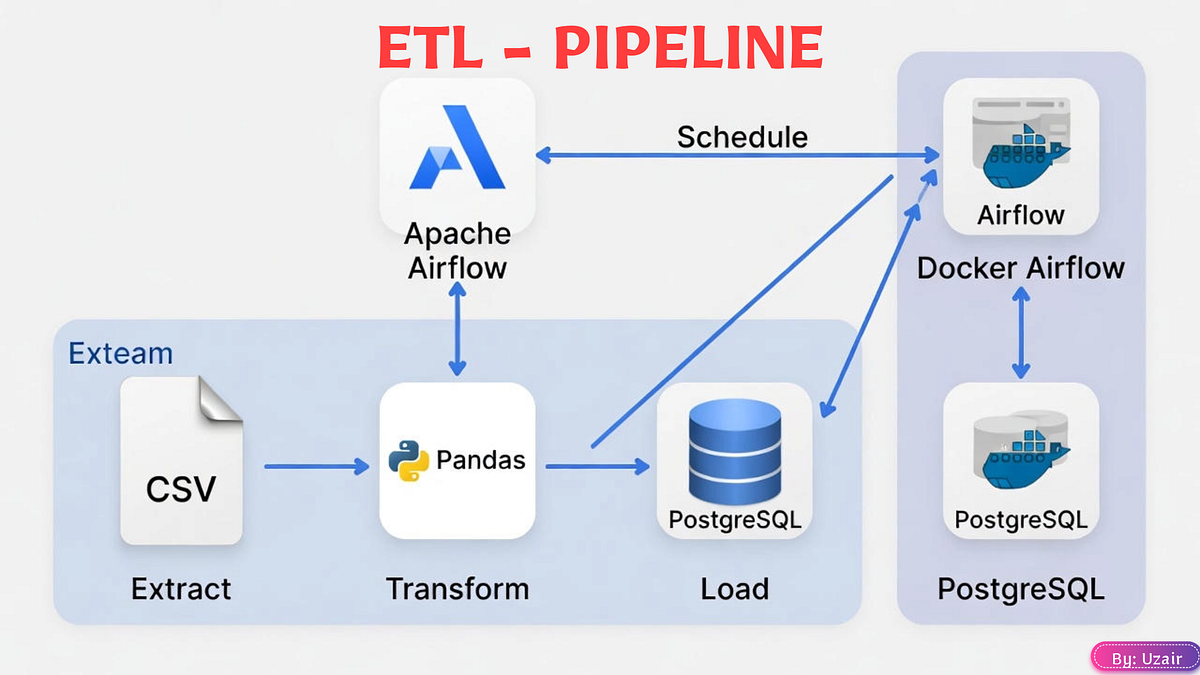
This diagram illustrates the high-level goal. Apache Airflow acts as the scheduler and orchestrator, triggering the Python/Pandas transformation logic that moves data from a source (like a CSV or API) into your PostgreSQL database.
The Anatomy of a DAG File
Before writing our own, let's understand the basic structure of a DAG. It consists of a few key components:
- Imports: Bringing in necessary Airflow classes like
DAGandPythonOperator. - Default Arguments: A dictionary of default parameters (
default_args) that apply to all tasks in the DAG (e.g., owner, start date, retry policies). - DAG Instantiation: Defining the DAG object itself with a unique ID, schedule, and other high-level properties using a
with DAG(...) as dag:context manager. - Task Definitions: Instantiating operators for each unit of work. In our case, we'll be using the
PythonOperator. - Task Dependencies: Defining the order of execution for your tasks.
The article "Apache Airflow for Data Engineering" provides a clear, practical example of these components coming together.
Apache Airflow for Data Engineering: Best Practices and ...
This article provides an excellent, self-contained example of an ETL pipeline written as an Airflow DAG. It will help you visualize how the different components fit together.
Please read the section titled Writing DAG Definitions. Focus on how the PythonOperator is used to call the extract, transform, and load functions, and how the >> operator is used to set their execution order.
The example you just read defines the Python functions directly inside the DAG file. While this is fine for simple examples, the best practice for maintainability and testability is to keep your core logic in separate files, just as we have done. Let's see how to apply that principle.
The PythonOperator: Your Bridge to Python Code
The PythonOperator is one of the most fundamental and versatile operators in Airflow. Its sole purpose is to execute a Python callable (a function or method).
The video below from Astronomer, a company specializing in Airflow, gives a focused overview of the PythonOperator and reinforces the best practice of separating your logic from your DAG file.
Focus On: The Apache Airflow PythonOperator, all you need in 20 mins!
This video provides a concise guide to using the PythonOperator and demonstrates why separating your code is a good idea.
Please watch these two short segments: Basic Usage: Watch from the beginning to see the operator in its simplest form. Separating Logic: Watch the section from "make your dag much cleaner". This directly corresponds to the approach we're taking.
Orchestrating Your Ingestion Scripts
Now, let's build the DAG that will run the api_ingestion.py script you created. We will also add a placeholder for a csv_ingestion.py script to fully satisfy our learning goal.
A critical question arises: Your Airflow instance is running in a Docker container. How can it access and import a Python script located in a different directory within your project? The solution involves two steps:
- Mounting a Volume: We need to update our
docker-compose.yamlfile to "mount" our scripts directory into the Airflow container's filesystem, making the files accessible. - Updating Python's Path: Inside our DAG file, we'll temporarily add the path of our mounted scripts directory to
sys.path, allowing Python to find and import our modules.
This process is a common and essential pattern when working with Airflow in Docker. The following video demonstrates this exact scenario, showing how to configure the volume and update sys.path to orchestrate an external script.
How to build an automated data pipeline using Airflow, dbt, Postgres, and Superset (Windows 11 WSL)
This video segment provides a detailed walkthrough of the technical steps required to make an external Python script available to an Airflow DAG running in Docker.
Watch the segment from "call the main function" to "run them again." Pay close attention to the changes made in the docker-compose.yaml file (adding a volume) and in the DAG file (sys.path.append). You don't need to replicate the debugging steps, just understand the core solution.
Building the DAG
Following the pattern from the video, let's assume you have the following project structure:
your_project/
├── dags/
│   └── ingestion_dag.py
├── scripts/
│   ├── api_ingestion.py
│   └── csv_ingestion.py
└── docker-compose.yaml
First, you would update your docker-compose.yaml for the Airflow service to include the volume mount:
# In your docker-compose.yaml, inside the airflow service definition:
volumes:
  - ./dags:/opt/airflow/dags
  - ./scripts:/opt/airflow/scripts  # <-- Add this line
Important: After changing docker-compose.yaml, you must stop and restart your services with docker-compose down and docker-compose up.
Next, here is the complete code for ingestion_dag.py. This file orchestrates both the API and CSV ingestion tasks.
import sys
from datetime import datetime, timedelta
from airflow.models.dag import DAG
from airflow.operators.python import PythonOperator

# This is the path to your scripts directory within the Airflow container.
# It matches the volume mount you added in docker-compose.yaml.
sys.path.append('/opt/airflow/scripts')

# Now you can import the functions from your scripts
# We assume each script has a main callable function, e.g., 'run_task'.
from api_ingestion import run_api_ingestion # Renamed for clarity
from csv_ingestion import run_csv_ingestion # Assumes a similar function exists

# --- 1. Default Arguments ---
default_args = {
    'owner': 'airflow',
    'depends_on_past': False,
    'email_on_failure': False,
    'email_on_retry': False,
    'retries': 1,
    'retry_delay': timedelta(minutes=5),
}

# --- 2. DAG Definition ---
with DAG(
    dag_id='data_ingestion_pipeline',
    default_args=default_args,
    description='A simple DAG to ingest data from an API and a CSV file.',
    schedule_interval=None,  # We will cover scheduling in the next lesson
    start_date=datetime(2024, 1, 1),
    catchup=False,
    tags=['ingestion'],
) as dag:

    # --- 3. Task Definitions ---
    # Task to ingest data from the API
    ingest_api_data = PythonOperator(
        task_id='ingest_api_data',
        python_callable=run_api_ingestion,
    )

    # Task to ingest data from a CSV file
    ingest_csv_data = PythonOperator(
        task_id='ingest_csv_data',
        python_callable=run_csv_ingestion,
    )

    # --- 4. Task Dependencies ---
    # In this case, the two tasks are independent and can run in parallel.
    # Airflow will schedule them as resources become available.
    # If ingest_api_data had to run before ingest_csv_data, you would write:
    # ingest_api_data >> ingest_csv_data
With this file in your dags folder and your Docker containers running, Airflow will automatically discover and display your data_ingestion_pipeline DAG in the UI. You can then manually trigger it to see your ingestion scripts run as orchestrated tasks.
Conclusion
Congratulations! You have successfully transitioned from writing a standalone script to creating a fully orchestrated Airflow workflow. This is a fundamental skill for any data engineer.
Here are the key takeaways from today's lesson:
- DAGs for Orchestration: An Airflow DAG is a Python script that defines the structure and dependencies of your workflow, keeping it separate from the core business logic.
- The
PythonOperator: This operator is your primary tool for executing Python functions as distinct tasks within your DAG. - Separation of Concerns: Keeping ingestion logic in separate scripts (
scripts/) and DAGs in their own folder (dags/) leads to a cleaner, more maintainable, and testable project.
- Bridging Docker and Python: Using Docker volumes and modifying
sys.pathis the standard pattern for making your project's code accessible to the Airflow container. - Task Dependencies: While our tasks today were parallel, you now know the
>>syntax to define sequential dependencies when needed.
In our next lesson, we will bring your pipeline to life by exploring scheduling. You'll learn how to define a schedule for your DAG using cron expressions, transforming it from a manually triggered workflow into an automated, recurring process.