Welcome back! In the previous lesson, you successfully created your first Airflow DAG, taking your standalone Python ingestion scripts and orchestrating them as tasks. That DAG, however, required manual triggering. Today, we will automate it.
This lesson focuses on turning your manual workflow into an automated, time-based pipeline. We will cover two essential and interconnected concepts. First, you'll learn how to define a recurring schedule for your DAG using cron expressions. Second, and more importantly, we will dive into Airflow's data-interval semantics. Understanding this core concept—how Airflow thinks about time—is arguably the most critical step in mastering pipeline orchestration and avoiding common pitfalls.
Part 1: Setting a Schedule for Your DAG
In the last lesson, we set schedule_interval=None. To automate the DAG, we need to replace None with a definition of when and how often it should run. Airflow provides several ways to do this, most commonly with cron expressions, cron presets, or timedelta objects.
These are all passed to the schedule parameter of your DAG (or schedule_interval in versions before Airflow 2.4).
- Cron Expressions: A powerful, standard way to define schedules. A cron expression is a string of five fields representing minute, hour, day of month, month, and day of week. For example,
'0 5 * * *'means "run at 5:00 AM every day." - Cron Presets: Airflow provides user-friendly presets for common intervals, like
'@daily'(run once a day at midnight),'@hourly', or'@weekly'. - Timedelta Objects: For schedules based on a repeating interval rather than a fixed time, you can use Python's
timedeltaobject. For example,timedelta(minutes=30)will run the DAG every 30 minutes.
The Astronomer documentation provides a concise reference for these options.
Schedule DAGs in Apache Airflow® | Astronomer Documentation
This document provides a clear guide on the different ways to schedule a DAG.
Please read the section Cron-based schedules. Focus on the three methods presented: Cron expressions, Cron presets, and Timedelta objects. A useful external tool for building and verifying cron expressions is crontab.guru, which is worth bookmarking.
For now, let's update the DAG from our previous lesson to run daily. We can simply use the '@daily' preset.
# In your ingestion_dag.py
with DAG(
    dag_id='data_ingestion_pipeline',
    default_args=default_args,
    description='A simple DAG to ingest data from an API and a CSV file.',
    schedule='@daily',  # Changed from None
    start_date=datetime(2024, 1, 1),
    catchup=False,  # We will discuss this shortly
    tags=['ingestion'],
) as dag:


    # ... rest of the DAG definition
With this simple change, your DAG is no longer manual. But when exactly does it run? If it's scheduled daily, does the run for January 5th happen at the beginning of January 5th or at the end? This question leads us to the heart of Airflow's design philosophy.
Part 2: Understanding Airflow's Data Interval
The single most common point of confusion for new Airflow users is how it handles time. The key principle is this: An Airflow DAG run operates on a data interval, and the run is only triggered after that interval has fully passed.
Airflow was designed for batch processing, where you typically want to process all the data for a given period (e.g., a full day's worth of logs). To ensure the data is complete, you must wait until that period is over.
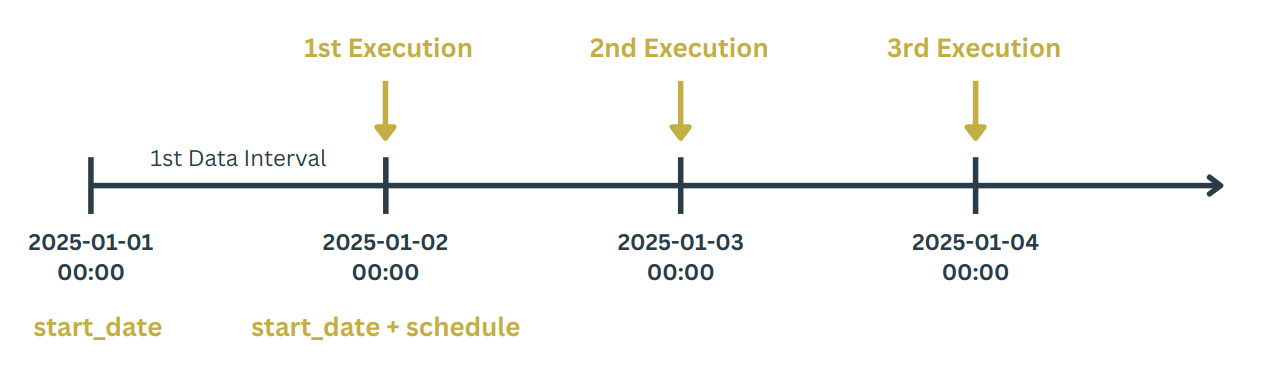
A daily DAG run for January 5th processes data generated during January 5th (from 2024-01-05 00:00:00 to 2024-01-06 00:00:00). To do this reliably, the run itself will only be scheduled to start at midnight on January 6th, once the entire interval has completed.
To formalize this, Airflow uses a few key concepts for each DAG run:
- Data Interval Start: The beginning of the time period this run is responsible for.
- Data Interval End: The end of that time period.
- Logical Date: A timestamp representing the DAG run. In modern Airflow, this is simply equal to the
data_interval_start. (Historically, this was called theexecution_date, which caused much confusion).
The following diagram illustrates this for a daily schedule. Notice how the execution for a given data interval happens after that interval closes.
The video below provides a very clear, animated explanation of this core concept.
Airflow DAG Scheduling in 5 mins
The presenter in "Airflow DAG Scheduling in 5 mins" does an excellent job of visualizing the relationship between the schedule, the data interval, and the actual trigger time.
Watch the segment from what is a DAG run to see a step-by-step example of a pipeline running every 10 minutes, demonstrating exactly when each run is triggered and what data interval it corresponds to.
This might feel counter-intuitive at first, but it is fundamental to building reliable, idempotent pipelines. It guarantees that when your ingest_api_data task runs for January 5th, all of January 5th has occurred.
start_date and catchup
The start_date parameter now takes on a deeper meaning. It doesn't define when your DAG will run, but rather the start of the first data interval.
This leads to the catchup parameter. If you set a start_date in the past (e.g., a month ago) and set catchup=True, Airflow will see that 30 daily data intervals have passed without a corresponding run. It will then schedule 30 DAG runs, one for each missed day, to "catch up".
This can be a powerful feature for backfilling data, but it can also be dangerous, potentially overwhelming your source systems or database. For this reason, it's a best practice to set catchup=False for most new DAGs, as we did in our example.
The following video from Astronomer clearly explains the historical confusion around execution_date and clarifies the modern concepts of data_interval_start and logical_date.
This video, "Scheduling in Airflow", gives a great overview of the evolution of these concepts.
Pay close attention to the section from the new concepts, where the presenter contrasts the old, confusing execution_date with the much clearer data_interval_start and data_interval_end. This will solidify your understanding.
Part 3: Using Data Intervals in Your Tasks
This is not just a theoretical exercise. You can access the data interval's start and end times within your tasks. This is the key to creating incremental pipelines that process only the data relevant to their specific interval.
Airflow makes these values available through Jinja templating. For example, you can use {{ data_interval_start }} or {{ data_interval_end }} as parameters in your operators. When your task executes, Airflow replaces these placeholders with the actual values for that run.
The article "Airflow Data Intervals: A Deep Dive" provides an excellent, comprehensive look at these concepts and includes a practical example of using the data interval to query an API.
Airflow Data Intervals: A Deep Dive | Towards Data Science
This article consolidates everything we've discussed and shows a practical application.
First, read the introduction What Are Data Intervals and How do data intervals work to reinforce the core concepts. Next, look at the table under Visualising Data Intervals, which clearly lays out the relationship between the Logical Date and the interval boundaries. Finally, study the working example carefully. It shows a complete DAG that uses the data_interval_start variable inside a Python function to make a time-filtered API call. This is directly applicable to the pipeline you are building.
Notice in the example how the Python function is defined to accept **kwargs. This is how Airflow passes the task instance context, including data_interval_start, to your callable. This is a powerful pattern you will use frequently.
Conclusion
In this lesson, we took your manual DAG and put it on an automated schedule. More importantly, we explored the "why" behind Airflow's scheduling logic.
Here are the key takeaways:
- You can schedule a DAG using the
scheduleparameter with a cron expression (e.g.,'0 9 * * *'), a preset (e.g.,'@daily'), or atimedelta. - Airflow's core scheduling principle is based on data intervals. A DAG run for a specific interval (e.g., an entire day) is only triggered after that interval has completed.
- The
start_datedefines the beginning of the first data interval, not when the DAG starts running. - The
catchup=Falseparameter is a safe default to prevent unintended backfilling when a DAG is first deployed or unpaused. - You can access an interval's boundaries within your tasks using Jinja templates like
{{ data_interval_start }}, which is the key to building incremental ingestion logic.
In our next lesson, we will explore another powerful scheduling mechanism: event-based triggering. You will learn how to use a FileSensor to start your DAG run not at a specific time, but as soon as a new file lands in a directory.