Hello and welcome to the second module of our course!
In our last lesson, we demystified the ad auctions on Google and Meta, learning that success hinges on delivering quality and relevance, not just the highest bid. This strategic understanding is crucial, but it's only half the story. To know if our ads are truly working and to improve their quality score, we need to measure everything that happens after the click.
This brings us to today's learning outcome: Set up a new Google Analytics 4 property and configure its data stream. We are now moving from the "why" of advertising strategy into the "how" of technical implementation. Think of this as laying the foundation for your hotel's digital marketing headquarters. Everything we do from now on—from tracking bookings to analyzing user behavior—will rely on the setup we complete today.
Let's get started.
1. The Structure of Google Analytics 4
Before we jump in, it's important to understand the hierarchy within GA4. It's organized into three levels:
- Account: This is the highest level, typically representing your entire business or organization. For example, if you manage a small hotel chain, you would have one Account for the entire chain.
- Property: This sits inside an Account and is where data for a specific website or app is collected and processed. You would create a separate Property for each hotel's website.
- Data Stream: This is the source of data that flows into your Property. For a hotel website, you will create a "Web" data stream. If you later develop an iOS or Android app for your hotel, you would add separate "iOS app" and "Android app" data streams to the same Property.
Understanding this Account > Property > Data Stream structure helps keep your analytics organized and scalable as your business grows.
2. Creating Your GA4 Account and Property
Now, let's walk through the practical steps of creating your new GA4 setup. The process involves creating the Account, then the Property, and finally the Data Stream.
The following video from Analytics Mania provides a clear, step-by-step walkthrough of this entire process.
Google Analytics 4 tutorial for beginners (2026 update) || GA4 tutorial for beginners || GA4 course
This video will guide you through creating your first GA4 account, property, and data stream. It covers all the initial settings we need to configure.
Please watch from 00:10 to 04:24. Pay close attention to the hierarchy of Account > Property > Data Stream, and the settings for time zone, currency, and Enhanced Measurement.
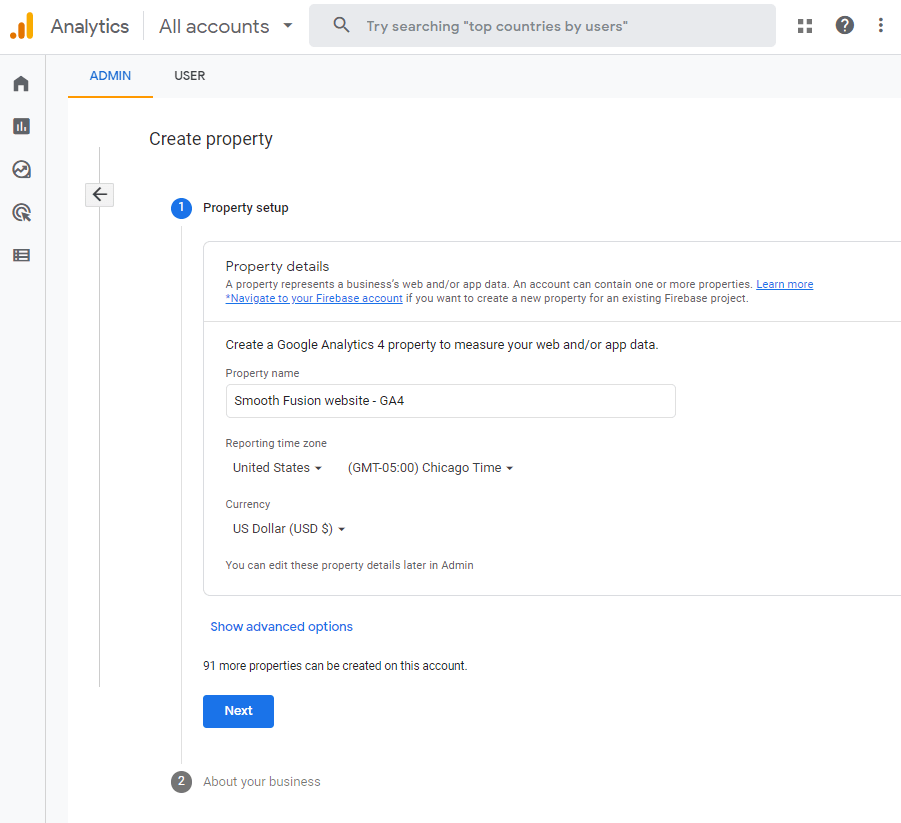
As you saw in the video, the initial setup is straightforward but requires attention to a few key details. Let's recap the most important settings for a hotel:
- Account Name: Use your business name (e.g., "The Grand Mountain Hotel Group").
- Property Name: Be specific (e.g., "Grand Mountain Hotel - Website").
- Reporting Time Zone: Crucial for accurate daily reporting. Select the time zone where your hotel is physically located.
- Currency: Select the primary currency your hotel operates in. GA4 can convert revenue from other currencies into this primary one.
- Business Objectives: For now, selecting "Get baseline reports" (or "Other business objectives" in some versions) is the best choice. It gives you access to all standard reports without pre-filtering your view.
This image shows exactly what the "Property details" screen looks like during this step.
For a detailed written guide that you can refer to alongside the video, the article below from Analytics Mania is an excellent resource.
How to Install Google Analytics 4 in 2026 (3 Ways)
For a detailed written guide that complements the video, this article walks through the same process with helpful screenshots and explanations.
Read the first section, '#1. Create a Google Analytics 4 Property & Data Stream'. This covers the same steps as the video, providing a good text-based reference for each setting.
3. Configuring Your Web Data Stream
Once your property is created, you'll immediately be prompted to create your first data stream. This is the connection that will allow data from your website to flow into your new GA4 property.
Here are the key elements for your hotel's website:
- Choose a platform: Select "Web".
- Website URL: Enter your hotel's homepage URL (e.g.,
www.grandmountainhotel.com). - Stream name: Give it a clear name (e.g., "Hotel Website Stream").
- Enhanced Measurement: Leave this enabled. It automatically tracks key interactions like page views, scrolls, outbound link clicks, and file downloads without any extra setup. This gives you valuable data right out of the box.
After creating the stream, you will see a Measurement ID (formatted as G-XXXXXXXXXX). This ID is extremely important. It is the unique address of your data stream. We will use it in our next lessons to tell Google Tag Manager where to send the data from your website.
4. A Critical Step for Hotels: Cross-Domain Tracking
Here is a point that is absolutely vital for most hotels. Many hotel websites use a third-party booking engine (like Webhotelier, SynXis, or TravelClick). This means a potential guest might browse rooms on yourhotel.com but then click "Book Now" and be taken to booking.engine.com to complete the reservation.
By default, Google Analytics sees this as two separate visits from two different users, breaking the customer journey. We need to tell GA4 that these are trusted domains that belong to the same journey. This is called cross-domain tracking.
This guide from Hotelytix, written specifically for hotels, explains exactly how to configure this.
Google Analytics 4 for Hotels (Complete Guide 2023)
Now let's address a critical point for any hotel: tracking users as they move from your main website to your booking engine. This guide explains how to set up cross-domain tracking in GA4.
Please read the section titled 'Cross-domain tracking between Google Analytics 4 & Webhotelier’s booking engine'. Focus on understanding why this is necessary and where in the data stream settings you go to configure it (Admin > Data Streams > Configure tag settings > Configure your domains).
Setting this up correctly ensures that you can track a user from the moment they land on your homepage, through their room selection, all the way to a completed booking on the external engine, all within a single, unified session.
Test your understanding!
A potential guest from New York visits your London hotel's website (yourlondonhotel.com). They browse a few room pages, then click "Book Now," which takes them to your booking engine at reservations.booking-partner.com.
If you have NOT configured cross-domain tracking, what will GA4 most likely report?
Show answer
GA4 will likely report two separate, incomplete user journeys:
- One user from New York who visited
yourlondonhotel.comand then left the site (this is called a "referral exit" to the booking engine). - A second, new user who arrived at
reservations.booking-partner.comfrom a "referral" source (yourlondonhotel.com) and then made a booking.
You would lose the ability to see that it was the same user who completed the entire journey, making it impossible to attribute the booking to your original marketing efforts.
Key Takeaways
- GA4 Structure: Your analytics is organized hierarchically as Account > Property > Data Stream.
- Property Setup is Key: Correctly setting the time zone and currency is crucial for accurate business reporting.
- The Measurement ID is Your Target: The "G-" ID is the unique identifier for your data stream. We will need this to connect your website to GA4.
- Cross-Domain Tracking is Non-Negotiable for Hotels: If you use an external booking engine, you must configure cross-domain tracking to measure the full customer journey and accurately attribute bookings.
What's Next?
Congratulations! You have successfully created and configured your GA4 property and data stream. You've built the empty vessel for your data. However, it isn't collecting any information from your website just yet.
In our next lesson, we will solve that. We will learn how to install and configure Google Tag Manager on a website. GTM is the tool we will use to "inject" our GA4 Measurement ID (and other tracking tags, like the Meta Pixel) into our website, finally bringing our analytics setup to life.