Hello! Welcome to the final lesson in our module on Marketing Dashboards & Reporting.
In our last session, you built a powerful booking funnel visualization, giving you a clear view of your hotel's customer journey and the precise points where potential guests drop off. You now have a dashboard that turns raw data into actionable business intelligence.
But a great report that no one sees is just a file. Today, we'll make sure your insights get into the right hands at the right time. Our learning outcome is to set up automated email delivery of Looker Studio reports. We'll transform your dashboard from a destination people have to visit into a proactive communication tool that lands directly in your team's inbox.
1. The 'Why' Behind Automated Reporting
Before we jump into the "how," let's consider the strategic value. Manually downloading and emailing reports is time-consuming and prone to being forgotten. Automation solves this by:
- Ensuring Consistency: Key stakeholders, like your hotel's General Manager or Head of Sales, receive critical performance data on a predictable schedule (e.g., every Monday morning).
- Driving Accountability: When everyone sees the same numbers (ROAS, booking volume, conversion rates), the entire team stays aligned and accountable for the results.
- Saving Your Time: Automating this task frees you up to focus on what's important: analyzing the data and optimizing your campaigns, rather than being a report courier.
2. How to Schedule Your First Report Delivery
Let's walk through the process of setting up a recurring email for the dashboard you've built. The starting point is the "Share" button, which you've used before.

Now, you will configure the details of the delivery. The official Google documentation provides a concise overview of the steps involved.
Schedule automatic report delivery | Looker Studio
The official documentation from Google, 'Schedule automatic report delivery', outlines the core process. We will use this as our guide to create a new schedule.
Read the section 'Create a delivery schedule in Looker Studio'. This short section gives you the 7 key steps. As you read, think about how you would configure each option for your hotel's weekly performance report.
Let's break down those configuration options with a hotel context in mind:
- Recipients: Add the email addresses of your key stakeholders. You will automatically be included. For example:
general.manager@yourhotel.com,head.of.sales@yourhotel.com. - Customize email subject and message (Optional): This is highly recommended. A good subject line makes the email easy to find and understand. For example:
- Subject:
Weekly Marketing & Booking Performance Report - Message:
Hi Team, please find the performance report for last week attached. The interactive dashboard is available via the link in this email. Key focus areas this week are the booking funnel conversion rate and Meta Ads ROAS.
- Subject:
- Pages: You can choose to send
All pagesor select specific ones. For a high-level stakeholder report, you might only send the main KPI dashboard page, not the detailed data tables. - Start time & Repeat: This is where the automation happens. A common and effective cadence is a weekly report sent on Monday morning, giving everyone a summary of the previous week and setting the agenda for the current one. For example,
Repeats: Weekly on Mondayat8:00 AM.
3. Managing and Modifying Your Schedules
Your reporting needs will change over time. You might want to adjust the recipients, change the frequency during a major campaign, or pause reports during a holiday. Looker Studio makes it easy to manage existing schedules.
The process is straightforward:
- Navigate back to Share > Schedule email delivery.
- You will see your existing schedule. Here you can click to Edit it or use the "More" options (⋮) to Delete the schedule entirely.
If you have a Looker Studio Pro subscription, you also gain the ability to pause a schedule without deleting it, which can be very convenient.
Test your understanding!
Your General Manager loves the weekly report but asks if the PDF attachment can show performance for "Last 30 days" instead of the "Last 7 days" that you originally set. The live report should keep its default view of the last 7 days. How can you accomplish this without changing the main report's default date range?
Show answer
You can edit the schedule's specific settings. When you click Edit schedule, you will see a Filters tab. This allows you to override the report's default filter and date range settings for that specific email schedule only. You would go into this tab, find the date range control, and set it to "Last 30 days" for the schedule, then save your changes. The main interactive report will remain unchanged.
4. Important Limitations and Advanced Features
While powerful, the scheduling feature has some limitations, especially in the free version of Looker Studio. It's important to be aware of these.
Schedule automatic report delivery | Looker Studio
The official documentation also contains a crucial section on the limits and troubleshooting for scheduled delivery. Understanding these will help you avoid issues and know when an upgrade to the Pro version might be necessary.
Read the sections 'How scheduled email delivery works' and 'Limits and troubleshooting'. Pay close attention to the differences between the standard (free) version and Looker Studio Pro, especially regarding: The number of schedules you can create per report. The maximum number of recipients. The highest frequency you can set (e.g., daily vs. hourly).
Key Differences: Free vs. Pro
| Feature | Looker Studio (Free) | Looker Studio Pro |
|---|---|---|
| Schedules per Report | 1 | Up to 200 |
| Max Frequency | Daily | Hourly |
| Recipients | Up to 50 addresses | Up to 50 addresses |
| Personalized Data | No | Yes |
The most significant limitation for the free version is one schedule per report. This means you can't have both a weekly summary for management and a daily check-in for your marketing team from the same report file. You would need to create a copy of the report for the second schedule.
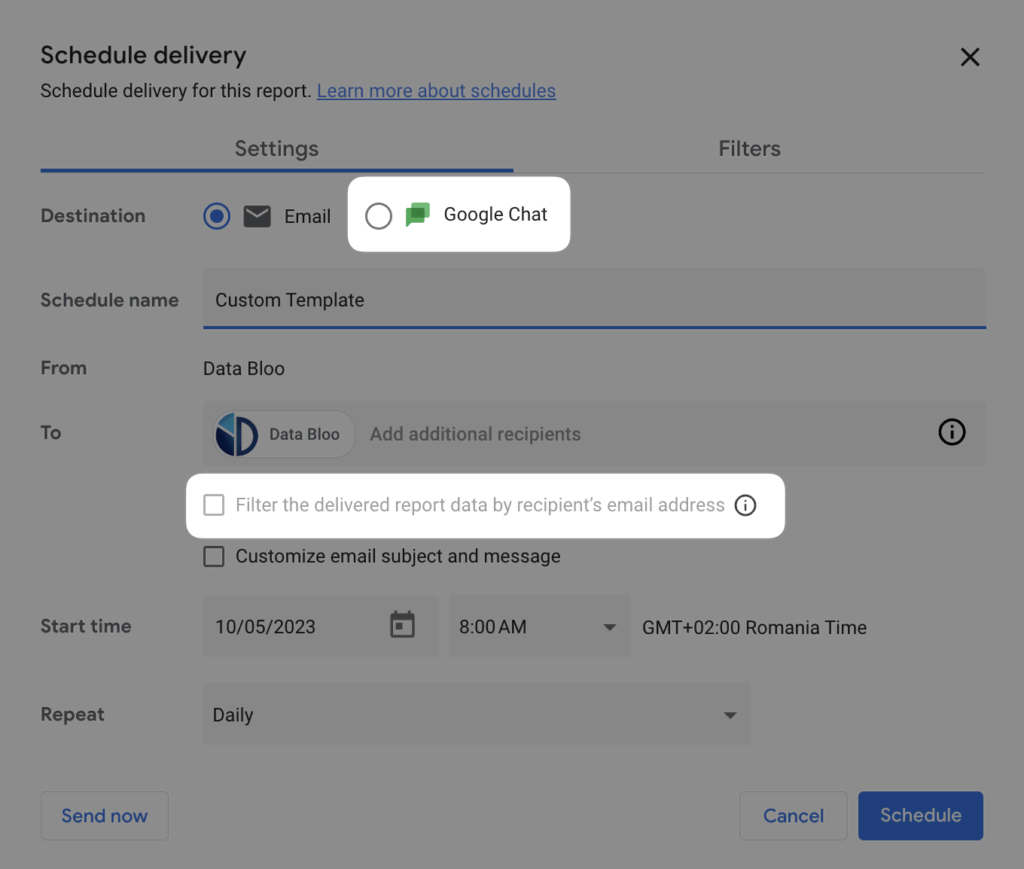
The Pro version also unlocks powerful features like personalizing the data in the report based on the recipient's email address, as shown in the image below. This would allow you to send one report to regional managers, where each manager only sees data for their specific region.
Conclusion
Congratulations! You have now mastered the final step in the reporting workflow: effective and automated distribution. By setting up scheduled email deliveries, you ensure that the valuable insights from your dashboards are consistently reviewed by the people who need them, driving a more data-informed culture within your organization.
Key Takeaways:
- Automated reporting saves time and ensures consistent communication of key metrics.
- You can schedule a report delivery via the Share > Schedule email delivery menu.
- Key settings include recipients, a custom message, which pages to include, and the delivery frequency.
- Existing schedules can be easily edited or deleted.
- The free version of Looker Studio is limited to one schedule per report, with a maximum frequency of daily.
What's Next?
This lesson concludes our module on Dashboards and Reporting. You've learned how to connect data sources, build interactive dashboards, visualize complex journeys like the booking funnel, and now, automate your reporting.
We will now shift our focus from reporting on user behavior to proactively influencing it. In our next module, Marketing Automation Foundations, we'll explore how to engage with guests at critical moments in their journey. Our first lesson will be: Map key moments in the hotel guest journey suitable for automation.