Hello! In our last lesson, we delved into Domain-Driven Design (DDD), establishing a powerful strategic framework for understanding a business domain and defining service boundaries called Bounded Contexts. We learned that these contexts are excellent candidates for becoming your microservices.
That leaves a critical question: once you have a well-defined service, how should it communicate its capabilities to the outside world? Today, we will explore one of the most prevalent and important architectural patterns for this: REST (Representational State Transfer). Your goal for this lesson is to learn how to design RESTful APIs following standard conventions and constraints, including HATEOAS. Mastering REST is essential for an architect, as it provides a standardized, stateless, and scalable way for services to interact.
1. The Path to REST: The Richardson Maturity Model
Before diving into specific rules, it's crucial to understand that REST is not a strict protocol like SOAP, but an architectural style defined by a set of constraints. Not all APIs that use HTTP are "RESTful."
To understand the journey toward a truly RESTful API, we can use a framework called the Richardson Maturity Model. It outlines four levels of maturity, providing a clear path from a basic HTTP-based API to one that fully embraces REST principles.
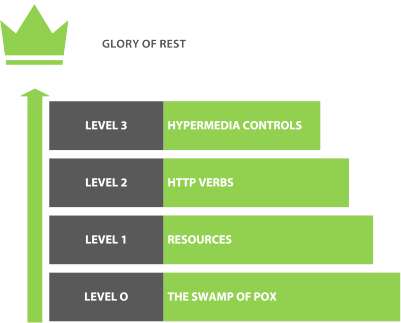
To get a solid grasp of these levels, let's turn to a classic article by Martin Fowler that explains the model.
The article 'Richardson Maturity Model' by Martin Fowler provides a foundational understanding of the different stages of API design, from simple remote procedure calls to a fully hypermedia-driven system.
Read the entire article, paying close attention to the examples for each level. As you read, notice how each level introduces a new constraint that brings the API closer to the REST ideal. Pay special attention to the jump from Level 2 to Level 3.
Let's briefly summarize the journey through the levels:
-
Level 0: The Swamp of POX (Plain Old XML/JSON): At this level, HTTP is used merely as a transport mechanism for Remote Procedure Calls (RPC). Typically, you have a single URI endpoint, and you send documents via
POSTto execute different procedures (e.g.,POST /api { "action": "getUsers" }). This style doesn't leverage the capabilities of the web. -
Level 1: Resources: This is the first major step. Instead of a single endpoint, you start thinking in terms of resources. Each resource gets a unique identifier (a URI). For example, you now have
/doctors/123and/appointments/456. This aligns well with your full-stack experience, where routing maps URLs to specific entities. -
Level 2: HTTP Verbs and Status Codes: This level introduces the use of HTTP methods (verbs) to operate on the resources defined in Level 1. It also emphasizes using HTTP status codes to communicate the outcome of an operation. This is where many so-called "REST APIs" stop.
GET: Retrieve a resource (safe and idempotent).POST: Create a new resource.PUT/PATCH: Update an existing resource.DELETE: Remove a resource.- Status Codes: Using
201 Createdinstead of200 OKfor a successful creation, or404 Not Foundfor a missing resource.
-
Level 3: Hypermedia Controls (HATEOAS): This is the final and most mature level. HATEOAS stands for Hypermedia as the Engine of Application State. It means that the API response should include links that tell the client what actions they can perform next. This makes the API discoverable and decouples the client from hardcoded URIs.
2. Practical Conventions for RESTful API Design
Now that we have the conceptual framework of the RMM, let's focus on the practical conventions that make a Level 2 API clean, predictable, and easy for other developers to consume. Many of these practices are considered industry standards.
The following video provides an excellent, pragmatic overview of these conventions, drawn from real-world projects.
8 Pragmatic REST API Design Tips (From Real Projects)
The video '8 Pragmatic REST API Design Tips (From Real Projects)' by Milan Jovanović offers a concise and practical guide to common API design conventions.
Watch the segments covering the following tips: consistency (00:49), standard HTTP methods (01:32), correct status codes (02:42), plural nouns for resources (04:00), avoiding nested URLs (04:41), wrapping collection responses (05:41), and using a structured error format (08:41). The code examples are in .NET, but the principles are universal.
Let's consolidate the key design rules from the video and other best practices:
A. URI Design
Your URIs should be logical, predictable, and resource-oriented.
- Use Nouns, Not Verbs: URIs represent resources (nouns), while HTTP methods represent actions (verbs).
- Good:
GET /users/123 - Bad:
GET /getUserById?id=123
- Good:
- Use Plural Nouns: Represent collections with plural nouns for consistency.
- Good:
/users(the collection) and/users/123(a specific user from the collection). - Bad:
/userand/user/123.
- Good:
- Avoid Deep Nesting: For relationships beyond one level, prefer using query parameters to filter.
- Good:
GET /users/123/posts(posts by a user). - Better than:
GET /users/123/posts?status=published - Avoid:
GET /users/123/categories/4/posts/5
- Good:
B. HTTP Status Codes
Always return a status code that accurately reflects the outcome of the request. Never use 200 OK to report an error in the response body.
Mastering RESTful API Design: A Practical Guide
For a detailed list of common status codes and their meanings, this article, 'Mastering RESTful API Design: A Practical Guide,' provides a great reference.
Quickly review the sections 'Status Codes' and 'Server Responses'. Pay special attention to the 'Do Not Return a 200 Status Code for Errors' part, as this is a common anti-pattern.
C. Response and Error Formatting
- Use JSON: Standardize on
application/jsonfor your responses. - Wrap Collections: Return arrays of resources inside a JSON object (e.g.,
{ "data": [...] }). This allows you to add metadata, like pagination information, without breaking clients. - Provide Structured Errors: When an error occurs (e.g.,
400 Bad Request), return a JSON object with a consistent structure that explains the error. TheProblem Detailsstandard (application/problem+json) is a great choice.
Test your understanding!
A junior developer has proposed the following API endpoints for a simple blog system. Refactor them to align with the REST conventions we've just discussed.
POST /getallpostsGET /post?id=42POST /createPost(with post content in the body)GET /deletepost?id=42GET /users/123/userposts
Show answer
Here is a refactored, more RESTful design:
GET /posts: Uses theGETverb for retrieval and a plural nounpostsfor the resource collection.GET /posts/42: Uses a path parameter for the specific resource ID, which is standard practice.POST /posts: Uses the correct verb (POST) for creation on the collection URI.DELETE /posts/42: Uses theDELETEverb to indicate a destructive action on a specific resource.GET /users/123/posts: This is a good way to represent a nested resource. The original/userpostswas unclear.
3. HATEOAS: The Engine of Application State
We've now covered what it takes to build a solid Level 2 API. To reach Level 3, the "Glory of REST," we must implement HATEOAS.
The core idea of HATEOAS is that a client interacting with a REST API should not need prior knowledge of all the specific URIs to navigate the application. Instead, the server provides links within its responses that guide the client to the next possible states or actions.
Imagine browsing a website. You don't type every URL manually; you click on links (<a> tags) that the server provides on the page. HATEOAS brings this same dynamic to APIs.
HATEOAS 101: Opinionated Introduction to a REST API Style - Webcast
The concept of HATEOAS can be abstract. This 'HATEOAS 101' video explains it clearly, using the analogy of a state machine and a direct quote from Roy Fielding, the creator of the REST architectural style.
Watch the sections that define HATEOAS within the REST constraints (01:56), explain the state machine analogy (05:36), and present Roy Fielding's definitive statement on the topic (23:18).
As Fielding states, an API that isn't driven by hypermedia is not truly a REST API. So, how do we implement this? We embed links in our responses.
A practical example is pagination. When you request a list of items, the API can include links for the next, previous, first, and last pages.
8 Pragmatic REST API Design Tips (From Real Projects)
Let's return to the '8 Pragmatic REST API Design Tips' video to see a concrete implementation of HATEOAS for pagination.
Watch the section on pagination and hypermedia links (06:44 to 08:51). Notice how the _links (or links) property is added to the enveloped response we discussed earlier.
Here's what a response with HATEOAS controls might look like:
{
  "data": [
    {
      "id": 123,
      "total": 50.00,
      "currency": "USD",
      "status": "shipped"
    }
    // ... more orders
  ],
  "links": {
    "self": { "href": "/orders/123" },
    "cancel": { "href": "/orders/123/cancel" },
    "track": { "href": "/orders/123/tracking" }
  }
}
With this response, the client application doesn't need to know how to construct the URL to cancel or track an order. It just needs to know to look for the cancel or track link relation (rel). This makes the system more resilient to change; the server can update the URI structure without breaking clients.
Conclusion
In this lesson, we journeyed from the foundational principles of REST to the practical conventions that define a well-designed API. You've learned to think about APIs not just as a collection of endpoints, but as a structured system of resources, operations, and discoverable state transitions.
Key Takeaways:
- REST is an architectural style, and the Richardson Maturity Model (Resources -> Verbs -> Hypermedia) provides a framework for understanding its principles.
- Well-designed APIs follow clear conventions: they use nouns for resources, plural URIs, correct HTTP verbs, and precise status codes.
- Responses should be structured and predictable, using JSON, enveloping collections, and providing detailed error information.
- HATEOAS (Level 3) is the key to a truly RESTful API. By embedding hypermedia links in responses, the server makes the API self-discoverable and decouples clients from specific URI structures.
Preview of the Next Lesson:
We now have a deep understanding of how to design a RESTful API. But is REST always the right choice? In our next lesson, we will compare the trade-offs of different API paradigms (REST, GraphQL, gRPC). This will equip you with the architectural knowledge to select the most appropriate API style for different use cases, a critical skill for any software architect.