Hello! Welcome to your second lesson.
In our previous session, you successfully installed Fusion 360 and set up your personal use license. With the software ready, it's time to get oriented. Think of it like walking into a new workshop for the first time; before you can start building, you need to know where the tools are, where the projects are stored, and how to look at your work from different angles.
This lesson is your guided tour of the Fusion 360 user interface (UI). By the end of our session, you will be able to identify and understand the purpose of the four most important areas for a designer: the Toolbar, the Browser, the Timeline, and the View Cube. Mastering this "map" is the foundation for everything you will create.
The Big Picture: A Map of the Fusion 360 Interface
When you first open Fusion 360, the screen is divided into several distinct sections. Each one serves a specific purpose. Let's start with a high-level overview.
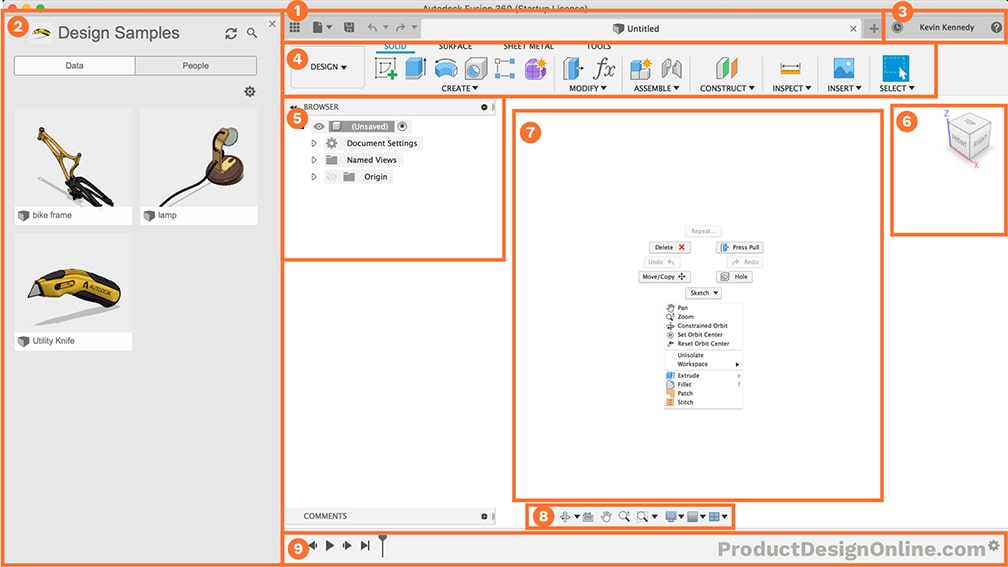
Take a moment to familiarize yourself with these labeled areas. In this lesson, we'll explore the most critical ones in detail. I recommend having Fusion 360 open on your computer to locate these elements as we discuss them.
1. The Toolbar: Your Digital Toolbox
The Toolbar, located at the top of the screen, contains all the commands you'll use to create and modify your designs. Its most important feature is the concept of Workspaces.
Fusion 360 is a multi-purpose tool that extends beyond 3D modeling into areas like rendering (creating photorealistic images) and manufacturing (preparing models for CNC machines or 3D printers). Each of these functions has its own dedicated Workspace, and selecting a workspace changes the tools available in the Toolbar.
For the majority of this course, we will be in the Design workspace.
To see this in action, watch the following short clip from an official Autodesk tutorial. It clearly demonstrates the Workspace switcher and how the Toolbar adapts.
Navigate the Autodesk Fusion Interface Like a Pro! [UPDATED!!]
This video from the official Autodesk Fusion channel explains how the Toolbar is organized by Workspaces and contextual tabs.
Watch from 02:28 to 03:51. Focus on how the narrator switches between different Workspaces (Design, Render, Manufacture) and how the available tools change. Also, notice the mention of 'contextual tabs' like the Sketch tab, which appears only when you are in a sketch.
Key Takeaways for the Toolbar:
- It's where you find your tools (e.g., create, modify).
- It's organized into Workspaces. We will primarily use the Design workspace.
- The tools are grouped into tabs (e.g., Solid, Surface, Sheet Metal).
2. The Browser: Your Design's Table of Contents
On the left side of the screen is the Browser. It presents a hierarchical list of every single object in your design file. You can think of it as a structured table of contents for your model.
As you build a design, this list will grow to include:
- Sketches: The 2D drawings that form the basis of 3D shapes.
- Bodies: The solid 3D objects you create.
- Components: Collections of bodies that function as a single part in an assembly.
- Origins, Joints, Construction Geometry: And much more.
The Browser is not just for viewing; it's interactive. You use it to select objects, control their visibility by clicking the eye icon (👁️), and organize your model. Given your engineering background, you can appreciate this as being similar to a bill of materials or a component tree in a system diagram.
The following video provides a quick but clear explanation of the Browser's role.
Beginner Questions on Fusion 360 Interface
In this clip, Tyler Beck of Tech & Espresso gives a straightforward overview of the Browser and its relationship to the main design area, the Canvas.
Watch the segment from 06:49 to 07:28. The narrator explains the Canvas, and then focuses on the Browser, describing how it organizes elements like sketches and bodies.
3. The Timeline: Your Design's History
At the very bottom of the screen is the Timeline. This is perhaps the most powerful and fundamental concept in parametric CAD. The Timeline captures every single operation you perform—from creating a sketch to extruding a body to adding a fillet—in chronological order.
Why is this so important? Because it allows you to go back in time and change any step. If you decide a hole needs to be wider or a component needs to be thicker, you don't start over. You simply find that operation in the Timeline, edit its parameters, and Fusion 360 will automatically rebuild the model with your changes.
This is the essence of parametric modeling: your design is defined by a series of historical steps and parameters, not just by its final shape.
This next video does an excellent job demonstrating how the Timeline works and the power it gives you.
Beginner Questions on Fusion 360 Interface
This video segment clearly illustrates the function of the Timeline by walking through a design's history and showing what happens when design history is turned off.
Watch from 09:40 to 11:29. Pay close attention to how you can drag the history marker to see the model being built step-by-step. The contrast shown between a design with a timeline ('parametric mode') and one without ('direct modeling mode') is particularly insightful.
4. The View Cube: Your Camera Operator
Finally, in the top-right corner of the canvas, you'll find the View Cube. This is your primary tool for orienting your view of the model.
You can interact with it in several ways:
- Click on a face (e.g., TOP, FRONT, RIGHT) to snap to a standard orthographic view.
- Click on an edge or corner to snap to an intermediate view.
- Click the home icon (🏠) to return to the default isometric (3D) perspective.
- Click and drag the cube to freely orbit the model.
While your mouse is the main tool for fluid navigation (which we will cover in the next lesson), the View Cube is indispensable for quickly and precisely aligning your camera to a standard view.
Navigate the Autodesk Fusion Interface Like a Pro! [UPDATED!!]
This brief clip shows the View Cube in action, along with a quick tip on using your mouse to pan the view.
Watch from 04:10 to 04:40. Focus on how clicking different parts of the View Cube changes the model's orientation.
You'll also notice a Navigation Bar at the bottom of the canvas. This contains tools for Orbit, Pan, and Zoom. While the View Cube snaps you to set views, these tools provide free-form control. We will focus on mastering these controls in our next session.
Conclusion
Well done. You've just completed a full tour of the Fusion 360 command center. While it may seem like a lot to take in, you'll quickly become familiar with these areas as you begin to design.
Let's recap the key takeaways:
- Toolbar: Contains all your tools, organized into Workspaces.
- Browser: An organized list of all objects that make up your design.
- Timeline: A chronological history of every operation, enabling powerful parametric editing.
- View Cube: Your tool for snapping the camera to standard perspectives like Top, Front, and Home.
Before our next lesson, I encourage you to simply spend a few minutes in Fusion 360. Click the Workspace switcher to see the Toolbar change. Create a new, empty design and identify the Browser and the Timeline. Click the faces and corners of the View Cube. Don't worry about creating anything yet—just get comfortable with the layout of your new digital workshop.
In our next lesson, "Manipulate the 3D viewport," we'll build on this by learning the mouse and keyboard controls to smoothly orbit, pan, and zoom around your designs.