Hello! Welcome to the next lesson in your journey to mastering Fusion 360.
In the last few lessons, we've built a solid foundation in creating 3D models. We learned how to sketch, extrude, revolve, and combine bodies to build static shapes. While powerful, this approach has a limitation: if you want to change a dimension, you often have to go back and manually edit sketches and features, which can sometimes break your model.
Today, we're diving into Parametric Design, a core principle of modern CAD that solves this problem. This lesson introduces one of the most powerful concepts in Fusion 360, and it will be fundamental to creating adaptable designs for your gaming accessories, household items, and especially your capstone desk project.
Our goal is to learn how to define and use user parameters to control sketch dimensions and feature values. We will create a simple, adaptable box to see this principle in action.
1. Why Go Parametric? The Problem with Manual Edits
Imagine you've designed a perfect holder for your game controller. Now, you get a new controller with slightly different dimensions. With a static model, you'd have to go back and manually change several dimensions, hoping you don't break any subsequent features. This can be time-consuming and frustrating.
Parametric modeling is a design approach where your model's geometry is defined by relationships and variables, called parameters, rather than fixed numeric values.
Just as a change in a key variable like an interest rate can ripple through a financial spreadsheet to update an entire forecast, a change in a user parameter in Fusion 360 updates all related dimensions and features in your 3D model.
To understand why this is so important, it's helpful to see the problem it solves.
Parametric modeling in Fusion360 explained in 40 seconds + detailed tutorial with example
This video from Prusa 3D does an excellent job of showing how a non-parametric model can break when you try to change its dimensions manually. It makes a very compelling case for why parametric design is a superior workflow.
Watch from 00:40 to 06:20. First, you'll see why you might want to resize a model. Then, pay close attention to the section where the presenter tries to change the height of a flower pot. The model breaks, resulting in a cascade of errors in the timeline that must be fixed one by one. This highlights the inefficiency of non-parametric editing.
2. Creating Your First User Parameters
The solution to the chaos you just witnessed is using User Parameters. These are custom variables you create to drive your design. Let's see how to set them up.
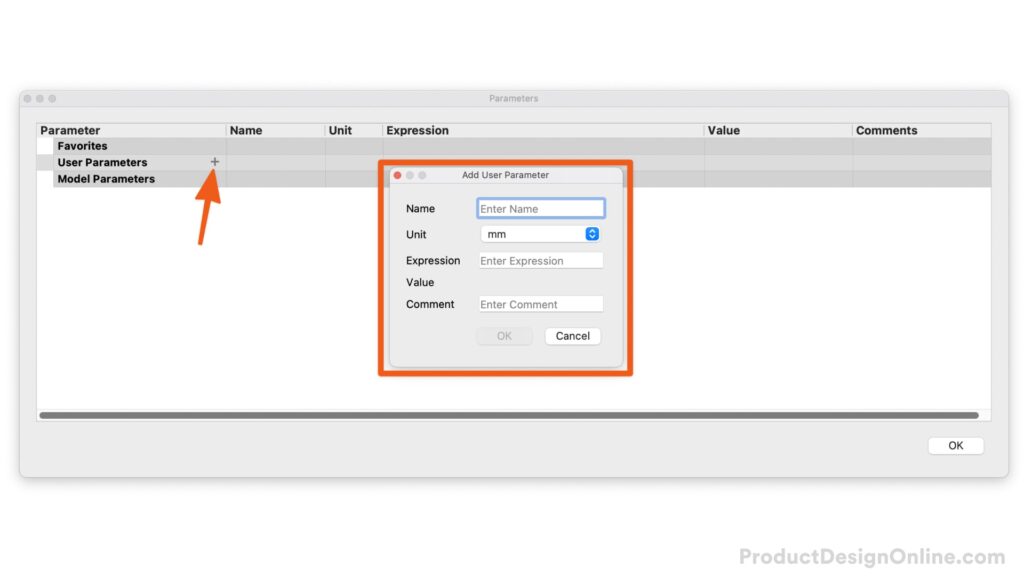
In Fusion 360, you'll find the parameter controls under Modify > Change Parameters. This opens a dialog box where you can define your variables.
Intro to User Parameters and Joints | Day 19 of Learn Fusion 360 in 30 Days - 2023 EDITION
Let's watch this segment from Product Design Online to see exactly how to create User Parameters in Fusion 360. It provides a clear, step-by-step walkthrough.
Watch the first 1 minute and 26 seconds (00:00 - 01:26). Kevin Kennedy will show you how to open the 'Change Parameters' dialog and create new parameters, explaining the naming rules (no spaces!) and how to set units.
As you saw in the video, creating a parameter involves:
- Clicking the
+sign next to User Parameters. - Giving it a descriptive Name (e.g.,
boxWidthorbox_width). - Setting the Unit (e.g.,
mmfor length,degfor angle, orNo Unitsfor a count). - Entering the starting value in the Expression field.
- Optionally, adding a Comment to remember its purpose.
3. Hands-On Project: Building a Parametric Box
Now, let's apply this concept by building a simple box whose dimensions are controlled entirely by parameters. This fulfills your preference for learning through hands-on design.
Part 1: Define the Parameters
- Start a new design in Fusion 360.
- Go to
Modify > Change Parameters. - Click the
+icon to add the following four User Parameters:- Name:
box_length, Expression:75mm - Name:
box_width, Expression:50mm - Name:
box_height, Expression:40mm - Name:
wall_thickness, Expression:2mm
- Name:
- Click OK to close the dialog.
Part 2: Build the Model Using Parameters
Now, we'll build the box, but instead of typing in numbers, we'll use our new parameter names.
Intro to User Parameters and Joints | Day 19 of Learn Fusion 360 in 30 Days - 2023 EDITION
The same video we just watched continues with a perfect example of building a parametric box. Follow along to build your own.
Watch from 01:26 to 03:16 and follow these steps in your own Fusion 360 window: Create a sketch and use the Center Rectangle tool. When dimensioning, type your parameter names (box_length and box_width) instead of numbers. Notice how Fusion 360 autocompletes the name for you. Extrude the sketch profile. In the distance field, enter the box_height parameter. Use the Shell tool on the top face. For the thickness, enter the wall_thickness parameter.
After following the video, you should have a complete, hollowed-out box. Every key dimension of this box is now linked to the parameters you created.
4. The Payoff: Instant, Error-Free Updates
This is the most rewarding part of parametric design. Let's see how easily we can now modify our box.
- Go back to
Modify > Change Parameters. - Change the expression for
box_lengthto100mm. - Change the expression for
box_heightto60mm. - Click OK.
Your model should instantly resize on the screen without any errors. You've just created an adaptable design.
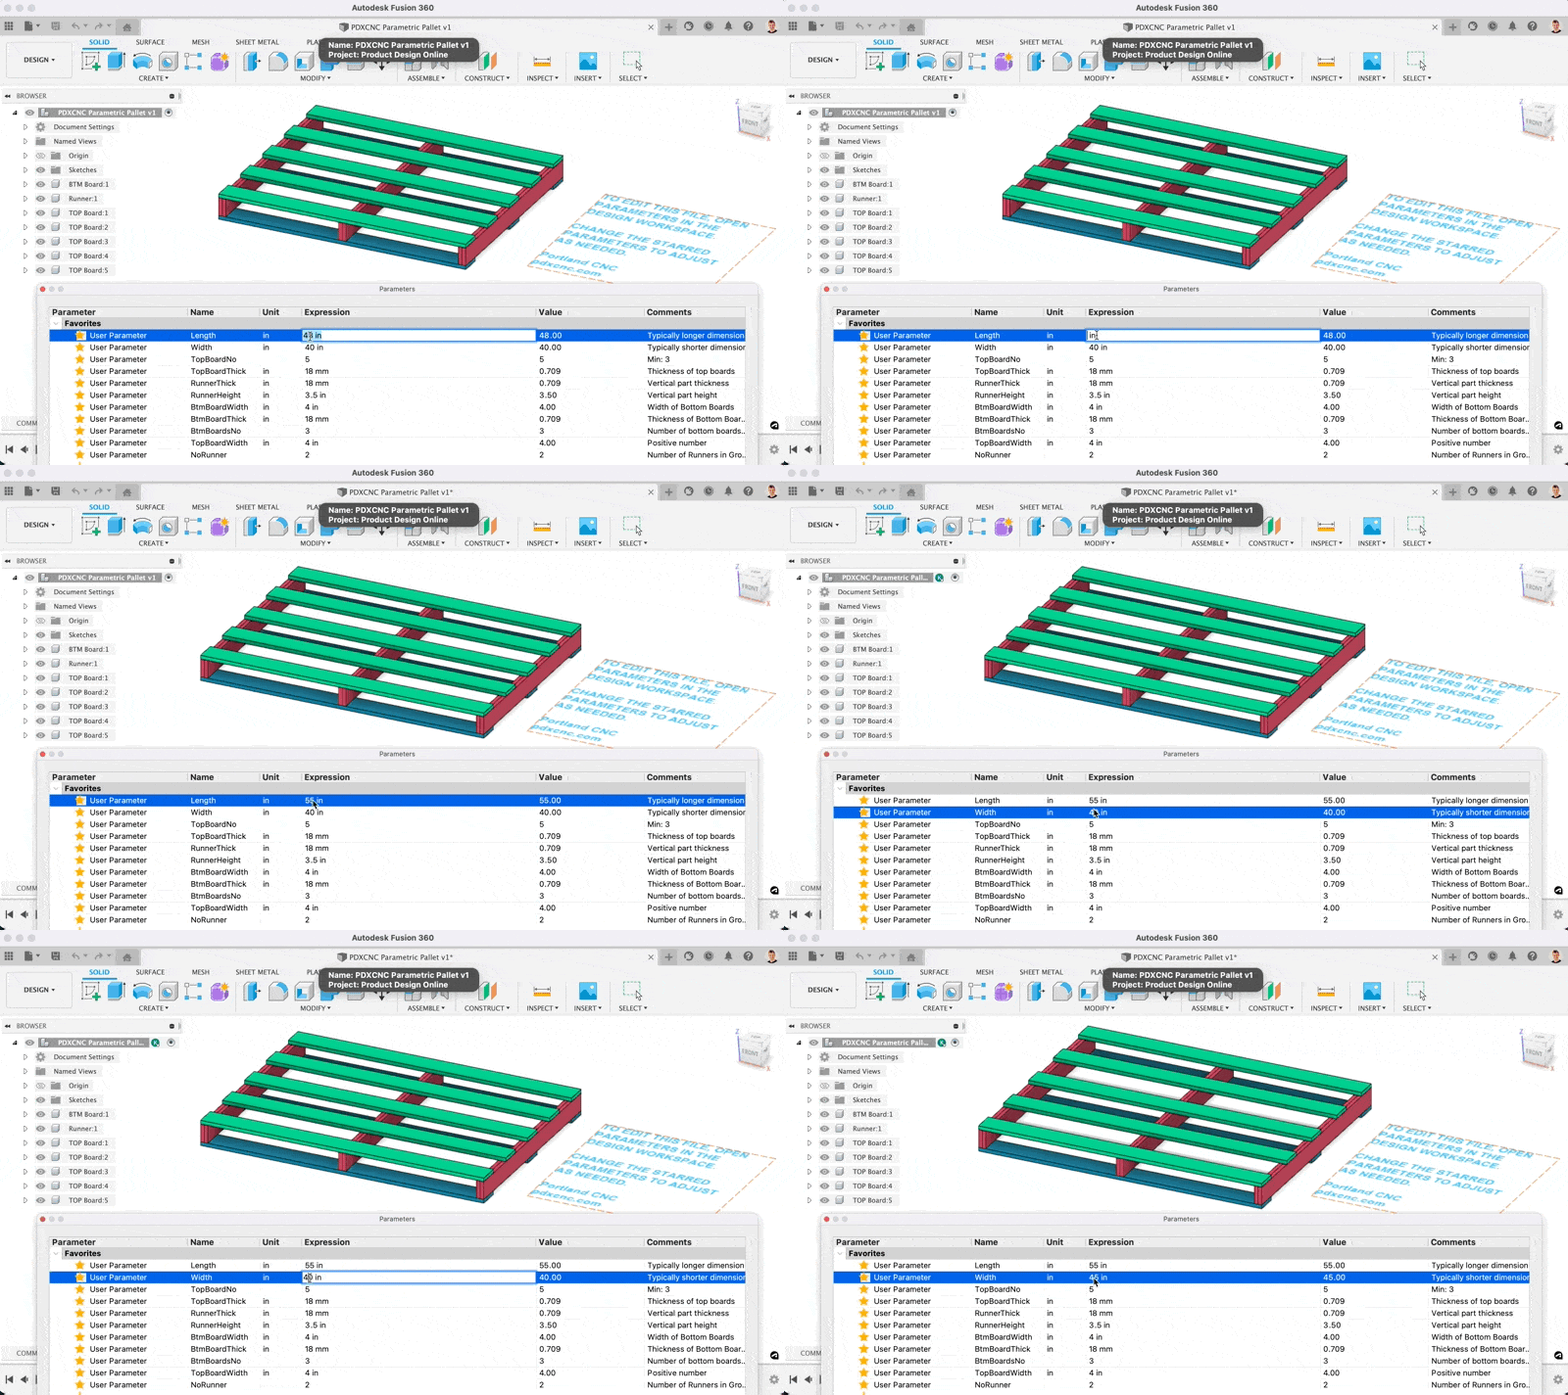
To see this final step again, you can watch the last part of the Product Design Online video.
Intro to User Parameters and Joints | Day 19 of Learn Fusion 360 in 30 Days - 2023 EDITION
Let's confirm the result with the video.
Watch from 03:16 to 04:09. The video shows how changing the parameter values in the dialog box instantly updates the model. You've now experienced this with your own model!
Conclusion
Today you've unlocked a new level of design capability. By moving from static numbers to dynamic parameters, you can create flexible, reusable, and robust models that are easy to adapt and iterate on.
Key Takeaways:
- Parametric modeling uses named variables (parameters) to control design dimensions, making models adaptable.
- User Parameters are defined in the
Modify > Change Parametersdialog. - You can use parameter names directly in sketch dimensions and feature dialogs (like Extrude and Shell).
- Changing a parameter's value in the dialog automatically updates the entire 3D model, saving time and preventing errors.
In our next lesson, we will explore the Design History Timeline. We've seen how parameters link to features, and the timeline is the "recipe book" that records every step of your design process. You'll learn how to read, edit, and reorder those steps, giving you even more control over your parametric models.