Hello! Welcome back to your course.
In our last lesson, you took a big step from a digital model to a manufacturing plan. You learned how to adjust the core slicer settings—layer height, infill, and speed—to balance the trade-offs between print quality, strength, and time.
Today, we address a fundamental constraint of 3D printing: gravity. Since your printer builds objects layer by layer from the bottom up, what happens when a part of your model has nothing underneath it? This is called an "overhang," and without help, the printer would just be extruding melted plastic into thin air, creating a failed, stringy mess.
This lesson is about solving that problem by generating support structures. You will learn why supports are necessary, how to automatically generate different types of supports in Bambu Studio, and how to choose the right kind for your specific model. Understanding supports is crucial for moving beyond simple shapes and successfully printing the complex, functional parts you envision for your gaming and DIY projects.
1. Why We Need Supports: The 45-Degree Rule
Before we even add supports, the first and most important strategy is to orient your part on the build plate to minimize overhangs. As you saw in the first video of this lesson, sometimes just flipping a model over is all you need to do.
But when orientation alone isn't enough, we need supports. The key principle to understand is the "45-degree rule."
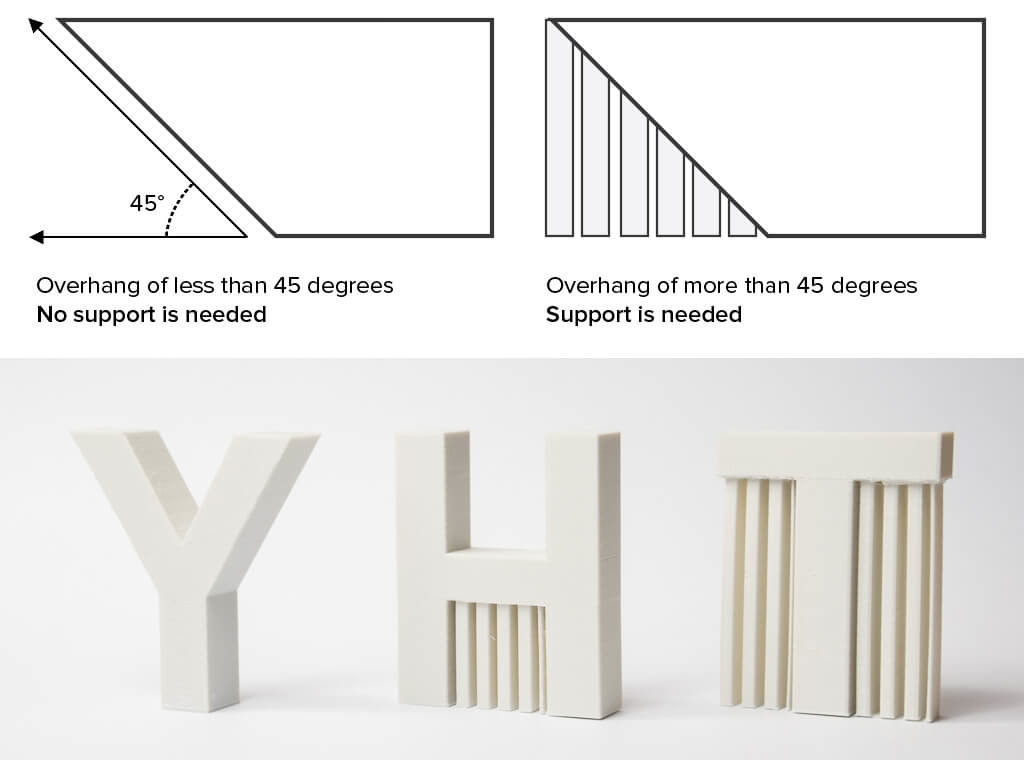
Because each new layer of molten plastic needs to be placed on a solid foundation, printers can typically handle gentle slopes without issue. A good rule of thumb is that any surface with an overhang angle greater than 45 degrees will need support.
Let's watch a video that explains these core concepts visually.
3D Printing with Supports: When, Why, and How
The video "3D Printing with Supports: When, Why, and How" from the Teach Me 3DP channel provides an excellent introduction. It shows what happens when overhangs fail and clearly explains the 45-degree rule using the 'YHT test'.
Watch the first part of this video (from the beginning to 09:26). Pay close attention to: How the presenter reorients models to avoid supports. The analogy of supports in construction. The 'YHT test,' which demonstrates the 45-degree rule and the concept of 'bridging' (printing across a horizontal gap).
As you saw, printers can print "bridges" over short, straight gaps, but large overhangs like the top of the letter 'T' will sag and fail without support.
2. Generating Supports in Bambu Studio: Normal vs. Tree
Now that you know when supports are needed, let's learn how to add them in Bambu Studio. The process is highly automated. You'll primarily be making one key choice: the Type of support.
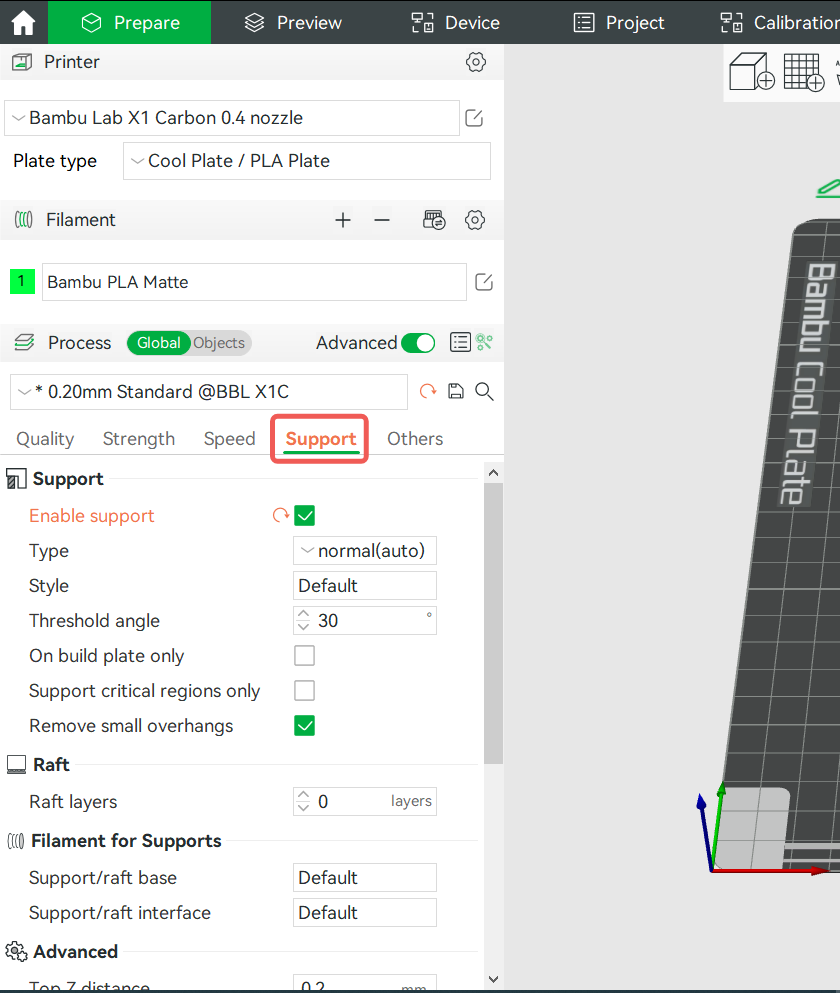
There are two main types of support structures:
- Normal (or Grid) Supports: These are vertical pillars that form a grid-like structure directly underneath the overhanging areas. They are robust and great for supporting large, flat surfaces.
- Tree Supports: These start from a few "trunks" on the build plate and grow branches out to touch the overhangs at specific points. They are excellent for complex and organic shapes, use less material, and are often easier to remove.
This video demonstrates the difference between the two types and when to use each.
3D Printing with Supports: When, Why, and How
Let's continue with the same video to see how to enable supports in Bambu Studio and compare the two main types.
Watch from 09:26 to 15:03. The video shows: How to enable Normal and Tree supports. A comparison for a flat overhang (a box lid), where Normal supports are more efficient. A comparison for an organic model (the Statue of Liberty), where Tree supports are superior, using less material and being easier to remove from delicate features.
3. A Deeper Dive: Support Styles
Within the Normal and Tree types, Bambu Studio offers several "styles" that refine how the supports are generated. While the defaults are excellent, understanding these styles gives you more control.
Support Types in Bambu Studio | Normal vs. Tree Supports
The video "Support Types in Bambu Studio" by ItsMeaDMaDe provides a fantastic hands-on comparison of the different support styles, showing how they look in the slicer and how the actual printed supports behave during removal.
Please watch these two key sections: 02:41 - 10:36: This segment explains the 'Normal' support styles ('Default/Grid' vs. 'Snug'). Pay attention to the tips for physical removal, which will be useful when you start printing. 13:06 - 22:08: This part compares the different 'Tree' support styles, including 'Slim,' 'Strong,' and 'Organic.' The presenter finds 'Organic' to be their favorite for its clean removal and good surface finish, which is a common experience in the community.
Your Turn: Experiment in the Slicer
Now, apply what you've seen. If you have a model with significant overhangs (like the Statue of Liberty or the Rascal dog from the video), load it into Bambu Studio. If not, you can use one of the default models included with the software.
- On the Process tab, go to Support.
- Check the box to Enable support.
- Set the Type to Normal (auto) and the Style to Grid. Slice the plate and observe the support structure, print time, and filament cost.
- Now, change the Type to Tree (auto) and the Style to Organic. Slice again.
- Compare the two results. Notice how the tree supports often use less material and may have a shorter print time, while branching around the model.
4. Key Parameters and the "Perfect" Surface
While there are many support settings, a few are critical for balancing easy removal against surface quality.
- Threshold angle: This setting (defaulting to 30 degrees in Bambu Studio) automates the 45-degree rule. It tells the slicer: "add supports to any surface with an angle steeper than this." For most prints, the default is fine.
- Top Z distance: This is the small vertical air gap between the top of the support and the bottom of your model. This gap is what makes the support removable.
- A larger gap makes supports easier to remove but results in a rougher surface on your part.
- A smaller gap gives a better surface finish but can make supports very difficult to remove.
- Support/object XY distance: This is the horizontal gap between the sides of the support and your model. A larger gap helps prevent the support from fusing to the side of your print.
Using the same material for both the model and the supports forces this trade-off. But since you plan to get a printer with an Automatic Material System (AMS), you can unlock a much better solution.
The Bambu Lab Wiki explains a powerful technique for users with an AMS: using a dedicated support material for the interface layers.
Please read the section titled "Introduction to Dedicated Support Filament." Focus on understanding the concept of using a different material for the 'support interface' and how this allows you to set the 'Top Z Distance' to 0 for a perfectly smooth surface.
By loading your main filament (like PLA) and a compatible support filament (like Bambu Support for PLA) into the AMS, you can tell the slicer to print just the very top layers of the support structure with the special material. This support material is designed to break away cleanly without bonding to the main filament. This lets you close the Top Z distance to zero, resulting in a flawless surface finish where the supports were, with no difficult removal. This is a game-changing feature for printing complex functional parts and detailed models.
Conclusion
You now have a solid understanding of how to handle overhangs, one of the most common challenges in 3D printing. While supports are a powerful tool, remember the best practice from the first video: it's always best to avoid supports if you can, either through smart orientation or by designing your part to be self-supporting.
Key Takeaways:
- Always try to orient your model to minimize overhangs before resorting to supports.
- The 45-degree rule is your guide: steeper overhangs generally require support.
- Normal (Grid) supports are best for large, flat, horizontal overhangs.
- Tree (Organic) supports excel for complex, organic, or delicate models, saving material and time.
- The Top Z distance is the critical setting that balances easy removal with surface quality.
- Using a dedicated support interface material with an AMS allows for easy removal and a perfect surface finish, eliminating the typical support trade-off.
In our next lesson, we will formalize the first principle we learned today. We'll dive deep into strategies for orienting a part on the build plate, not just to minimize supports, but also to maximize the strength of the final printed object.