Hello! Welcome back to your course on mechanical design.
In the last few lessons, we've focused on turning a 3D model into a printable file using Bambu Studio. You've learned to configure essential settings like layer height, infill, and speed, and most recently, how to generate support structures for complex overhangs. You now have all the tools to prepare a model for printing.
Today's lesson is the final, critical step before your digital design becomes a physical object. You will learn how to preview the sliced toolpath layer-by-layer and send the job to the printer. This is the pre-flight check for every print, allowing you to catch potential errors, verify your settings, and ensure the printer is executing the plan exactly as you intended. This verification step is fundamental in any manufacturing process, ensuring the final product matches the design specification.
1. From Preparation to Preview
So far, all your work has been in the Prepare tab of Bambu Studio. When you're satisfied with your settings (model orientation, layer height, infill, supports, etc.), you click the Slice Plate button.
This action is what transforms your 3D model and settings into a detailed, layer-by-layer instruction set for the printer, a file format known as G-code. Bambu Studio then automatically takes you to the Preview tab to visualize these instructions.
Bambu Studio Quick Start Guide - A beginners Guide To Bambu Lab Slicer Software
To start, let's get a quick overview of the main tabs in Bambu Studio. This video from Ricky Impey will help clarify the distinct roles of the 'Prepare', 'Preview', and 'Device' tabs in the printing workflow.
Watch this brief segment from 04:15 to 04:56. It clearly explains the purpose of each of the three main tabs you'll be using.
As the video explained, the Preview tab is your chance to see exactly what the printer is going to do before you commit time and filament.
2. Navigating the Toolpath Preview
Once you slice your model, you're presented with a colored representation of your object. This isn't just a pretty picture; every color and line represents a specific action the printer will take.
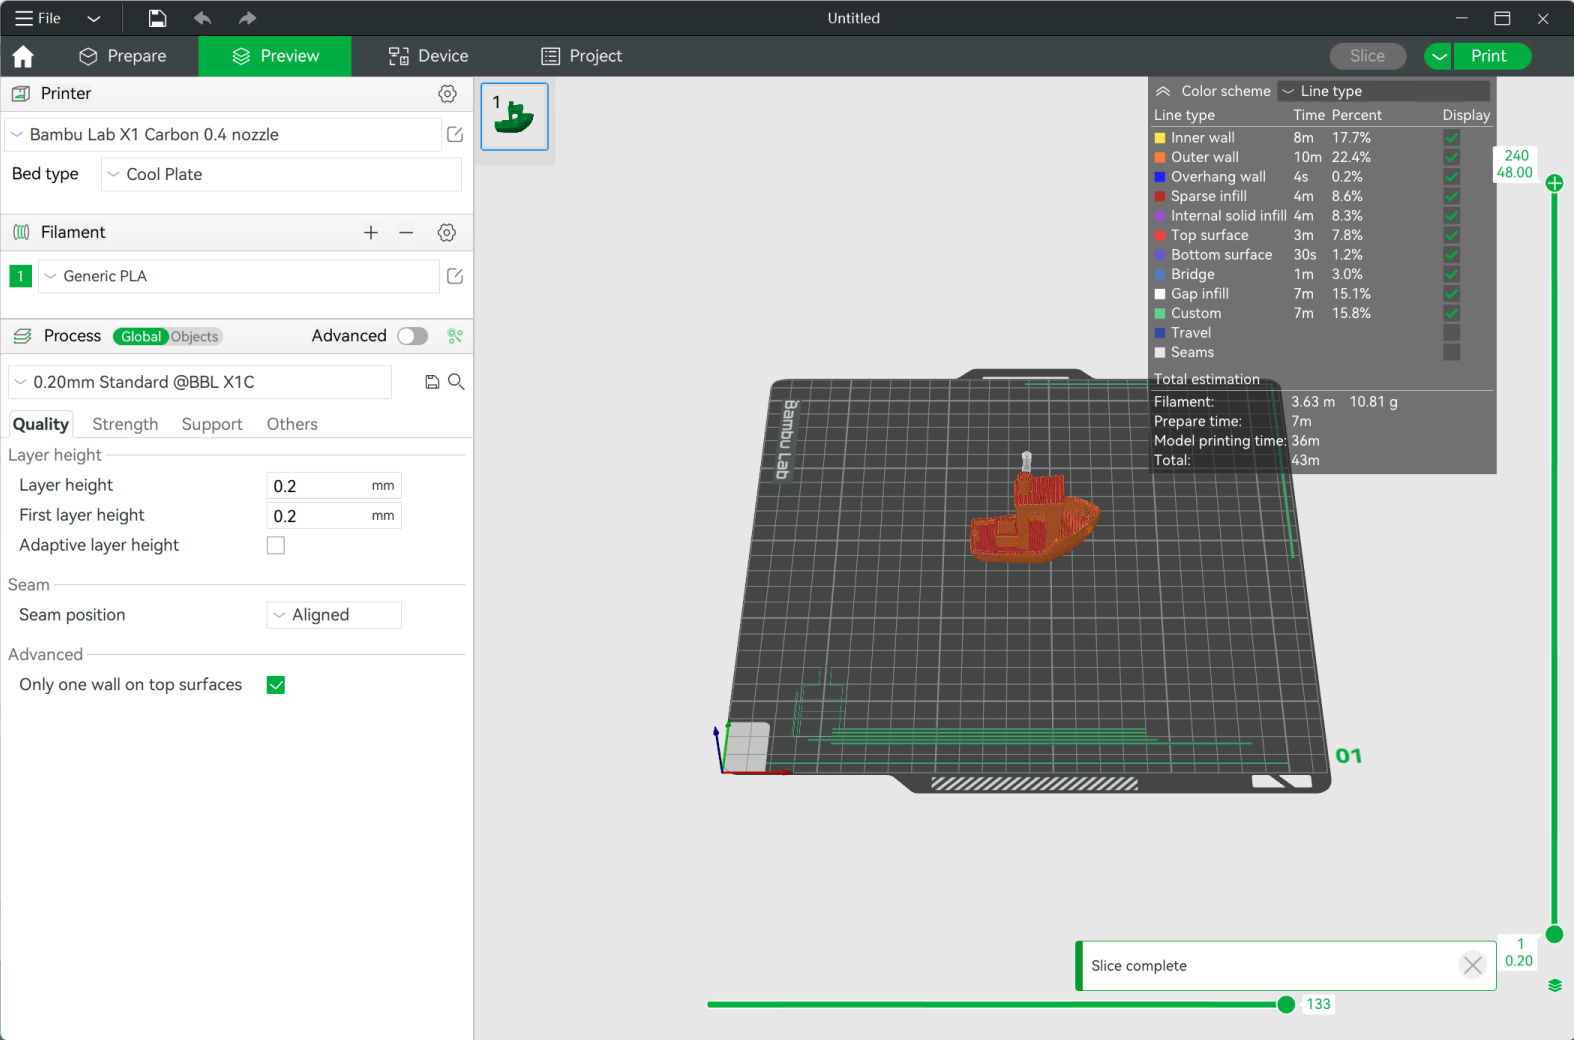
The most powerful feature here is the set of sliders:
- The vertical slider on the right lets you move up and down through the layers of the model.
- The horizontal slider at the bottom lets you see the nozzle's path within a single layer.
Let's watch a detailed walkthrough of how to use these tools and interpret the information provided.
Bambu Studio - Complete Beginner’s Guide to Slicing for 3D Printing
The video "Bambu Studio - Complete Beginner’s Guide" provides an excellent demonstration of the Preview tab's features.
Watch the segment from 09:45 to 11:20. Pay close attention to: How the presenter uses the sliders to inspect the sliced model. The different preview modes available in the drop-down menu (Line Type, Speed, etc.). The print estimations on the left, which give you valuable data on time, filament usage, and cost.
3. Your Pre-Print Checklist: What to Look For
Inspecting the preview isn't just about watching a neat animation; it's about active quality control. As you get more experienced, you'll develop a quick eye for potential problems. Here is a checklist of what you should always verify:
- First Layer: Drag the vertical slider all the way to the bottom (Layer 1). Is the first layer making good, solid contact with the build plate? This is the foundation of your print; if it's too thin, patchy, or incomplete, the print is likely to fail.
- Supports: Since you just learned about supports, this is a crucial check. Do the supports appear where you expect them? Are they properly touching the overhangs they're meant to support? Are there any delicate parts of the model that might get damaged during support removal? The preview helps you assess this.
- Infill: Move to a layer in the middle of your object. Do you see the infill pattern you selected? Does the density look correct for the strength you need?
- Walls (Perimeters): In the "Line type" view, check the outer and inner walls. Did you get the number of walls you specified in the settings? This is key for the part's strength and water-tightness.
- Small Features & Gaps: Look for any very small features, like thin posts or text. Do they appear in the preview? Sometimes, features smaller than the nozzle width won't be printed. Also, look for any unwanted gaps or holes in the toolpath.
- Print Time and Filament Cost: Do the estimates on the left seem reasonable? If a small part is estimated to take 10 hours, you might have an incorrect setting (like an extremely low layer height or 100% infill).
For a deeper dive into all the information available in the preview, the official Bambu Lab Wiki is an excellent reference.
View slicing information | Bambu Lab Wiki
This wiki page details every single piece of information available in the preview tab and provides practical applications for why you'd want to inspect them.
Skim through this page. You don't need to memorize everything. Focus on the "Basic information" section to understand what each view (Line type, Speed, Flow, etc.) shows, and then read the "Applications" section to see why this tool is so useful for improving print quality.
4. Sending the Job to the Printer
Once your pre-flight check is complete and you're confident in the toolpath, it's time to print.
The primary method is to send the job directly to your printer over the network.
Bambu Studio - Complete Beginner’s Guide to Slicing for 3D Printing
Let's return to the "Bambu Studio - Complete Beginner’s Guide" video, which clearly demonstrates the final step of sending the print.
Watch from 11:20 to the end (12:12). The presenter walks you through the "Print plate" dialog box, explaining the final options you need to confirm.
As shown in the video, clicking Print Plate opens a final confirmation window. Here you will:
- Select your printer from the drop-down list.
- Confirm the filament slots. If you're using the AMS, you can make a final check that the correct filament/color is assigned.
- Choose pre-print calibrations. It is highly recommended to always leave Bed Leveling checked. This ensures the first layer adheres perfectly.
- Decide on a timelapse. This is optional and can be turned off to save a small amount of time.
- Click Send.
Your printer will now receive the file, heat up, perform its calibrations, and begin printing.
Alternative Sending Methods
While direct network printing is most common, it's good to know the alternatives. The Bambu Lab Wiki provides a quick guide.
Bambu Studio Quick Start Guide
This Quick Start Guide outlines other ways to get your sliced file to the printer.
Briefly read the sections under "Send print job". You've already seen "Print plate" in the video. Now look at: Send: This sends the file to the printer's SD card over Wi-Fi, but doesn't start the print automatically. You would then start it from the printer's screen. Export plate sliced file: This saves the file to your computer, so you can manually copy it to the printer's microSD card. This is a useful backup if your network is down.
Conclusion
Congratulations! You've completed the full workflow from a 3D model in Fusion 360 to a print-ready file sent to your machine. Mastering the Preview tab is what elevates a beginner to an intermediate user. It's the skill that allows you to diagnose problems before they waste hours of print time and material.
Key Takeaways:
- Slicing converts your model and settings into a set of machine instructions (G-code).
- The Preview tab is your tool for visualizing and verifying this G-code before printing.
- Always use the layer-by-layer preview to perform a "pre-flight check," looking at the first layer, supports, infill, and overall print integrity.
- The "Print Plate" button sends your job to the printer, but gives you a final chance to confirm settings like bed leveling and filament choice.
- Knowing how to export a sliced file to an SD card is a valuable backup method.
In our next lesson, we will begin the Design for Additive Manufacturing (DfAM) module. You'll learn how to strategically orient a part on the build plate to minimize supports and maximize its strength. The preview skills you learned today will be absolutely essential, as you'll use them to evaluate the outcome of different orientation choices.