Hello! Welcome back to your course on mechanical design for 3D printing.
In our last lesson, you got your first 3D model, the Benchy, loaded into Bambu Studio and configured the basic printer and filament profiles. You've told the software what you're printing with. Today, we'll focus on how you want to print it.
This lesson is all about adjusting the core "Process" settings: layer height, infill, and speed. Mastering these three parameters is the key to controlling the outcome of your prints. You'll learn to make conscious trade-offs between print quality, the strength of the final part, and how quickly it prints. This knowledge is essential for everything from printing detailed gaming miniatures to creating strong, functional parts for your DIY projects.
The Fundamental Trade-off: Quality, Strength, and Speed
Nearly every decision you make in slicing involves balancing three competing factors:
- Quality: How good does the part look? Is the surface smooth? Are fine details visible?
- Strength: How durable is the part? Can it withstand mechanical stress?
- Speed: How long does the print take?
You can't maximize all three at once. A high-quality, high-strength print will be slow. A fast print might sacrifice some quality or strength. The goal is to find the right balance for your specific needs.
To start, let's review the basic principles that govern these trade-offs.
Parameters selection and setting during slicing - Bambu Lab Wiki
The Bambu Lab Wiki provides a concise set of rules that summarize the relationship between the main slicer settings. Pay close attention to these as they form the foundation of everything we'll cover today.
Please read the section titled "Fundamental Rules and Principles." Focus on principles (2), (3), and (4) which cover the direct relationships between speed, layer height, infill, and the final print outcome.
1. Layer Height: The Key to Quality and Detail
Layer height is the vertical thickness of each individual layer of plastic. It's the primary factor that determines the visual quality and surface finish of your print.
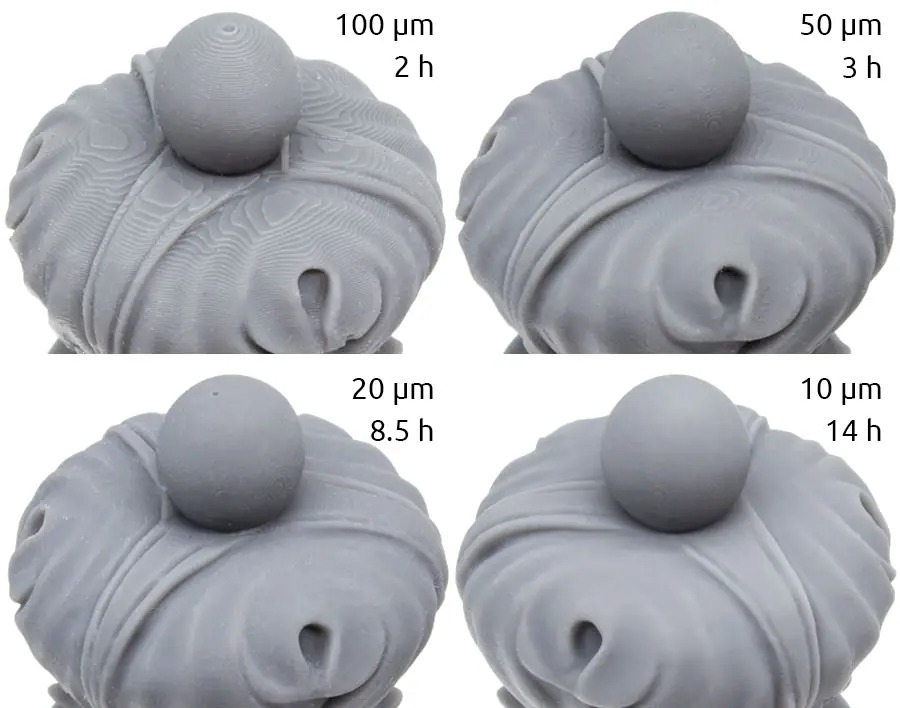
A smaller layer height creates a smoother surface with less visible "stair-stepping" on curved or angled surfaces, but it requires more layers to build the part, thus increasing print time. A larger layer height prints much faster but results in more prominent layer lines.
Since you have a background in mechanical engineering, you'll appreciate that there are some practical constraints. A common rule of thumb is to set your layer height between 25% and 75% of your nozzle's diameter. For your Bambu A1 with a standard 0.4 mm nozzle, this means your practical range is about 0.1 mm to 0.3 mm.
Let's see this in action within Bambu Studio.
Bambu Studio 101 | Beginners Guide to Bambu Slicer Software | Quality & Variable Layers
The video "Bambu Studio 101" by ItsMeaDMaDe offers an excellent visual demonstration of how layer height presets in Bambu Studio affect both the sliced preview and the final physical object.
Please watch the following two segments: 01:53 - 13:04: This part explains the built-in quality presets (from 'Extra Fine' to 'Extra Draft') and shows how layer height affects print time and the 'plateauing' effect on curved surfaces in the slicer preview. 13:42 - 23:45: Here, you'll see a side-by-side comparison of actual Benchys printed with these different settings. This is invaluable for understanding the real-world impact of your choices.
As you saw, the difference is significant. For your future projects:
- Aesthetic Models (e.g., gaming accessories, figures): Use a smaller layer height (like 0.12 mm) for a smooth, detailed finish.
- Functional Parts (e.g., replacement parts, brackets): A standard layer height (0.20 mm) is often a good balance of strength and speed.
- Rapid Prototypes (e.g., just checking if a part fits): Use a larger layer height (0.28 mm) to get a part in your hands as quickly as possible.
Advanced Technique: Variable Layer Height
Bambu Studio has a powerful feature that lets you get the best of both worlds. Variable Layer Height allows the slicer to use thin layers on curved surfaces where detail is needed and thick layers on flat, vertical walls to save time.
Bambu Studio 101 | Beginners Guide to Bambu Slicer Software | Quality & Variable Layers
Let's continue with the same video to see how this advanced feature works. It's a fantastic tool for optimizing your prints.
Watch from 23:45 to 34:04. The presenter explains how to enable and adjust the Variable Layer Height feature to improve quality on specific areas of a model without dramatically increasing the total print time.
2. Infill: The Inner Strength of Your Part
Infill is the internal structure printed inside the solid outer walls of your model. It serves two main purposes:
- Provide strength and rigidity to the part.
- Support the solid top surfaces of the model so they don't collapse while being printed.
In Bambu Studio, you can find the infill settings under the Strength tab. The two most important settings are Sparse infill density (a percentage) and Sparse infill pattern.

A higher infill density creates a stronger, heavier part but uses more filament and takes longer to print. A lower density is faster and saves material, suitable for models that don't need to be strong. The pattern also plays a huge role.
Master infill to take your 3D prints to the next level
The video "Master infill" from Teaching Tech provides a comprehensive look at different infill strategies for different goals. While the interface shown is a similar slicer, the concepts and pattern names are directly applicable to Bambu Studio.
Watch the following sections: 00:45 - 02:23: Understand the basic concept of sparse and solid infill. 03:06 - 04:48: Learn about Lightning infill, an excellent choice for cosmetic models where you want to save time and material. 06:35 - 08:59: Discover how to achieve maximum strength. This section introduces Adaptive Cubic infill and, crucially, highlights that increasing wall loops (perimeters) is often more effective for strength than simply raising the infill percentage.
Hands-On: Experiment with Infill
Now, it's your turn to experiment. In Bambu Studio with your Benchy model loaded:
- Go to the Process dropdown and select the
0.20mm Standard @Bambu Lab A1profile. - Click on the Strength tab. Note the default infill density (likely 15%) and pattern (likely Grid or Gyroid).
- Click Slice Plate. In the top right, note the estimated print time and filament usage.
- Now, change the Sparse infill density to
5%and slice again. Observe the changes in time and filament. Switch to the Preview tab and drag the layer slider down to see the sparse internal structure. - Finally, change the density to
50%and slice. Compare the results again. You'll see a significant increase in print time and material cost for a much denser part.
3. Print Speed: Finding the Right Pace
Your Bambu A1 is designed to print very fast. The default profiles are already optimized for a good balance of speed and quality. However, you can still adjust the speed for specific outcomes.
- Going Faster: For rapid prototypes where looks don't matter, you can increase the speed settings. Your printer also has "Sport" and "Ludicrous" modes which do this at a hardware level (by also increasing nozzle temperature to keep up).
- Slowing Down: For the highest possible quality, especially for models with very fine details, you'll want to slow the printer down. The "High Quality" process presets in Bambu Studio (like
0.12mm Fineor0.08mm Extra Fine) do this automatically by lowering the default speeds and accelerations.
The Bambu Lab Wiki article you read earlier explains this well. The "High Quality Process Parameter" achieves its smoother surface and clearer details primarily by using a lower layer height and lower speeds. Conversely, the "Strength Process Parameter" focuses on more walls and higher infill density.
Slicing Your First Model
Let's put all this together and finalize the slicing for your Benchy.
- In Bambu Studio, select the
0.20mm Standard @Bambu Lab A1process profile. This is an excellent all-around starting point. - Click the Slice Plate button in the top-right corner.
- After a few moments, the view will switch to the Preview tab.
This preview is a simulation of your print. You can see the exact path the nozzle will take, layer by layer.
- Use the vertical slider on the right to scrub through the layers and see how the Benchy is built up from the build plate.
- Look at the legend on the left to see what the different colors mean (e.g., Outer wall, Infill, Top surface).
- Check the print time and filament usage estimates on the left. This gives you a clear idea of the resources required for your print.
You've now successfully taken a 3D model, applied a set of intelligent printing parameters, and generated the final machine instructions (G-code) for your printer.
Conclusion
In this lesson, you explored the three most critical slicer settings and learned how to manipulate them to achieve your desired outcome.
Key Takeaways:
- Layer Height is your primary control over surface quality and print time. Lower is smoother but slower.
- Infill Density and Pattern determine the internal structure, affecting strength, weight, and material cost. For strength, focus on wall loops first, then infill.
- Print Speed is a trade-off between throughput and quality. Bambu's default profiles are fast; slow down for maximum detail.
- The "Slice" and "Preview" functions are where your digital design becomes a concrete manufacturing plan.
In our next lesson, we'll tackle a common challenge in 3D printing: models with "overhangs"—parts that would otherwise be printed in mid-air. You'll learn how to generate and customize support structures to make even more complex designs printable.