Hello! Welcome back to your course on mechanical design for 3D printing.
In the last lesson, you installed Bambu Studio and successfully connected it to your Bambu A1 printer. You've now established the full software-to-hardware link. Today, we'll start using that software by bringing in a digital object and telling the slicer what machine and material you're using.
This lesson focuses on the first steps of any print job: importing a 3D model and configuring the essential printer and filament profiles. These profiles contain critical information that ensures the slicer generates instructions tailored precisely to your hardware and the plastic you're printing with.
1. Understanding 3D Model File Formats
Before we import anything, it's important to understand the files we're working with. In 3D printing, you'll most commonly encounter two file formats: STL and 3MF.
- STL (Standard Tessellation Language): This is the traditional, most widely supported format. An STL file describes the surface geometry of a 3D object using a mesh of triangles. However, it's a very simple format—it contains only the geometry. It does not store information about color, material, scale, or print settings.
- 3MF (3D Manufacturing Format): This is a modern format designed specifically for additive manufacturing. Think of it as an archive or a "smart" file. A single 3MF file can contain not only the geometry but also color information, materials, and even slicer settings like infill percentages and support structures.
Bambu Lab, and its slicer Bambu Studio, heavily favors the 3MF format. When you download a pre-configured file from Bambu's MakerWorld platform, it's often a 3MF file that includes all the recommended print settings for a perfect print on your A1.
To get a deeper understanding of these formats, please read the following article.
Understanding 3D File Formats: STL vs OBJ vs 3MF
This article from Mandarin3D provides a clear comparison of the most common 3D printing file formats. It will help you understand why 3MF is becoming the new standard.
Please read the sections "STL: The Old Reliable," "3MF: The Modern Standard," and its subsection "3MF and Bambu Lab Printers." Then, review the "Quick Comparison" table and the recommendations under "Which Format Should You Use?" to solidify your understanding.
2. Importing a Model into Bambu Studio
Now, let's get a model into the slicer. You can do this in two ways:
- Click the "Add" icon (a cube with a plus sign) on the top toolbar.
- Drag and drop a model file directly from your computer's file explorer onto the virtual build plate in Bambu Studio.
For practice, you'll need a model to import. A great starting point is the "3D Benchy," a small boat specifically designed to test a printer's capabilities. You can easily find it by searching for "3D Benchy STL" online and downloading it from a reputable model repository like Printables or Thingiverse.
Action: Please find and download the standard "3D Benchy" STL file.
Once you have the file, watch the following video segment to see how to import a model and get an initial tour of the Bambu Studio interface.
Beginner Bambu Lab Studio Slicer Software Basics Tutorial
This video from The 3D Print Zone provides a clear walkthrough of the Bambu Studio interface and demonstrates how to load a model.
Watch from 05:22 to 06:20. The creator will show you how to add a model to the build plate. You can ignore the parts about rotating and positioning the model for now; we will cover that in a future lesson.
After importing your Benchy model, it should appear on the virtual build plate in the "Prepare" tab.
3. Configuring Printer and Filament Profiles
With a model loaded, you must tell the slicer what machine you're printing on and what material you're using. This is done via profiles.
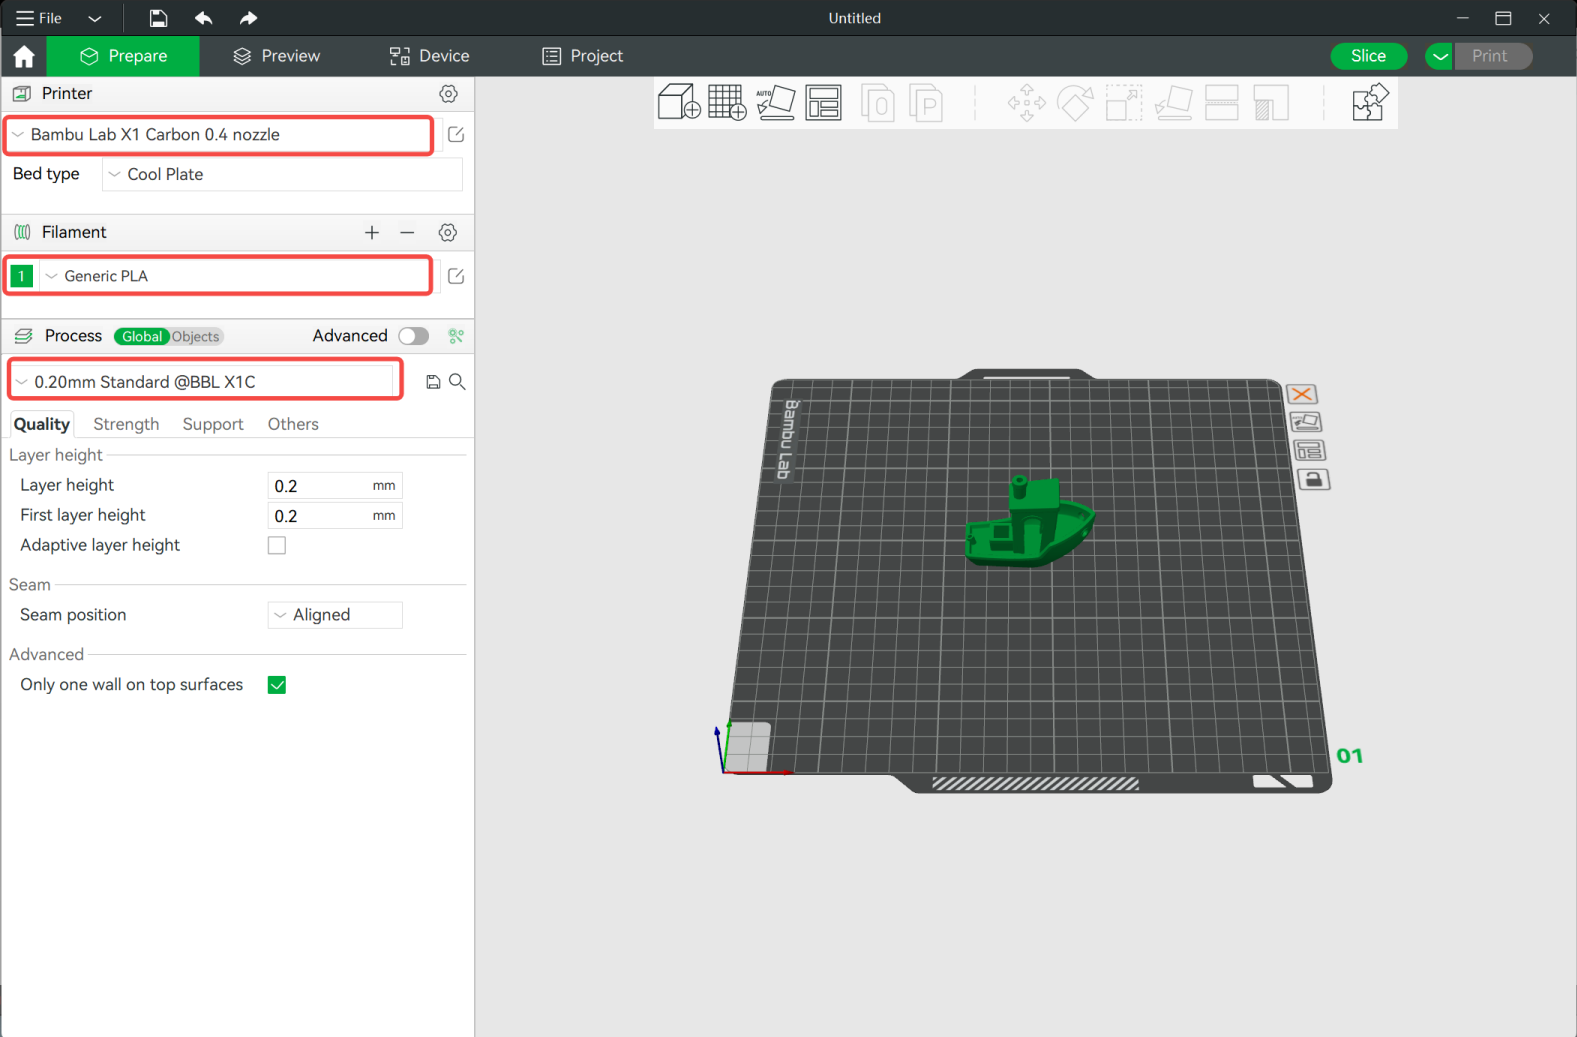
Printer Profile
The printer profile contains all the hardware-specific settings, such as the build volume dimensions, nozzle diameter, and maximum print speeds. You selected your Bambu A1 during the initial setup, so this should already be correctly configured.
- Location: The top-left panel, under "Printer."
- Verification: Ensure it says Bambu Lab A1 0.4 nozzle. You should also select the correct plate type (e.g., Textured PEI Plate) that you have installed on your printer.
Filament Profile
The filament profile stores settings related to the material, most importantly the nozzle and bed temperatures, as well as flow rate and cooling fan speeds. Using the wrong profile (e.g., PLA settings for an ABS filament) will almost certainly result in a failed print.

The following video clip demonstrates how to select and manage your filament profiles, including how to configure them for your AMS lite.
Beginner Bambu Lab Studio Slicer Software Basics Tutorial
This clip continues from the previous one and explains how to select a filament profile, including how to set up different materials for each slot in the AMS.
Watch from 01:52 to 05:22. The first part is a refresher on selecting the printer and plate type. The main part to focus on is the filament selection process, where the video shows how to choose a material and configure multiple filaments for the AMS.
Synchronizing Filaments with the AMS
Your AMS lite automatically detects the Bambu Lab filaments you load into it. A key feature of Bambu Studio is its ability to synchronize with the AMS, so the software knows exactly what colors and materials are ready to print.
When you load a project file (especially a multi-color 3MF), the project may have its own filament settings. The "Sync" function allows you to quickly match the project's filament slots to the actual filaments in your AMS.
TOP 10 Bambu Studio For Beginners! 10 MUST-KNOW Tips and Tricks For Bambu Lab A1/A1 mini Beginners!
This short clip from Lukas Engstrom highlights a must-know tip for AMS users: how to synchronize the filament list.
Watch from 11:43 to 12:38. This explains how to use the 'Synchronize' or 'Update' button to make the filaments in Bambu Studio match what is physically loaded in your AMS.
4. Your First Configuration
Let's put it all together. Follow these steps in Bambu Studio:
- Open Bambu Studio and ensure you are on the Prepare tab.
- Import your 3D Benchy STL file.
- In the left-hand panel, verify your printer profile:
- Printer:
Bambu Lab A1 0.4 nozzle - Plate type: Select the one you have on your printer (e.g.,
Textured PEI Plate).
- Printer:
- Configure your filament profile:
- Assuming you have loaded a spool of PLA into the first slot of your AMS lite, click the colored square next to filament slot
1. - Select the vendor (e.g.,
Bambu Lab), the filament type (PLA), and the specific color. If you're using a generic brand,Generic PLAis a safe starting point. - If you have your AMS connected, click the "sync" icon (which looks like a refresh symbol) next to the "Filament" header to automatically pull the filament data from your printer.
- Assuming you have loaded a spool of PLA into the first slot of your AMS lite, click the colored square next to filament slot
You have now successfully imported a model and configured the slicer for your specific hardware and material.
Conclusion
In this lesson, you bridged the gap between a digital 3D model and the physical reality of your printer. You learned how to bring a model into Bambu Studio and, crucially, how to apply the correct settings for your specific machine and filament.
Key Takeaways:
- 3MF is a modern file format that bundles geometry, colors, and print settings, making it superior to the older STL format for use with modern printers like the Bambu A1.
- Models can be imported into Bambu Studio using the "Add" button or by dragging and dropping the file.
- Printer and Filament profiles are collections of settings that tell the slicer how to create instructions for your specific hardware and material.
- For AMS users, the "Sync" function is a powerful tool to ensure the filament settings in the software match the physical spools loaded in the printer.
In our next lesson, we will dive deeper into the slicing process. You'll learn how to adjust the most important print settings—layer height, infill, and speed—to balance quality, strength, and print time. We'll then slice the Benchy and send your first self-prepared print job to the printer