Hello! Welcome back.
In our last lesson, you successfully assembled and calibrated your Bambu A1 printer. Your machine is now physically and electronically ready. The next logical step is to give it the material it needs to create objects.
Today's lesson focuses entirely on handling filament with your Automatic Material System (AMS) Lite. By the end of this session, you will be able to confidently load new spools of filament, unload them, and understand the key differences between using Bambu's own filament and third-party brands. This is the final preparatory step before you start printing.
Let's dive in.
1. How the AMS Lite Works: A Quick Technical Overview
Before we start handling filament, it's helpful to understand the mechanism you're interacting with. Given your mechanical engineering background, you'll appreciate that the AMS Lite is more than just a set of spool holders. It's an active feeding system.
To understand the core components, take a look at the Bambu Lab Wiki page that describes the system's modules.
Introduction to the modules and functions of AMS lite
This page provides a technical breakdown of the AMS lite. We'll focus on the components responsible for moving the filament.
Please read the sections "First stage feeder" and "Rotary Spool Holder," followed by the short section on "Pre-loading." Note the roles of the odometer and motor speed sensors in detecting filament motion and potential slips.
As you read, you'll see the system consists of two main parts for each slot:
- Rotary Spool Holder: This holds the spool and can automatically rotate slightly to keep the filament taut when unloading.
- First Stage Feeder: This is the heart of the system. It contains a motor and gears that grip and push the filament into the long PTFE tube leading to the printer's tool head. It also has an odometer wheel to measure how much filament has passed through and sensors to detect jams.
When you insert filament, the AMS performs a pre-loading sequence, automatically feeding about 40 cm of filament into the tube to prepare it for printing.
2. Loading Filament into the AMS Lite
Now for the hands-on part. We'll walk through preparing a spool and loading it into one of the four AMS slots.
Spool and Material Compatibility
Not all spools or materials are suitable for the AMS. Before you load anything, it's crucial to know the limitations to avoid jams or damage.
A1 First Print with AMS Lite - Bambu Lab Wiki
The official Bambu Lab Wiki specifies the supported spool dimensions and explicitly lists materials that should NOT be used with the AMS Lite.
Read the section "1. Spool loading." Pay close attention to the list of materials to avoid (like flexible TPU and abrasive carbon fiber filaments) and the required spool dimensions.
The key takeaway is to avoid flexible and abrasive filaments in the AMS Lite. These should be mounted on the separate, single-spool holder that came with your printer for direct feeding. Also, ensure your filament spool's width and inner diameter are within the supported range (40-68 mm width, 53-58 mm inner diameter) to prevent issues. Most standard 1 kg spools will fit.
The Loading Process
Let's load your first spool. We'll start with a Bambu-branded filament, as the process is slightly more automated.
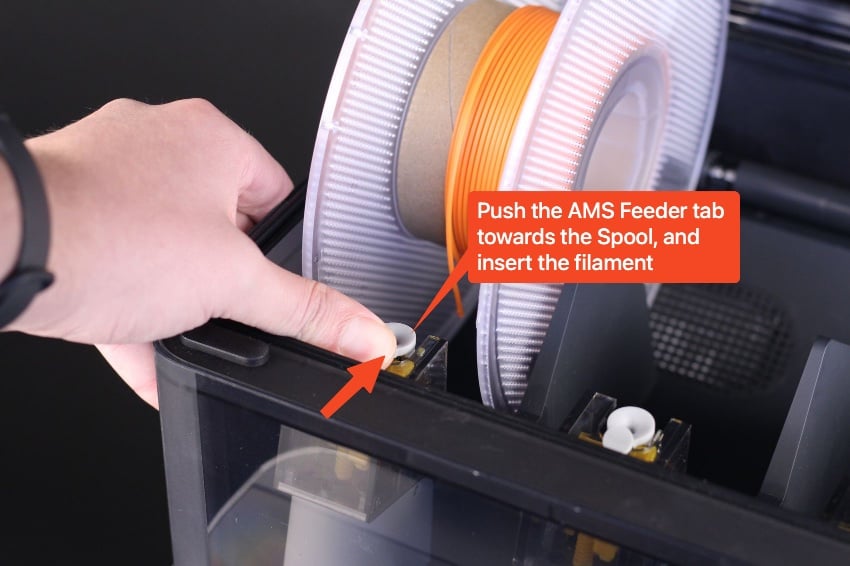
- Orient the Spool: The filament must feed from the bottom of the spool, up into the feeder inlet. Placing it the wrong way will cause feeding problems.
- Prepare the Filament End: Snip the end of the filament at a sharp 45-degree angle. This creates a point that feeds much more smoothly into the mechanism.
- Feed the Filament: Push the filament end into the inlet port of your chosen slot. You may need to press the small release button above the inlet to help it engage.
This video demonstrates the process clearly.
Bambu Lab A1 + AMS Lite Guide, Assembly, Setup, Slicing, Example Prints, Optimizing AMS, and Review!
This guide from Embrace Making shows the complete loading process for a Bambu-branded filament, from cutting the tip to seeing it appear on the printer's screen.
Watch from 12:00 to 13:25. Notice how the RFID tag on the Bambu spool allows the printer to automatically identify the filament type and color.
Now, try it yourself. Load a spool of Bambu filament into one of the AMS Lite slots. You should hear the motor engage and see the filament type appear automatically on the printer's screen.
Loading Third-Party Filament
What if you're not using a Bambu filament with an RFID tag? The process is nearly identical, but requires one manual step. The printer will detect the filament but will show a question mark for its type and color. You must set these manually on the screen.
Bambu Lab A1 + AMS Lite Guide, Assembly, Setup, Slicing, Example Prints, Optimizing AMS, and Review!
The same video also explains how to handle non-Bambu filament.
Watch from 45:23 to 46:01. See how you can tap the question mark on the screen to manually select the filament material (e.g., PLA) and its color.
This step is crucial. The printer uses this information for temperature settings and to allow you to select the correct color in the slicing software.
3. Unloading and Switching Filament
Once a print is done, the filament automatically retracts. However, you'll often need to unload it manually to change colors or material types.
The process is initiated from the printer's touchscreen.

The official wiki provides a step-by-step guide for unloading.
A1 First Print with AMS Lite - Bambu Lab Wiki
This appendix from the Bambu Lab Wiki covers the proper procedure for unloading filament and removing the spool safely.
Read the sections "1. Unload the filament" and "2. Remove the spool." Note the instruction to manually click "unload" on the screen if a print was canceled, and the proper two-handed technique for removing the spool from the holder.
To summarize the unloading process:
- On the printer screen, navigate to the filament menu and select the spool you want to unload. Press "Unload."
- The printer will first heat the nozzle to soften any filament inside, then retract it all the way back to the AMS Lite.
- Once the screen indicates it's safe, you can pull the filament out of the feeder.
- Crucially, secure the loose end of the filament in the small holes on the side of its spool to prevent it from uncoiling and creating a tangle.
- Remove the spool from the holder using two hands for stability.
Switching from one filament to another is simply a sequence of unloading one spool and loading another. This short clip shows how quick the physical swap can be.
Bambu Lab A1 + AMS Lite Guide, Assembly, Setup, Slicing, Example Prints, Optimizing AMS, and Review!
This brief clip demonstrates a quick swap between two different filament spools on the AMS lite.
Watch from 31:21 to 31:50 to see the unload-and-reload action for a quick changeover.
Conclusion
Excellent work. You are now familiar with the entire lifecycle of filament management on your Bambu A1: understanding the mechanism, knowing which materials are compatible, and physically loading and unloading spools.
Key Takeaways:
- The AMS Lite is an active system with feeders and sensors that automate filament handling.
- Always orient spools so filament feeds from the bottom and cut a sharp 45-degree angle on the tip for smooth loading.
- Bambu filament is auto-detected via RFID; third-party filaments require you to manually set the type and color on the printer's screen.
- Use the "Unload" function on the screen to safely retract filament before removing a spool.
- Always secure the loose end of a filament spool immediately after unloading to prevent tangles.
In the next lesson, we will put this all together. With filament loaded and ready, you will perform your first test print from a pre-sliced file on the printer's memory. This will be the satisfying moment where you verify the entire system is working correctly and create your first physical object.