Hello! Welcome back to your course on mechanical design.
In the last module, you mastered parametric design, learning how to create intelligent, adaptable single parts. You saw how changing a parameter like wall_thickness could automatically update your entire model. This is a powerful skill for designing individual objects.
However, most of your ambitious projects, from gaming accessories to your custom desk, will consist of multiple parts that fit and work together. This requires us to move from single-part design to multi-component assemblies.
This lesson is the first and most critical step in that transition. Our learning outcome is to distinguish between bodies and components and their use cases. Understanding this distinction is the absolute foundation for building complex, well-organized, and functional assemblies in Fusion 360.
1. The Fundamental Difference: Clay vs. Lego Bricks
At its core, the distinction is simple. Think of it this way:
- A Body is like a lump of clay. It's a continuous 3D shape that you can add to, subtract from, and sculpt. You can have multiple lumps of clay, but they are all just shapeless material in the same workspace.
- A Component is like a Lego brick. It's a distinct, manufactured part with its own identity. It's designed to be connected to other bricks to form a larger assembly.
A single design file in Fusion 360 acts as your top-level assembly. Within it, you can have many components, and each component can be made up of one or more bodies.
The official Autodesk blog provides a very clear summary of this distinction. Please read the following article, paying close attention to the definitions and the comparison table.
Understanding Autodesk Fusion Bodies & Components for New ...
This article from the official Autodesk Fusion blog provides a concise and authoritative explanation of bodies and components. Focus on the definitions, the constraints listed for each, and especially the side-by-side comparison table.
Read the entire article. The key information is presented in the sections 'What are bodies in Autodesk Fusion?', 'What are components in Fusion?', and the summary table under 'Other ways to understand bodies and components.' The final sentence is an excellent rule of thumb.
The table in that article is your key reference. The most important differences for your work will be:
- Motion: Only components can have joints applied to simulate movement.
- Manufacturing: Only components appear in a parts list or Bill of Materials (BOM), which is crucial for your larger DIY projects.
- Reuse: Components are designed to be reused (like screws or brackets), and copies can be linked so that a change to one updates all instances.
2. Assemblies: Top-Down vs. Bottom-Up
Your mechanical engineering background gives you a head start in understanding that products are assemblies of parts. In the world of CAD, there are two main philosophies for creating these assemblies:
- Bottom-Up: You design each part in a separate file, then bring them all together into a new "assembly" file. This is the traditional method used by older CAD software like Autodesk Inventor or SolidWorks.
- Top-Down: You start with one main assembly file and design all your parts within the context of that assembly. This allows you to reference the geometry of one part while designing another, ensuring everything fits together perfectly.
Fusion 360 is primarily a top-down modeling tool. This is why the distinction between bodies and components is so important—it's the system that allows you to manage all the parts of a complex assembly within a single file.
3. Bodies vs. Components in Action
Now that you have the theory, let's see what it means in practice. The following video gives a great visual explanation of the pros and cons of each, and introduces a critical best practice.
Bodies vs Components in Fusion 360 Explained - Learn Autodesk Fusion 360 in 30 Days: Day #13
This video from Product Design Online clearly demonstrates the practical consequences of using bodies versus components. It will help solidify the concepts from the article you just read.
Please watch the following segments: 02:27 - 03:17: For a clear definition of bodies and components with examples. 03:28 - 04:57: To understand the limitations of bodies (copying, parts lists, patterns). 06:27 - 09:02: To see the powerful advantages of components (joints, organization, activation, reuse). 09:02 - 10:19: For a summary and the introduction of 'Rule #1'.
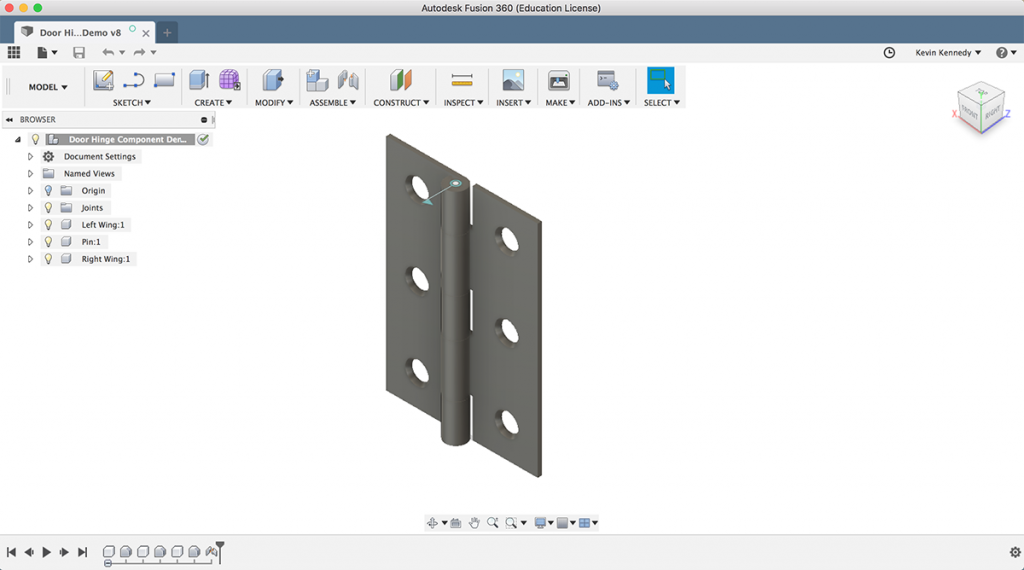
As the video demonstrates, a multi-part object like a door hinge must be built with components to function correctly.
4. When to Use Which? The "Rules of Thumb"
So, how do you decide what to use for your projects? Here's a simple decision-making framework.
Use Bodies when:
- You are designing a single, static object.
- The object has no moving parts.
- It's a quick model for a simple 3D print.
- Example: A simple, one-piece phone stand or a coffee mug.
Use Components when:
- Your design has more than one distinct part.
- The parts need to move relative to each other (e.g., using hinges, sliders).
- You need to reuse a part multiple times (e.g., screws, identical brackets).
- You plan to create a parts list or assembly drawings.
- Example: Your gaming desk, a multi-part enclosure for a gaming accessory, or anything with screws and bolts.
This leads to the most important best practice for anyone serious about using Fusion 360:
Fusion 360 Rule #1: Always start your design by creating a new component.
Even if you think you're only making a single part, getting into this habit is invaluable. It costs nothing to do, but it saves a lot of time and complexity if your simple part later evolves into an assembly. By starting with a component, your design is correctly structured from the very beginning.
Conclusion
In this lesson, you've learned the critical difference between the two fundamental building blocks in Fusion 360.
Key Takeaways:
- Bodies are geometric shapes used for modeling, best suited for single, static objects.
- Components represent real-world, manufacturable parts. They are essential for any design involving multiple parts, motion (joints), or parts lists.
- Fusion 360's top-down assembly approach makes this distinction central to its workflow.
- Rule #1 is your guiding principle: Always start a new design with a new component to ensure your model is structured for future complexity.
You now understand the "what" and "why" of bodies and components. You're ready to put this knowledge into practice.
In our next lesson, we will begin the hands-on work of building an assembly. You will learn how to create a new component and build its geometry within an assembly context, applying Rule #1 from the very start.