Hello! Welcome back to our course on becoming an Azure Developer.
In our last lesson, you successfully registered a client web application and a back-end API in Microsoft Entra ID. You configured the necessary application IDs, a client secret, and the API permissions, establishing the foundational trust relationship between your apps and the Microsoft Identity Platform.
Today, we will bring those configurations to life. Our goal is to achieve the learning outcome: Implement user sign-in using the Microsoft Authentication Library (MSAL) in a .NET application. We'll take the configuration values from the previous lesson and integrate them into a .NET web application to create a fully functional and secure user sign-in and sign-out experience.
MSAL and Microsoft.Identity.Web: Choosing the Right Tool
The learning outcome mentions the Microsoft Authentication Library (MSAL), which is the core library for interacting with the Microsoft Identity Platform. However, for building ASP.NET Core applications (web apps and web APIs), Microsoft provides a higher-level library called Microsoft.Identity.Web. It sits on top of MSAL.NET and is specifically designed to simplify integration with the ASP.NET Core framework, handling much of the boilerplate code for you.
The following flowchart illustrates when to use each library. As you can see, for an ASP.NET Core web app, Microsoft.Identity.Web is the recommended path.

Throughout this lesson, we will use Microsoft.Identity.Web because it is the current best practice for this scenario and what you'll most likely encounter on the AZ-204 exam.
The Authentication Flow in a Web App
Web applications use a redirection-based flow called the Authorization Code Flow to sign in users. Understanding this flow is key to knowing what Microsoft.Identity.Web does for you under the scenes.
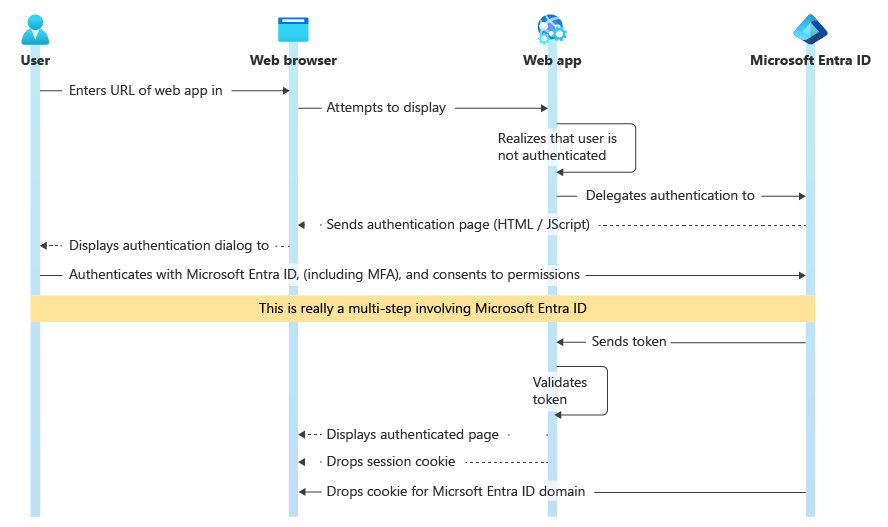
Here's a breakdown of the steps shown in the diagram:
- A user navigates to your web app.
- The app detects the user is not authenticated and redirects them to the Microsoft Entra ID sign-in page.
- The user enters their credentials, performs multi-factor authentication if required, and consents to the permissions your app requested.
- After a successful sign-in, Entra ID redirects the user back to your app's pre-configured Redirect URI. This redirect includes a temporary authorization code.
- Your web app's back end receives this code and makes a secure, direct call to Entra ID, exchanging the code (and its client secret) for an ID token and an access token.
- The app validates the ID token to confirm the user's identity and creates a session cookie to keep the user signed in.
Now, let's implement this flow in code.
1. Project Setup and Configuration
First, you'll need a new ASP.NET Core web application project. We'll then configure it with the values from your app registration.
-
Create a Project: Open Visual Studio or use the .NET CLI to create a new ASP.NET Core Web App (Model-View-Controller) project.
-
Add NuGet Packages: Install the necessary
Microsoft.Identity.Webpackages. Open the terminal in your project directory and run:dotnet add package Microsoft.Identity.Web dotnet add package Microsoft.Identity.Web.UI -
Configure
appsettings.json: Open theappsettings.jsonfile. Add anAzureAdsection and populate it with the details from the client web application (GameStore.Frontendor similar) you registered in the previous lesson.{ "AzureAd": { "Instance": "https://login.microsoftonline.com/", "Domain": "[Enter the domain of your tenant, e.g. contoso.onmicrosoft.com]", "TenantId": "[Enter your Tenant ID]", "ClientId": "[Enter your Client ID]", "CallbackPath": "/signin-oidc", "SignedOutCallbackPath": "/signout-callback-oidc", "ClientSecret": "[Enter your Client Secret]" }, "Logging": { ... }, "AllowedHosts": "*" }You can find your Tenant ID and Client ID on the overview page of your app registration in the Entra admin center.
A Critical Note on Secrets
Pasting a client secret directly into appsettings.json is a security risk, as this file is often committed to source control. For local development, you should use the .NET Secret Manager.
To do this:
- Initialize the secret manager in your project's directory:
dotnet user-secrets init - Add your client secret to the secret store. The key
AzureAd:ClientSecretdirectly maps to the JSON structure.dotnet user-secrets set "AzureAd:ClientSecret" "PASTE_YOUR_CLIENT_SECRET_VALUE_HERE" - Remove the
ClientSecretline fromappsettings.json. The configuration system will automatically pick it up from the secret store during development.
2. Integrating Authentication into Your Application
With the configuration in place, you only need to add a few lines to your Program.cs file to enable authentication.
Tutorial: Configure an ASP.NET Core web app for authorization
The official Microsoft documentation provides the exact code needed to enable authentication services and middleware. We will use the snippets from this tutorial.
Read through the sections 'Add authorization to HomeController.cs' and 'Add authentication and authorization elements to Program.cs'. Focus on understanding the purpose of the AddMicrosoftIdentityWebApp and AddMicrosoftIdentityUI methods, as well as the UseAuthentication and UseAuthorization middleware.
Based on the documentation, make the following changes to your Program.cs:
-
Add
usingstatements at the top:using Microsoft.AspNetCore.Authentication.OpenIdConnect; using Microsoft.Identity.Web; using Microsoft.Identity.Web.UI; using Microsoft.AspNetCore.Authorization; using Microsoft.AspNetCore.Mvc.Authorization; -
Add the authentication services after
builder.Services.AddControllersWithViews();:// Add services for authentication with the Microsoft identity platform builder.Services.AddAuthentication(OpenIdConnectDefaults.AuthenticationScheme) .AddMicrosoftIdentityWebApp(builder.Configuration.GetSection("AzureAd")); builder.Services.AddControllersWithViews(options => { var policy = new AuthorizationPolicyBuilder() .RequireAuthenticatedUser() .Build(); options.Filters.Add(new AuthorizeFilter(policy)); }).AddMicrosoftIdentityUI();AddMicrosoftIdentityWebAppreads yourAzureAdconfiguration and sets up all the OIDC parameters for the Authorization Code Flow.AddMicrosoftIdentityUIadds the default user interface for sign-in, sign-out, and other account management actions.- The
AuthorizeFilterensures that all pages in your application will require authentication by default.
-
Add the middleware to the request processing pipeline. Place these lines after
app.UseRouting();and beforeapp.MapControllerRoute(...):app.UseAuthentication(); app.UseAuthorization();The order is important!
UseAuthenticationmust come beforeUseAuthorization.
3. Adding the Sign-in/Sign-out UI
Now, let's add the UI elements to your application's layout so the user can sign in and see their status.
-
Create a new file in the
Views/Sharedfolder named_LoginPartial.cshtml. -
Add the following Razor code to the file. This code checks if the user is authenticated. If they are, it displays their username and a sign-out link. Otherwise, it shows a sign-in link.
@using System.Security.Principal

<ul class="navbar-nav">
@if (User.Identity?.IsAuthenticated == true)
{
    <li class="nav-item">
        <span class="navbar-text text-dark">Hello @User.Identity?.Name!</span>
    </li>
    <li class="nav-item">
        <a class="nav-link text-dark" asp-area="MicrosoftIdentity" asp-controller="Account" asp-action="SignOut">Sign out</a>
    </li>
}
else
{
    <li class="nav-item">
        <a class="nav-link text-dark" asp-area="MicrosoftIdentity" asp-controller="Account" asp-action="SignIn">Sign in</a>
    </li>
}
</ul>
The
asp-area="MicrosoftIdentity"tag helper points to the default UI controllers provided by theMicrosoft.Identity.Web.UIpackage. -
Finally, open
Views/Shared/_Layout.cshtmland render this new partial view inside the navigation bar. Find the<div>with thenavbar-collapseclass and add the partial view tag at the end of the<ul>:<div class="navbar-collapse collapse d-sm-inline-flex justify-content-between"> <ul class="navbar-nav flex-grow-1"> <li class="nav-item"> <a class="nav-link text-dark" asp-area="" asp-controller="Home" asp-action="Index">Home</a> </li> <li class="nav-item"> <a class="nav-link text-dark" asp-area="" asp-controller="Home" asp-action="Privacy">Privacy</a> </li> </ul> <partial name="_LoginPartial" /> </div>
4. Test Your Application
You are now ready to test the entire flow.
- Run your application (
dotnet runor press F5 in Visual Studio). - Because we added a global
AuthorizeFilter, your app should immediately redirect you to the Microsoft sign-in page. - Sign in with a user account from your tenant.
- After a successful login, you will be redirected back to your application's home page.
- Observe the navigation bar: it should now greet you by name and show a "Sign out" link.
- Click "Sign out". You should be logged out of the application and see the "Sign in" link again.
The following video demonstrates a very similar user experience in a Blazor application. Watching this segment can help you visualize the expected outcome.
Securing ASP.NET Core Apps With OIDC and Microsoft Entra ID (Azure AD) – Full Course
The video 'Securing ASP.NET Core Apps With OIDC and Microsoft Entra ID' by Julio Casal shows a complete login and logout flow. Watch this to see the user experience you just built in action.
Watch the video from 00:56:32 to 00:57:38 to see the login process, and then from 01:03:05 to 01:03:41 to see the logout and display of user information.
Conclusion
Congratulations! You have successfully implemented a secure user sign-in flow in a .NET application using the Microsoft Identity Platform. You've gone from theoretical configuration to a working, authenticated application.
Key Takeaways:
Microsoft.Identity.Webis the high-level library that simplifies integrating ASP.NET Core applications with Microsoft Entra ID.- Application settings are stored in
appsettings.json, with secrets protected by the .NET Secret Manager. - Authentication is configured in
Program.csby adding services (AddMicrosoftIdentityWebApp) and middleware (UseAuthentication). - The
[Authorize]attribute is used to protect pages and trigger the authentication flow. - The
Microsoft.Identity.Web.UIpackage provides default UI and controllers for a seamless sign-in/sign-out experience.
Next Steps
In our next lesson, we will focus on "Configure API permissions (delegated vs. application) and define scopes for a web API." While you've already touched on this during app registration, we will take a deeper dive into the meaning of different permission types and how they affect what your application is allowed to do after a user has signed in. This is a crucial step before we acquire an access token to call our protected back-end API.