Hello! Welcome back to the course.
In the last lesson, we successfully integrated authentication into a .NET web app. You configured your application to use Microsoft.Identity.Web, enabling users to sign in and sign out with their Microsoft Entra ID accounts. When a user signs in, the application receives an ID token, which serves as proof of the user's identity.
However, proving identity is only the first half of the security story. Now, your application needs to access a protected resource—your back-end web API. To do this, it needs authorization. This is where permissions and access tokens come into play.
Today's lesson focuses on this crucial concept, addressing the learning outcome: Configure API permissions (delegated vs. application) and define scopes for a web API. We will explore the different ways an application can be granted permission and then, in a hands-on exercise, you'll define the specific permissions for the web API you registered previously.
The Two Models of Access: Delegated vs. App-Only
When an application needs to access a protected resource, it can do so in one of two ways:
- Delegated Access: The application acts on behalf of a signed-in user. This is the most common scenario for web or mobile apps with a user interface.
- App-Only Access: The application acts on its own, with no user present. This is typical for background services, daemons, or automation scripts.
This distinction is fundamental to the Microsoft Identity Platform.
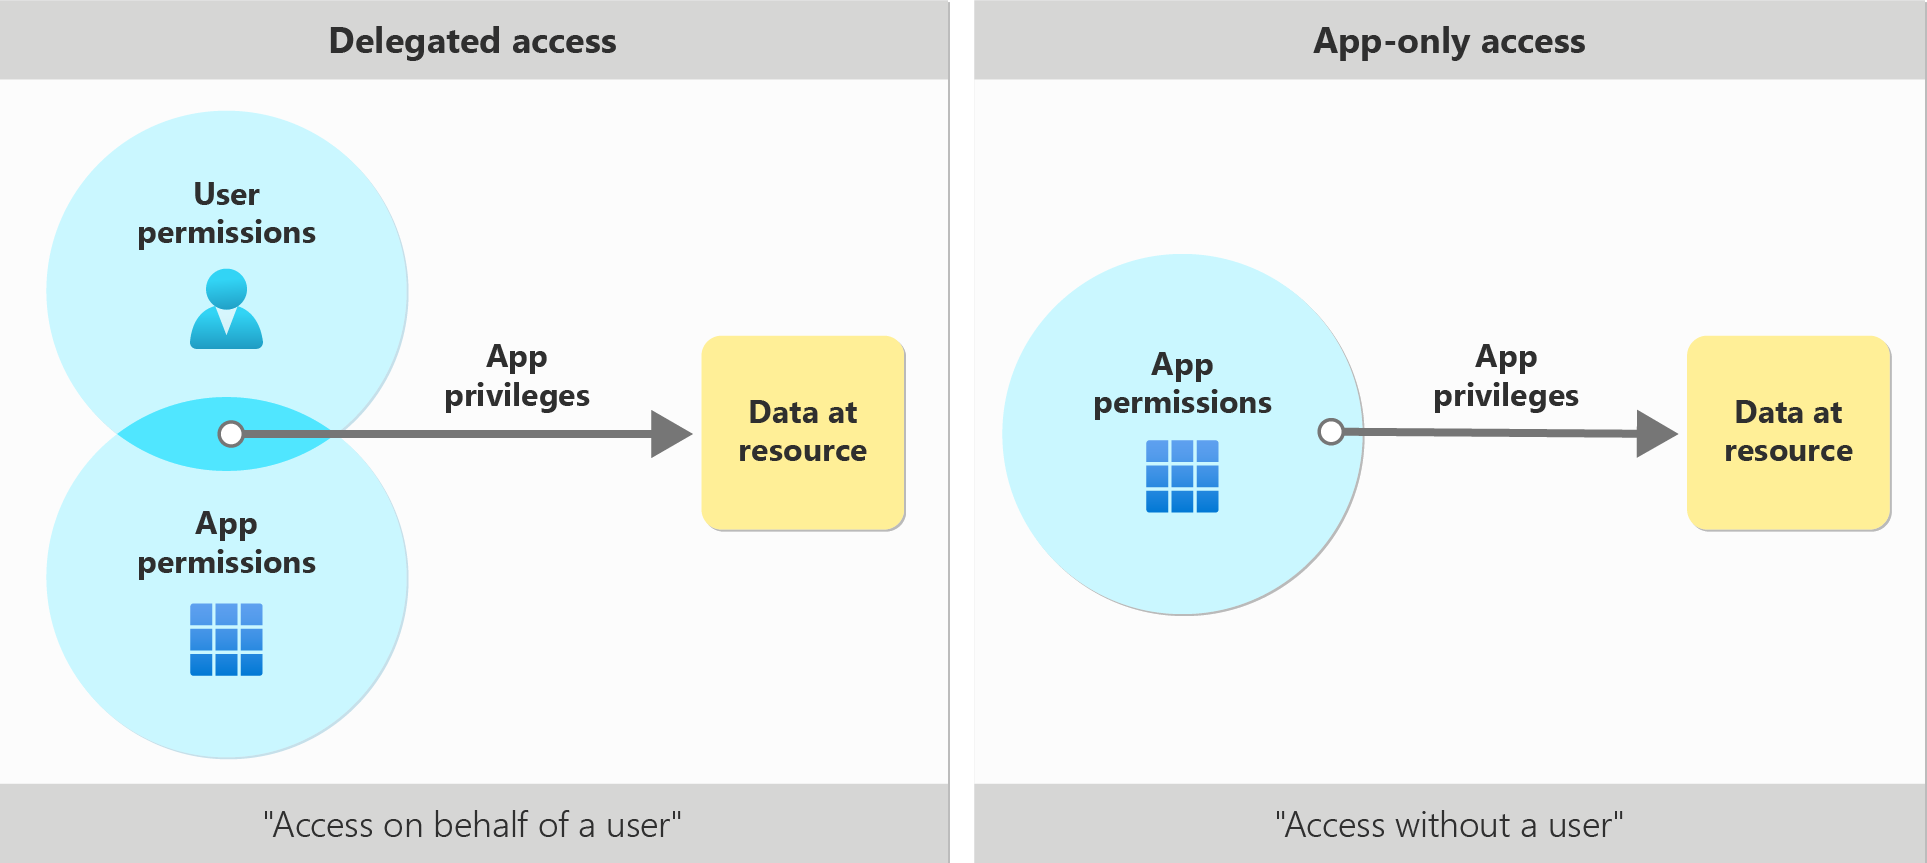
To build a solid understanding of these concepts, let's start with the official Microsoft documentation, which provides clear definitions and a helpful comparison.
Overview of permissions and consent in the Microsoft identity platform
The following article, 'Overview of permissions and consent in the Microsoft identity platform,' provides the foundational theory for this lesson. It clearly explains the two access scenarios and the corresponding permission types.
Please read the sections titled 'Access scenarios,' 'Types of permissions,' and 'Comparison of delegated and application permissions.' As you read, focus on the differences in who can consent, the access context, and the other names used for each permission type (scopes vs. app roles).
Key Differences Summarized
As you saw in the reading, the two permission types have distinct characteristics:
| Feature | Delegated Permissions | Application Permissions |
|---|---|---|
| Alias | Scopes | App Roles |
| Use Case | Apps with a signed-in user (e.g., your front-end web app). | Apps without a user (e.g., a background data processing service). |
| Access Context | Acts on behalf of the user. | Acts as its own identity. |
| Effective Permissions | The intersection of the user's privileges and the app's granted permissions. The app can never do more than the signed-in user is allowed to do. | The permissions granted directly to the application. If an app has User.Read.All permission, it can read all users, regardless of who (if anyone) is signed in. |
| Consent | Can be granted by users (for basic permissions) or admins. | Can only be granted by an administrator. |
Permissions in Action: Consuming Microsoft Graph
Microsoft Graph is a massive API that exposes data across Microsoft 365. It's a perfect example for seeing delegated and application permissions in a real-world context.
Delegated Permissions (Scopes)
When your application wants to read the signed-in user's profile or calendar, it needs delegated permissions. The following video explains this concept.
Overview of Microsoft Graph API and delegated permissions
The video 'Overview of Microsoft Graph API and delegated permissions' demonstrates how an application accesses data on behalf of a user. Pay close attention to the idea that the final authorization is a combination of user and app permissions.
Please watch the conceptual overview from the beginning (00:16 to 01:14) and the summary at the end (05:33 to 06:06). These segments capture the core ideas of delegated access.
Application Permissions (App Roles)
Now, consider a different scenario. Imagine you're building a service that runs every night to export a list of all users in the company for an HR report. There's no user interaction. This requires application permissions.
Overview of application permissions and using Graph API with application permissions | Microsoft
To contrast with the previous video, 'Overview of application permissions' explains the app-only access scenario. This is crucial for understanding how to build secure background services.
Watch the first section of this video (00:02 to 01:36). It clearly outlines the use cases for application permissions and explains why they always require administrator consent.
Defining Your Own API's Permissions (Scopes)
So far, we've discussed how a client application requests permissions to consume an existing API like Microsoft Graph. But for the AZ-204 exam, and as a developer, you also need to know how to create your own web API and define its permissions for others to consume.
These custom delegated permissions are called scopes. You will now expose a scope on the web API you registered in the previous module. This allows your client web app to request permission to call it.
The following guide is a hands-on activity. You will follow the steps to configure the web API registration (GameStore.Api or your equivalent) in the Azure portal.
How to configure an application to expose a web API
The Microsoft Quickstart, 'How to configure an application to expose a web API,' provides the exact steps for defining custom scopes. We will use this guide to configure your API registration.
Follow the steps in the documentation starting from the 'Add a scope' section. You will perform these actions in the Azure portal on your API's app registration. Specifically, complete the steps under 'Add a scope requiring admin and user consent', 'Add a scope requiring admin consent', and 'Verify the exposed scopes'.
Step-by-Step Walkthrough
Let's break down the process from the documentation you just followed:
-
Navigate to your API's App Registration: In the Azure portal, go to Microsoft Entra ID > App registrations and select your API application (e.g.,
GameStore.Api). -
Expose an API: Go to the Expose an API blade.
-
Set the Application ID URI:
- This is a globally unique identifier for your API. It acts as a namespace for the scopes you will create.
- The default format is
api://<client-id>. This is perfectly fine. Click Save.
-
Add a Scope:
- Click Add a scope. This is where you define a specific permission.
- For a read permission (e.g.,
Games.Read):- Scope name:
Games.Read - Who can consent?:
Admins and users. This allows regular users to consent to read-only operations. - Admin consent display name:
Read game data. - Admin consent description:
Allows the application to read data about games on behalf of the user. - User consent display name:
Read your game data. - User consent description:
Allows the application to read your game data. - State:
Enabled.
- Scope name:
- Click Add scope.
-
Add a Second Scope (for a write permission):
- Click Add a scope again.
- For a write permission (e.g.,
Games.Write):- Scope name:
Games.Write - Who can consent?:
Admins only. Since this is a higher-privileged operation, we'll require an admin to approve it. - Admin consent display name:
Read and write game data. - Admin consent description:
Allows the application to create, update, and delete game data on behalf of the user. - Leave the user consent fields blank.
- State:
Enabled.
- Scope name:
- Click Add scope.
After completing these steps, your "Expose an API" page should list both scopes. The full value for a scope is the combination of the App ID URI and the scope name, for example: api://<your-client-id>/Games.Read. This full string is what your client application will request to get an access token for your API.
Conclusion
In this lesson, you've moved from simply identifying a user to defining what your application is authorized to do. This is a cornerstone of building secure, multi-tier applications in Azure.
Key Takeaways:
- Delegated Permissions (Scopes) are used when an app acts on behalf of a user. The effective permissions are the lesser of what the app is granted and what the user is allowed to do.
- Application Permissions (App Roles) are for background services or daemons acting without a user. They are more powerful and always require admin consent.
- When you build your own API, you must Expose an API in its app registration and define custom scopes that client applications can request.
- The Application ID URI provides a unique namespace for your API's scopes.
Next Steps
Now that your API exposes scopes and your client app can sign in a user, the final piece of the puzzle is to connect them. In our next lesson, "Acquire an access token using MSAL and use it to call a protected web API," you will modify your front-end .NET application to request an access token with the Games.Read scope and use that token to make an authenticated call to your API.