Hello! Welcome to the next lesson in your journey to becoming an AZ-204 certified Azure Developer.
In our previous lesson, you configured your web API's application registration in Microsoft Entra ID to expose custom permissions, known as scopes. This was a crucial step in defining the "contract" for how client applications can access your API. You now have a client app that can sign in users and an API that declares what it protects (Games.Read, Games.Write).
Today, we will connect these two pieces. This lesson focuses on the learning outcome: Acquire an access token using MSAL and use it to call a protected web API. You will modify your client-side .NET web application to request an access token for your API and then use that token to make an authenticated call.
This process is the heart of modern, token-based security in distributed systems.
The Authentication Flow
Before we dive into the code, let's visualize the process. Your application, after signing in a user, needs to obtain a separate credential—an access token—specifically for the API it wants to call. This token is then presented to the API with each request.
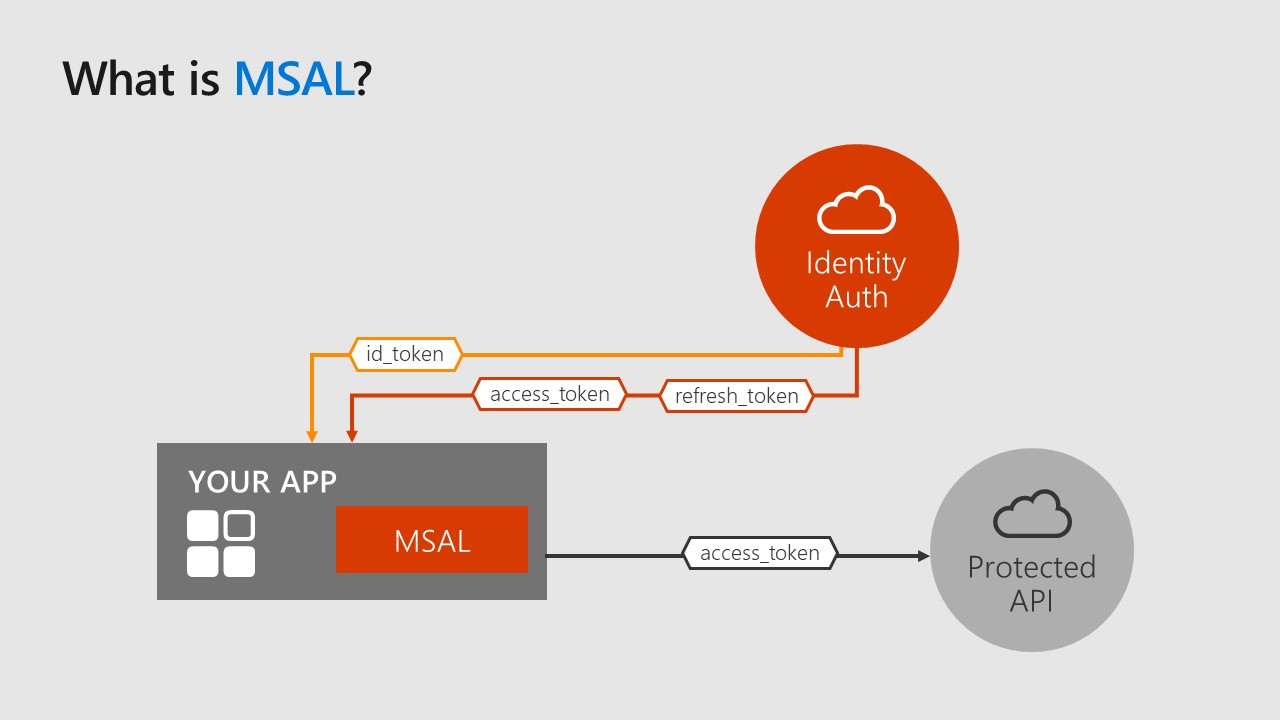
Choosing the Right Tool: MSAL vs. Microsoft.Identity.Web
To implement this flow in .NET, you have two key libraries from Microsoft:
- Microsoft.Authentication.Library (MSAL.NET): The foundational library for all interactions with the Microsoft Identity Platform. It handles the low-level details of OAuth 2.0 and OpenID Connect protocols, token acquisition, and caching.
- Microsoft.Identity.Web: A higher-level library built directly on top of MSAL.NET. It provides a set of convenient APIs and project templates that are deeply integrated with the ASP.NET Core framework, simplifying the process of securing web apps and web APIs.
Given that you are building an ASP.NET Core web application, Microsoft.Identity.Web is the recommended choice. It streamlines the configuration and abstracts away much of the boilerplate code you would otherwise have to write.

1. Configure the Client App for Token Acquisition
Your client web app (GameStore.Web or equivalent) is already configured to sign in users. Now, you need to tell it that it also intends to call a downstream API. This is done in two places: appsettings.json and Program.cs.
Step 1: Update appsettings.json
First, add a new section to your appsettings.json file to define the API's location and the scopes it requires. You'll need the Application (client) ID of the API you registered in the previous module.
{
  "AzureAd": {
    // ... existing settings ...
    "Instance": "https://login.microsoftonline.com/",
    "TenantId": "[Enter the tenant ID]",
    "ClientId": "[Enter the client ID of the web app]"
  },
  // Add this new section
  "DownstreamApi": {
    "BaseUrl": "https://localhost:7189", // The base URL of your running API project
    "Scopes": "api://[Enter the client ID of the web API]/Games.Read"
  },
  "Logging": {
    // ...
  },
  "AllowedHosts": "*"
}
BaseUrl: The address where your API project is running locally.Scopes: This is the full scope value you created in the last lesson. It's the API's Application ID URI followed by the scope name.
Step 2: Update Program.cs
Next, you need to modify your service configuration in Program.cs to enable token acquisition. You'll chain a new method call to your existing .AddMicrosoftIdentityWebApp() configuration.
// Find the line where you add Microsoft Identity Web App Authentication
builder.Services.AddAuthentication(OpenIdConnectDefaults.AuthenticationScheme)
    .AddMicrosoftIdentityWebApp(builder.Configuration.GetSection("AzureAd"))
    // Add these two lines:
    .EnableTokenAcquisitionToCallDownstreamApi(builder.Configuration.GetSection("DownstreamApi:Scopes"))
    .AddInMemoryTokenCache();
Let's break down what these new methods do:
.EnableTokenAcquisitionToCallDownstreamApi(): This is the key method. It hooks into the ASP.NET Core authentication pipeline. When a user successfully signs in and an authorization code is received, this method ensures that the code is automatically redeemed for an access token (and a refresh token)..AddInMemoryTokenCache(): This method sets up a simple, in-memory cache to store the acquired tokens. For a production application with multiple server instances, you would use a distributed cache (like Redis or a SQL database), but for local development, this is sufficient.
2. Acquire the Token and Call the API
With the configuration complete, your application is now capable of acquiring and caching tokens. The final step is to request the token and use it to call your API. Microsoft.Identity.Web makes this straightforward by providing the ITokenAcquisition service, which you can use via dependency injection.
Let's assume you have a page or a service where you want to fetch data from your API.
- Inject the necessary services: You'll need
ITokenAcquisitionto get the token andIHttpClientFactoryto make the HTTP call. - Request the access token: Call
_tokenAcquisition.GetAccessTokenForUserAsync(scopes). This method will first try to get a token from the cache. If a valid one isn't there, it will use the refresh token (if available) to silently acquire a new one. - Make the authenticated request: Create an
HttpClient, add the access token to theAuthorizationheader as a "Bearer" token, and make the call to your API endpoint.
Here is a complete example of what this might look like in a Razor Page's PageModel:
using Microsoft.AspNetCore.Mvc.RazorPages;
using Microsoft.Identity.Web;
using System.Net.Http.Headers;

public class GamesModel : PageModel
{
    private readonly ITokenAcquisition _tokenAcquisition;
    private readonly IHttpClientFactory _httpClientFactory;
    private readonly IConfiguration _configuration;

    public string ApiResponse { get; private set; }

    public GamesModel(ITokenAcquisition tokenAcquisition,
                      IHttpClientFactory httpClientFactory,
                      IConfiguration configuration)
    {
        _tokenAcquisition = tokenAcquisition;
        _httpClientFactory = httpClientFactory;
        _configuration = configuration;
    }

    public async Task OnGetAsync()
    {
        try
        {
            // 1. Define the scope for the token
            var scopes = new[] { _configuration["DownstreamApi:Scopes"] };

            // 2. Get the access token
            var accessToken = await _tokenAcquisition.GetAccessTokenForUserAsync(scopes);

            // 3. Use the token to call the API
            var client = _httpClientFactory.CreateClient();
            var baseUrl = _configuration["DownstreamApi:BaseUrl"];

            client.BaseAddress = new Uri(baseUrl);
            client.DefaultRequestHeaders.Authorization = new AuthenticationHeaderValue("Bearer", accessToken);
            client.DefaultRequestHeaders.Accept.Add(new MediaTypeWithQualityHeaderValue("application/json"));

            var response = await client.GetAsync("games"); // Assuming an endpoint like /games

            if (response.IsSuccessStatusCode)
            {
                ApiResponse = await response.Content.ReadAsStringAsync();
            }
            else
            {
                ApiResponse = $"Error: {response.StatusCode} - {await response.Content.ReadAsStringAsync()}";
            }
        }
        catch (MicrosoftIdentityWebChallengeUserException ex)
        {
            // This exception can be thrown if the user needs to re-consent or perform MFA
            // The middleware will handle this challenge and redirect the user
            throw;
        }
        catch (Exception ex)
        {
            ApiResponse = $"An error occurred: {ex.Message}";
        }
    }
}
3. Understanding the MSAL Flow Under the Hood
Microsoft.Identity.Web does a fantastic job of simplifying the process. To better understand what it's abstracting away, it's helpful to see the raw MSAL flow in a simpler application, like a console app.
The following video demonstrates using the core MSAL.NET library (Microsoft.Identity.Client) to acquire a token and call an API (in this case, Microsoft Graph). The principles are exactly the same as calling your own API.
Microsoft Authentication Library (MSAL) for .NET
The video 'Microsoft Authentication Library (MSAL) for .NET' shows the fundamental steps of using MSAL. It demonstrates initializing a client application, defining scopes, acquiring a token, and using it as a bearer token in an API call.
Watch from 00:47 to 08:26. Pay attention to these key steps: Initializing the PublicClientApplicationBuilder (02:50). Defining the scopes array (04:15). Calling AcquireTokenInteractive to get the token (04:59). Adding the acquired token as an OauthBearerToken to an HTTP request (06:52).
The video shows the interactive flow that Microsoft.Identity.Web manages for you behind the scenes when a user first signs in and the app needs to get a token.
4. Inspecting Your Access Token
The access token you acquired is a JSON Web Token (JWT). It's a self-contained, digitally signed package of information. You can inspect its contents to verify that everything is correct.
- Run both your client and API projects.
- In your client app's code (like the
GamesModelabove), place a breakpoint right after theaccessTokenis acquired. - Navigate to the page that triggers the API call.
- When the breakpoint hits, copy the value of the
accessTokenstring. - Go to a site like jwt.io and paste the token into the "Encoded" box.
You will see the decoded token payload. Look for these important claims:
aud(Audience): This should be the Application (client) ID or the App ID URI of your web API. It tells the API that this token was intended for it.scp(Scope): This claim lists the permissions the token grants. You should see theGames.Readscope you requested.iss(Issuer): The URL of the security token service that issued the token (e.g.,https://login.microsoftonline.com/{tenantId}/v2.0).
The following video, while using an Angular client, does an excellent job of demonstrating this debugging process and explaining the importance of the aud and scp claims.
How to Secure Your .NET API with Microsoft Entra ID & Angular MSAL!
This video segment demonstrates how to decode a JWT and verify its contents, proving that scope-based authorization is working correctly.
Watch the section from 21:45 to 24:12. The presenter copies a token from the debugger, decodes it using jwt.io, and points out the critical 'scope' and 'audience' claims. This is a great visual confirmation of the concepts we've discussed.
Conclusion
Congratulations! You have successfully implemented one of the most common and important security patterns in modern cloud development. Your client application can now securely obtain a credential and use it to access a protected resource on behalf of a user.
Key Takeaways:
Microsoft.Identity.Webis the recommended library for integrating authentication and authorization in ASP.NET Core applications.- You configure a client app to call an API by using
.EnableTokenAcquisitionToCallDownstreamApi()and defining the API's scopes in configuration. - The
ITokenAcquisitionservice abstracts the complexity of acquiring tokens, leveraging a token cache for performance. - The acquired access token is a JWT, which is passed in the
Authorizationheader of an HTTP request as a Bearer token. - The API uses the claims within the token (like
audandscp) to determine if the request should be allowed.
Next Steps
In this lesson, your API probably returned data even if you didn't send a token, because we haven't secured the API endpoint itself yet. In our next lesson, "Secure a .NET web API to require a valid access token from Microsoft Entra ID," we will complete the security loop. You will configure your API to inspect incoming requests, validate the JWT, and reject any call that doesn't have a valid token with the required scopes.