Hello! Welcome back to our module on implementing secure cloud solutions.
In our previous lesson, we established the conceptual foundation for security on the Microsoft Identity Platform. We discussed the roles of OAuth 2.0 and OpenID Connect, and importantly, we distinguished between an Application Object (the blueprint) and a Service Principal (the local instance of an app in a tenant).
Today, we transition from theory to practice. This lesson is dedicated to achieving the learning outcome: Register a web application in Microsoft Entra ID and configure its authentication settings. You will step into the role of a developer preparing an application to use Microsoft Entra ID for authentication. We will walk through the Microsoft Entra admin center to create and configure the necessary application registrations, generating the critical IDs and secrets you'll need for coding in the next lesson.
1. The Core Configuration Decisions
Before creating an app registration, you must answer two fundamental questions that directly map to settings in the portal:
- Who can use this application? This determines the audience for your app.
- Where will the platform send security tokens after a user signs in? This is a crucial security boundary.
Let's explore these concepts.
Supported Account Types: The "Who"
When you register an application, you must declare which set of users it is intended for. This choice has significant architectural implications.
To understand these options in detail, please watch the following segment.
Entra App Registration: A deep dive into configuration part 1
The video 'Entra App Registration: A deep dive into configuration part 1' by BlueScreen Brothers provides an excellent explanation of the different account types and their implications.
Watch from 02:08 to 07:16. The presenters discuss the four main 'Supported account types' options, explaining the difference between single-tenant, multi-tenant, and personal Microsoft accounts. Pay attention to how this choice relates to the concept of tenants we discussed previously.
To summarize the key options:
| Supported Account Type | Description | Common Use Case |
|---|---|---|
| Accounts in this organizational directory only | Single-tenant. Only users (including guests) within your own Microsoft Entra ID tenant can sign in. | Internal line-of-business (LOB) applications. |
| Accounts in any organizational directory | Multi-tenant. Users from any Microsoft Entra ID tenant can sign in. A Service Principal for your app is created in each tenant that consents. | Software-as-a-Service (SaaS) applications. |
| Accounts in any organizational directory and personal... | Multi-tenant + Personal Accounts. The widest audience. Supports both work/school accounts from any Entra ID tenant and personal Microsoft accounts (like Outlook.com, Xbox). | Applications with a broad consumer and business audience. |
| Personal Microsoft accounts only | Only users with personal Microsoft accounts can sign in. | Purely consumer-facing applications. |
For most scenarios in the AZ-204 exam and for initial development, you will start with single-tenant.
Redirect URIs: The "Where"
The Redirect URI (or Reply URL) is a critical security setting. After a user successfully authenticates, the Microsoft Identity Platform redirects them back to the application, sending the security tokens (or an authorization code) to this specific URI. Entra ID will only send tokens to a pre-registered Redirect URI, preventing them from being intercepted by a malicious actor.
The format of this URI depends on the type of application you are building (e.g., a server-side web app, a single-page app, a mobile app). For your background in C# and .NET web development, a common Redirect URI for local development is https://localhost:<port>/signin-oidc. The /signin-oidc path is the default endpoint where the .NET OIDC middleware listens for the authentication response from the identity provider.
2. Practical Walkthrough: Registering a Client and API
The most common and secure application architecture involves a client application (like a web app) calling a protected back-end API. To model this, we need to create two separate app registrations: one for the API and one for the client.
The following video provides a comprehensive walkthrough of this exact process. We will break it down into focused segments for each step.
Securing ASP.NET Core Apps With OIDC and Microsoft Entra ID (Azure AD) – Full Course
The course 'Securing ASP.NET Core Apps With OIDC and Microsoft Entra ID' by Julio Casal is a fantastic, practical resource. We'll use it to guide our registration process.
We will be referencing this video throughout the next sections. You don't need to watch it all at once; I will point you to specific timestamps for each step.
For a written step-by-step guide you can follow along with, you can also reference the official Microsoft documentation.
Register an application with the Microsoft identity platform
The official documentation, 'Register an application with the Microsoft identity platform', provides the definitive steps for app registration. It's a great reference to have open as we go through the video guide.
Scan through the sections 'Register an application', 'Configure platform settings', and 'Add credentials'. This will familiarize you with the UI and terminology in the Microsoft Entra admin center.
Now, let's begin the hands-on process. Open the Microsoft Entra admin center in a new browser tab and follow along.
Step 1: Register the Back-end API
First, we define our API. The API itself doesn't authenticate users; it just needs to be represented in Entra ID so it can be protected and have permissions defined for it.
Action: Follow the video to register the API application.
Securing ASP.NET Core Apps With OIDC and Microsoft Entra ID (Azure AD) – Full Course
Let's start by registering the back-end API. This creates the application object that will represent our protected resource.
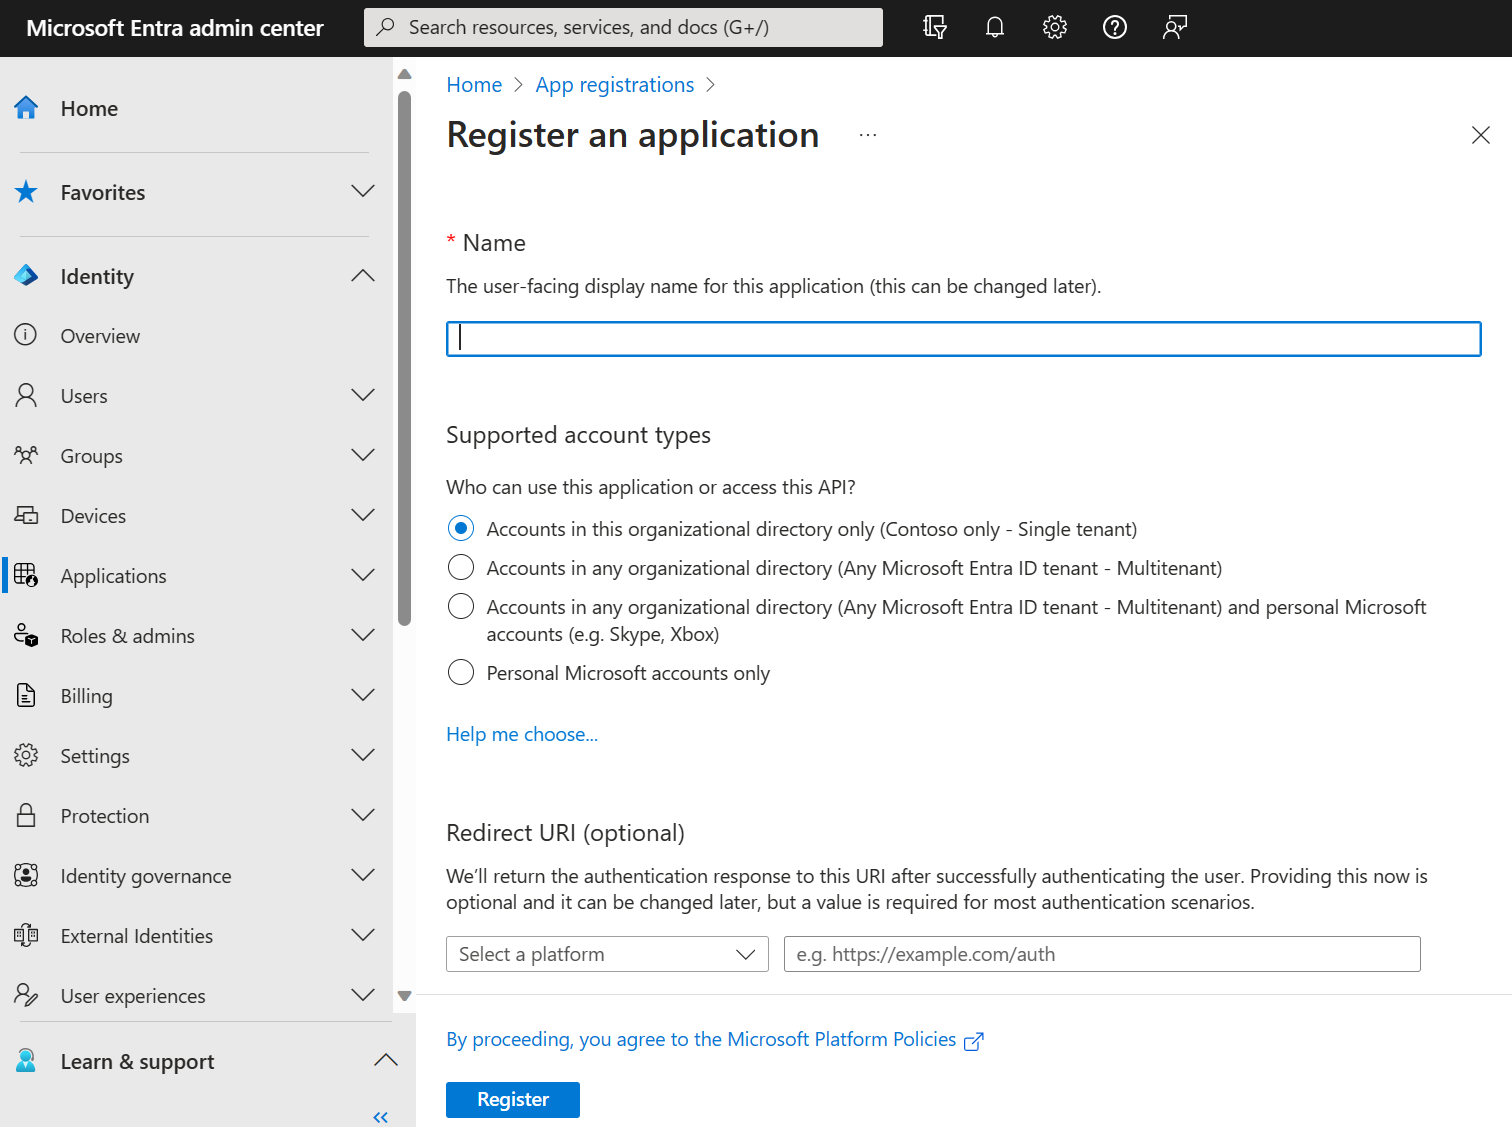
Watch the video from 00:05:56 to 00:09:14. Follow these steps in your Entra admin center: Navigate to Identity > Applications > App registrations and select New registration. Give your application a name, like GameStore.Api. For Supported account types, select Accounts in this organizational directory only (Single tenant). Leave Redirect URI blank for now. A back-end API typically doesn't need one. Click Register.
Step 2: Expose a Permission (Scope) on the API
An API protects resources. To allow client applications to access these resources, the API must "expose" permissions, which are called scopes in OAuth 2.0. A client application can then request one or more of these scopes.
Action: Follow the video to define a scope for your API.
Securing ASP.NET Core Apps With OIDC and Microsoft Entra ID (Azure AD) – Full Course
Now we'll define a permission for our API. This is what a client application will request to gain access.
Watch from 00:09:18 to 00:11:39. In your API's app registration: Go to the Expose an API blade. At the top, click Set next to Application ID URI. Accept the default value (e.g., api://<your-client-id>). This URI uniquely identifies your API. Click Add a scope. For Scope name, enter something like GameStore.Api.All. Select Admins only for who can consent. Fill in the Admin consent display name (e.g., Full access to the GameStore API) and Admin consent description. Click Add scope.
You have now defined a permission that says, "A client with this permission is allowed full access to the GameStore API."
Step 3: Register the Client Web Application
Next, we register our front-end application. This will be a "confidential client"—a server-side web app that can securely store a secret.
Action: Follow the video to register the client application.
Securing ASP.NET Core Apps With OIDC and Microsoft Entra ID (Azure AD) – Full Course
With the API defined, we now register the client application that will call it. This app will be responsible for handling user sign-in.
Watch from 00:32:51 to 00:34:57. Perform these steps: Go back to App registrations and create a New registration. Name it something like GameStore.Frontend. Keep the single-tenant option. This time, for Redirect URI, select Web and enter https://localhost:5001/signin-oidc. This tells Entra where to send the tokens after a successful sign-in during local development. Click Register.
Step 4: Configure Client Credentials and API Permissions
Our client application needs two more things:
- A client secret to prove its own identity to Entra ID when exchanging an authorization code for an access token.
- Permission to call the API we registered in Step 1.
Action: Follow the video to create a secret and add the necessary API permission.
Securing ASP.NET Core Apps With OIDC and Microsoft Entra ID (Azure AD) – Full Course
Finally, we configure the client with a secret and grant it permission to talk to our API.
Watch from 00:35:00 to 00:36:02 and then 00:44:48 to 00:45:46. In your GameStore.Frontend app registration: API Permissions: Go to the API permissions blade. Click Add a permission. Select the My APIs tab and choose your GameStore.Api. Select Delegated permissions, check the box next to the GameStore.Api.All permission, and click Add permissions. On the API permissions screen, click the Grant admin consent for [Your Tenant Name] button. This pre-approves the permission for all users in your tenant. Client Secret: Go to the Certificates & secrets blade. Click New client secret. Give it a description and click Add. CRITICAL: Copy the secret Value immediately and save it somewhere secure (like Notepad for now). You will never be able to see this value again once you leave the page.
You have now fully configured the identity aspects of a client-server application!
Conclusion
In this lesson, you have translated identity theory into practical configuration. You registered both a back-end API and a client web application, establishing a trust relationship between them and the Microsoft Identity Platform.
Key Takeaways:
- App registration is the process of defining your application's identity within Microsoft Entra ID.
- Supported Account Types determine your application's audience (single-tenant, multi-tenant, etc.).
- Redirect URIs are a security control that specifies where security tokens can be sent.
- APIs use the Expose an API blade to define permissions called scopes.
- Confidential clients (like server-side web apps) use Client Secrets (or certificates) to authenticate themselves.
- Client applications request API permissions to access protected resources, and an administrator must grant consent for these permissions.
Next Steps
You now have all the necessary configuration values: Client IDs, a Tenant ID, a Client Secret, and an API Scope URI. In our next lesson, Implement user sign-in using the Microsoft Authentication Library (MSAL) in a .NET application, you will use these values in a .NET web application to bring your secure sign-in flow to life.