Introduction
Hello! In our last lesson, you successfully deployed your first .NET microservice to Azure Container Apps (ACA) from an image in Azure Container Registry. Your application is now running and accessible via a public URL. This is a significant milestone.
However, a real-world application must be prepared to handle fluctuating demand. What happens if your API suddenly receives a surge in traffic? A single instance, or replica, might become overwhelmed, leading to slow response times or even failures. Conversely, during periods of low traffic, keeping that instance running might be an unnecessary expense.
This is where autoscaling comes in. Today's lesson focuses on one of the most powerful features of Azure Container Apps: its ability to automatically scale based on demand. We will address the learning outcome: Configure scaling rules for an Azure Container App based on HTTP traffic.
You will learn how to define the minimum and maximum number of replicas for your application and how to create a rule that tells Azure when to add or remove replicas based on the number of concurrent HTTP requests it's handling. This ensures your application is both resilient under load and cost-effective during quiet periods.
The Fundamentals of Scaling in Azure Container Apps
Azure Container Apps manages automatic horizontal scaling, which means it adjusts the number of running container instances (replicas) in response to load. This is powered by the open-source project KEDA (Kubernetes Event-driven Autoscaling), which is integrated directly into the platform.
To understand scaling, you need to grasp two key components:
-
Scale Limits (Min/Max Replicas): You define the boundaries for scaling.
- Minimum replicas: The fewest number of instances that should be running. Setting this to
0enables "scale-to-zero," a cost-saving feature where your app incurs no usage charges when idle. Setting it to1or higher ensures there's always at least one instance ready to handle requests, avoiding a "cold start." - Maximum replicas: The absolute highest number of instances your app can scale out to. This prevents runaway costs and resource consumption.
- Minimum replicas: The fewest number of instances that should be running. Setting this to
-
Scale Rules (Triggers): These are the conditions that trigger a scaling event (either scaling out by adding replicas or scaling in by removing them).

To begin, let's get a clear conceptual overview of how scaling works.
How to scale in Azure Container Apps
This video from Will Velida provides an excellent explanation of the core scaling concepts in Azure Container Apps, including replicas, revisions, and the different types of scale triggers.
Watch the first four minutes of the video (00:00 - 03:50). Focus on these key points: How scaling creates new replicas. How changing a scale rule creates a new revision of your app. The difference between min and max replica settings. The three main categories of scale triggers: HTTP/TCP traffic, event-driven (KEDA), and CPU/memory usage.
As the video explained, while there are multiple types of triggers, we will focus on the most common one for web APIs like the one you've deployed: HTTP traffic.
Configuring an HTTP Scale Rule
An HTTP scale rule is based on a single, intuitive metric: concurrent requests. You specify a threshold, and if the number of simultaneous requests per replica exceeds that number, Container Apps will add a new replica to share the load.
For example, if you set the concurrent request threshold to 20, and your app is currently running one replica that is handling 25 concurrent requests, ACA will initiate a scale-out action to add a second replica. The goal is to keep the load on each replica at or below the threshold you've defined.
Let's walk through how to configure this in the Azure Portal.
Azure Container Apps #03 - Scale Out Containers | HTTP Based
This video from Kamal Rathnayake provides a practical, step-by-step demonstration of setting an HTTP scale rule and then testing it with a load generator.
Please watch the segment from 00:00 to 03:53. The video will guide you through: Navigating to the Scale settings of your container app. Creating a new revision to edit the scaling configuration. Setting the min and max replicas. Adding an HTTP scale rule and defining the concurrent requests threshold.
Hands-On Practice: Apply a Scale Rule
Now it's your turn to apply what you've learned. Navigate to the container app you deployed in the previous lesson.
- Go to the Scale blade under the "Settings" section.
- Click Edit and deploy to create a new revision. This is necessary because scale rule changes are revision-scoped.
- In the new revision draft, go to the Scale tab.
- Set the Min / max replicas slider to range from 0 to 3.
- Click Add under "Scale rules".
- Configure the rule with the following values:
- Rule name:
http-traffic-rule - Type:
HTTP Scaling - Concurrent requests:
10
- Rule name:
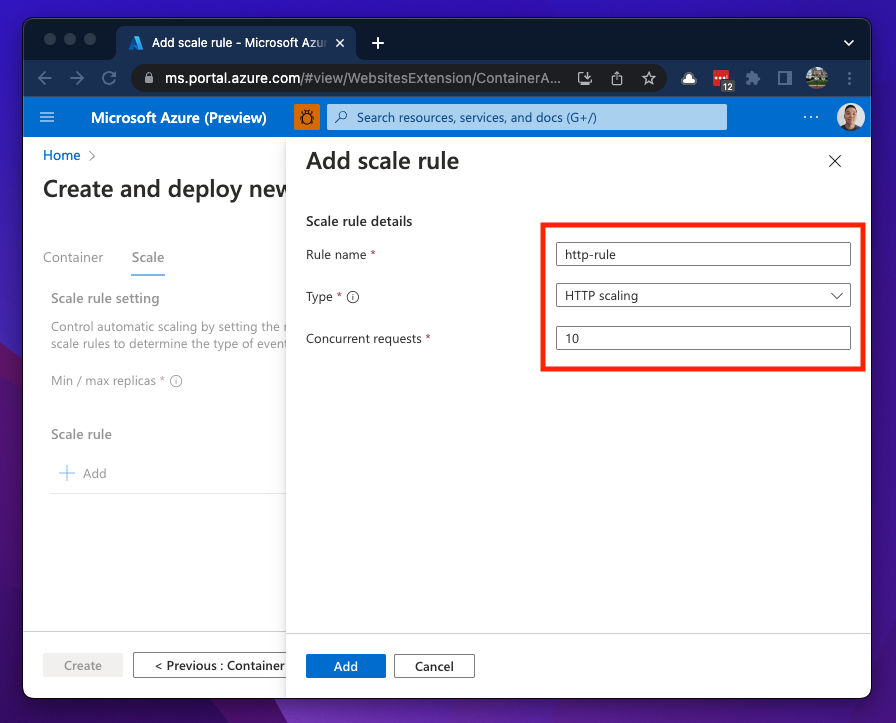
- Click Add to save the rule, and then click Create to deploy the new revision.
Once the new revision is active, your container app is configured to scale from zero replicas up to a maximum of three, with each scale-out event triggered when a replica is handling more than 10 concurrent requests.
Verifying Scaling (Conceptual)
In the video, the presenter used a tool called Apache JMeter to generate a high volume of concurrent requests to trigger the scaling behavior. You then saw the replica count increase in the Azure portal.
You can observe the same behavior by navigating to the Metrics blade of your container app and adding the Replica count metric. If you were to run a load test, you would see this chart update to show your app scaling out to the max of 3 replicas and then scaling back in after the test completes. While setting up a load test is beyond the scope of this lesson, understanding how to monitor the replica count is crucial.
The Infrastructure as Code (IaC) and CLI Perspective
As a developer, you know the importance of automating infrastructure setup. The changes you made in the portal can, and should, be defined in code for repeatable deployments.
Let's examine how to define this same scale rule using the Azure CLI. You would typically use the az containerapp update command or include these parameters in the az containerapp create command.
az containerapp update \
  --name my-api-app \
  --resource-group <YourResourceGroupName> \
  --min-replicas 0 \
  --max-replicas 3 \
  --scale-rule-name http-traffic-rule \
  --scale-rule-type http \
  --scale-rule-http-concurrency 10
Let's break down the new parameters:
--min-replicasand--max-replicas: These directly correspond to the scale limits you set.--scale-rule-name: The name for your rule.--scale-rule-type: Specifies the kind of trigger, in this casehttp.--scale-rule-http-concurrency: Sets the threshold for concurrent requests.
For a comprehensive reference on all scaling options, including the CLI syntax, the official documentation is your best resource.
Set scaling rules in Azure Container Apps
This official Microsoft documentation covers all aspects of scaling in Azure Container Apps. It provides examples for the Azure portal, CLI, and ARM/Bicep templates.
Please read the section titled 'HTTP'. Notice how it provides the same information but for different implementation methods: Bicep, ARM template, Azure CLI, and the Portal steps you just performed. This reinforces the connection between the UI and the underlying code.
Conclusion
In this lesson, you've taken a critical step in making your containerized application production-ready. You now know how to configure one of the most important features of Azure Container Apps: autoscaling based on HTTP traffic.
Key Takeaways:
- Azure Container Apps provides automatic horizontal scaling by adjusting the number of replicas.
- Scaling is defined by limits (min/max replicas) and rules (triggers).
- An HTTP scale rule triggers scaling based on the number of concurrent requests per replica.
- You can configure scaling via the Azure Portal by creating a new revision, or programmatically using the Azure CLI with parameters like
--scale-rule-typeand--scale-rule-http-concurrency. - Setting
minReplicasto0enables scale-to-zero, a powerful cost-saving feature for applications with intermittent traffic.
This lesson concludes our module on developing containerized solutions. You have successfully containerized a .NET application, pushed it to a registry, deployed it to Azure Container Apps, and configured it to scale dynamically.
Next Steps
We will now shift our focus to a different, but equally important, model of cloud development: serverless computing with Azure Functions. In the next module, you will learn how to build event-driven, serverless logic that runs without you having to manage any container or server infrastructure at all. Our first lesson will introduce you to the core concepts of Azure Functions, including hosting plans, triggers, and bindings.