Hello! Welcome to the second lesson in our module on containerized solutions.
In our previous lesson, we established a conceptual foundation, answering the question, "What are containers, images, and registries?" We learned that an image is a read-only blueprint, and a container is a live instance of that blueprint.
Today, we transition from theory to practice. We will address the learning outcome: Build a Docker image for a .NET application using a Dockerfile. This is a hands-on lesson where you'll leverage your C# and .NET expertise to package a web application into a portable, self-contained image. We will write the Dockerfile—the recipe for our image—and use Docker commands to build and run it on your local machine.
1. The Dockerfile and Multi-Stage Builds
A Dockerfile is a text file that contains a series of instructions on how to assemble a Docker image. Each instruction creates a new layer in the image, building upon the previous one.
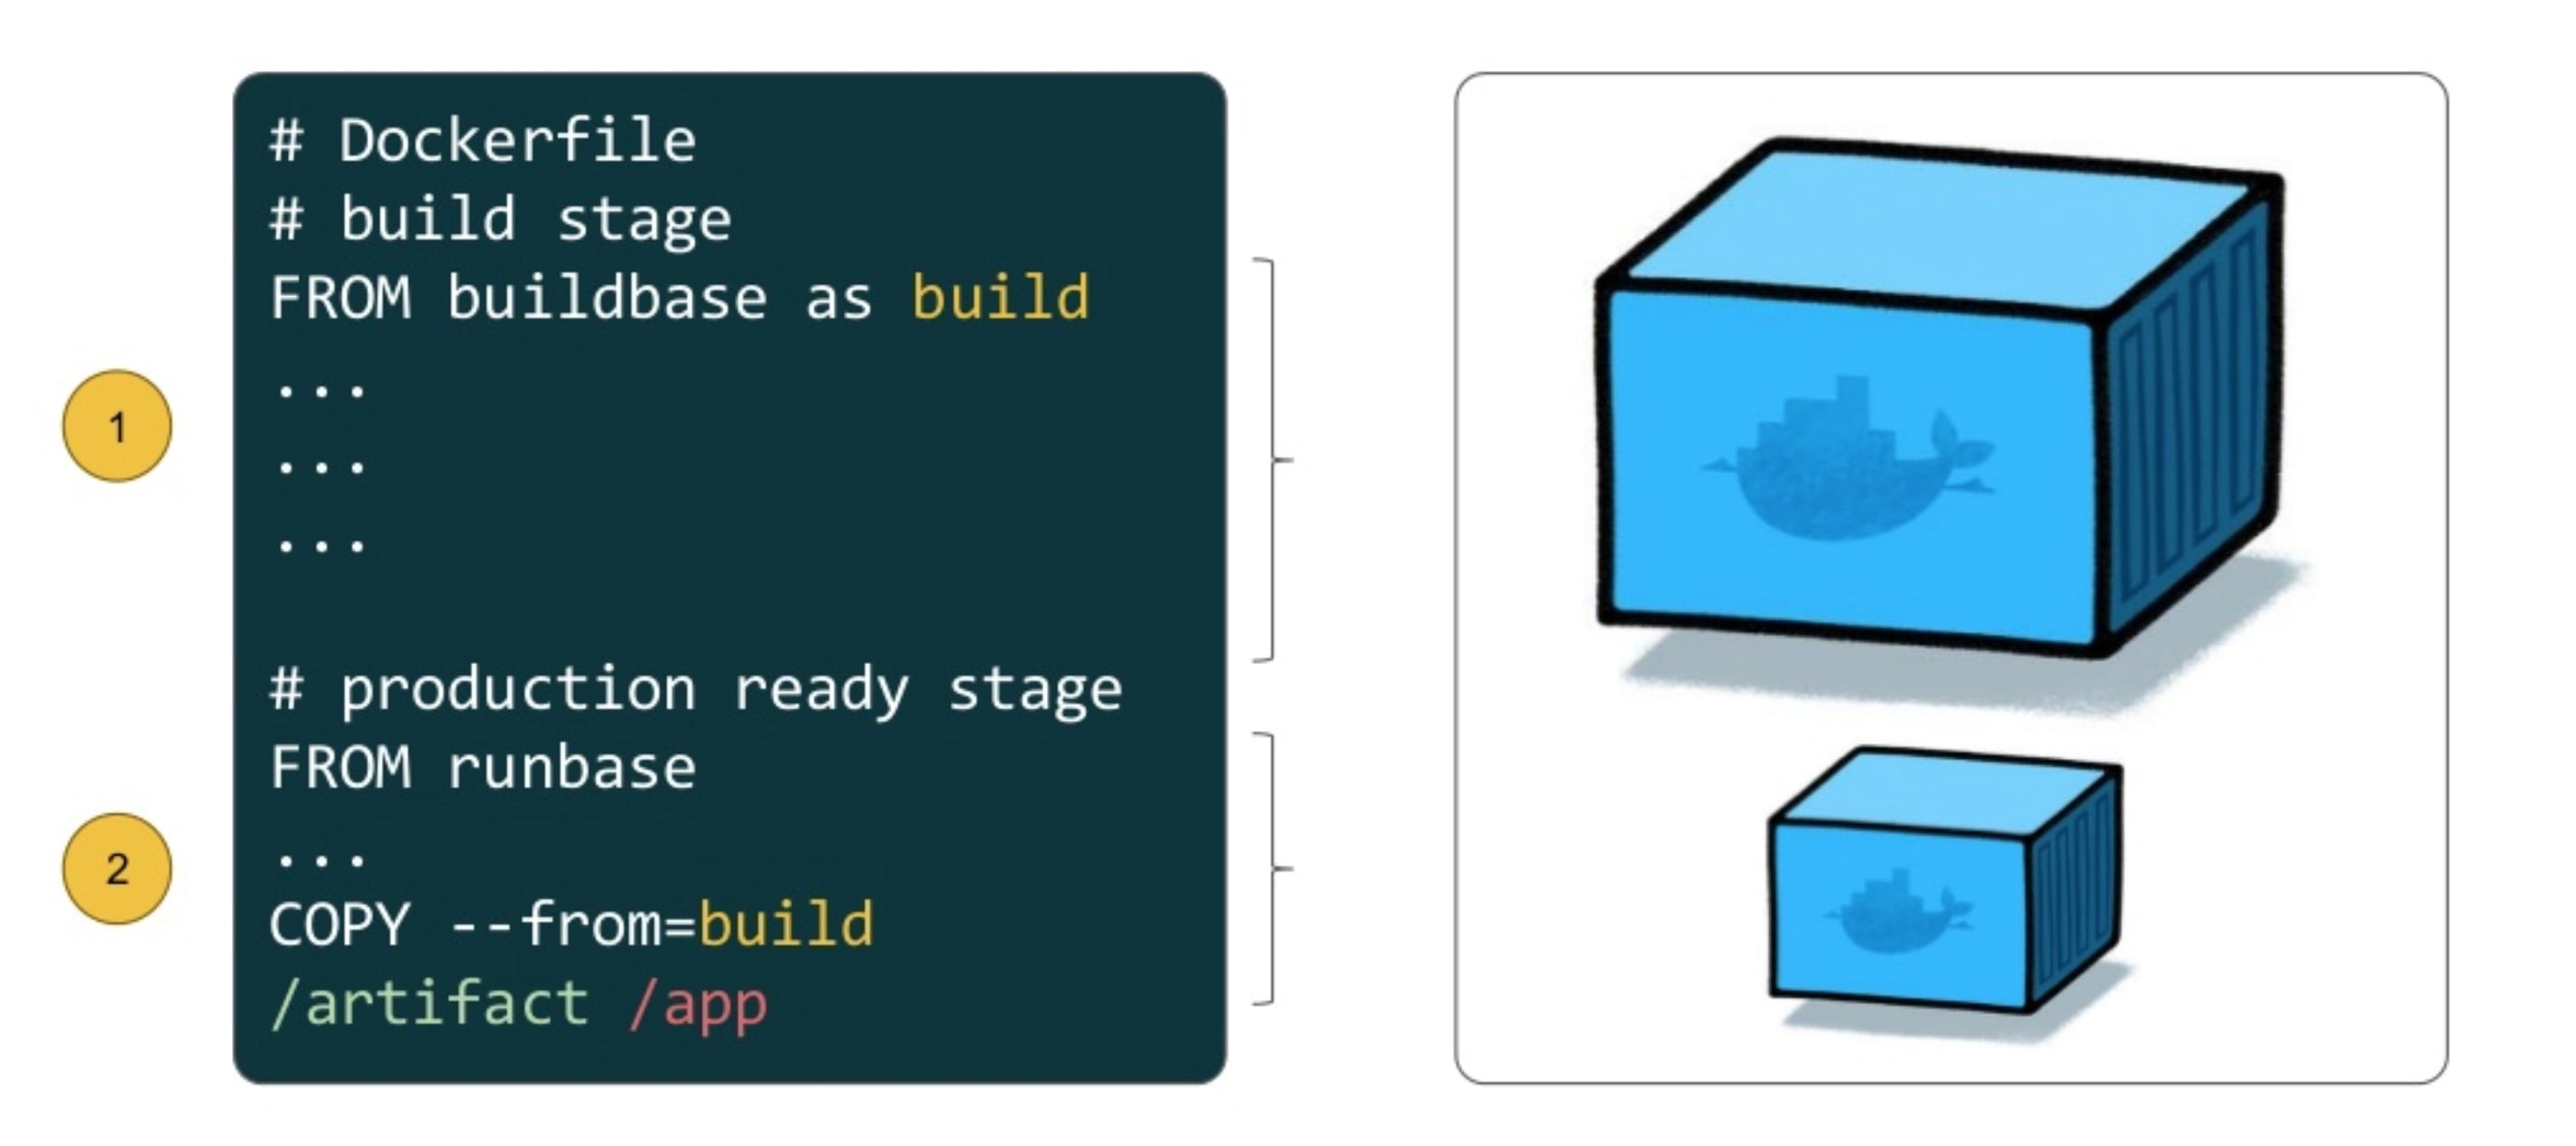
For compiled languages like C#, a crucial best practice is the multi-stage build. The idea is to use one container environment (a "stage") that contains the full .NET SDK to build and publish your application, and a separate, much smaller container environment that contains only the lightweight ASP.NET runtime to run it.
This process ensures your final production image is as small and secure as possible, containing only the necessary runtime artifacts and not the bulky build tools.
2. Crafting a Dockerfile for a .NET Application
Now, let's walk through the creation of a Dockerfile for a .NET application. The process involves defining the different stages and using specific commands to copy files, restore dependencies, build, publish, and finally, run the application.
The following video provides a step-by-step guide to writing a multi-stage Dockerfile from scratch for a .NET minimal API. This is an excellent, practical demonstration of the concepts.
Getting Started With .Net, Docker And Azure Container Instances
Watch this segment from the video 'Getting Started With .Net, Docker And Azure Container Instances' by Codewrinkles. It provides a detailed, commented walkthrough of creating a multi-stage Dockerfile.
Watch from 00:29 to 06:09. As you watch, pay close attention to the purpose of each stage and the commands used: Base Stage: Uses mcr.microsoft.com/dotnet/aspnet and the EXPOSE command. Build Stage: Uses mcr.microsoft.com/dotnet/sdk, COPY, RUN dotnet restore, RUN dotnet build. Publish Stage: Uses RUN dotnet publish. Final Stage: Copies from the publish stage using COPY --from=publish and sets the ENTRYPOINT.
To complement the video, here is a breakdown of the key Dockerfile commands. You can think of this as a quick reference guide.
| Command | Purpose | Example from a .NET Dockerfile |
|---|---|---|
FROM |
Specifies the base image for a new build stage. | FROM mcr.microsoft.com/dotnet/sdk:8.0 AS build |
WORKDIR |
Sets the working directory for subsequent commands. | WORKDIR /src |
COPY |
Copies files or directories from the build context to the container's filesystem. | COPY ["MyApp.csproj", "."] |
RUN |
Executes a command in a new layer on top of the current image. | RUN dotnet restore |
EXPOSE |
Informs Docker that the container listens on the specified network ports at runtime. | EXPOSE 80 |
ENTRYPOINT |
Configures the container to be run as an executable. | ENTRYPOINT ["dotnet", "MyApp.dll"] |
3. Best Practice: The .dockerignore File
When you run docker build, the Docker CLI sends the entire directory (the "build context") to the Docker daemon. To make builds faster and avoid including unnecessary or sensitive files in your image, you should use a .dockerignore file.
This file works just like a .gitignore file, telling Docker to exclude certain files and directories from the build context. For a .NET project, you should always ignore the bin and obj directories, which contain intermediate build artifacts.
To understand this better, please read the relevant section in the following article.
From Code to Container: The Complete Guide to Dockerizing .NET ...
This article, 'The Complete Guide to Dockerizing .NET Applications', includes a clear explanation of why a .dockerignore file is important.
Read 'Step 3: Configuring .dockerignore'. Note the example file content and the reasoning provided.
4. Hands-On: Building and Running Your Image
Now it's time to build the image and run it as a container. To follow along, you will need:
- A simple .NET Web API project on your machine. You can create one quickly with the command
dotnet new webapi -n MyDockerApp. - The
Dockerfileand.dockerignorefiles you learned about above, placed in the root of your project directory. - Docker Desktop installed and running.
The next segment of the video you watched earlier demonstrates exactly how to use the docker build and docker run commands.
Getting Started With .Net, Docker And Azure Container Instances
This clip shows you how to use the Docker CLI to build your image from the Dockerfile and then run it as a container.
Watch from 06:09 to 09:00. Follow along with the presenter and execute the commands on your own machine: Build the image: docker build -t <your-image-name> . The -t flag tags your image with a name. The . at the end specifies the current directory as the build context. Run the container: docker run -p 8080:80 <your-image-name> The -p flag maps port 8080 on your local machine to port 80 inside the container. This allows you to access your application at http://localhost:8080.
After running these commands, you should have a containerized .NET application running locally. Congratulations, you've successfully built your first Docker image!
Conclusion
In this lesson, we put the theory from our previous session into practice. You've learned how to write a Dockerfile for a .NET application, embracing the crucial multi-stage build pattern for optimization. You also now understand how to use the docker build and docker run commands to bring your application to life inside a container.
Key Takeaways:
- A
Dockerfileis a script of instructions for building a Docker image. - Multi-stage builds are essential for .NET applications to create small, efficient, and secure production images by separating build tools from runtime requirements.
- Key commands like
FROM,WORKDIR,COPY,RUN, andENTRYPOINTare the building blocks of aDockerfile. - A
.dockerignorefile is a best practice to keep your build context clean and your builds fast. - The
docker buildcommand creates an image from aDockerfile, and thedocker runcommand starts a container from that image.
Next Steps
Now that you can build a container image on your local machine, the next logical step is to store it in a remote, private location in the cloud. In the next lesson, you will learn how to create an Azure Container Registry (ACR) and push a container image to it. This will be our first step in preparing the image for deployment to Azure services.