Introduction
Welcome to the next lesson in our journey with containerized solutions on Azure. In our previous session, you successfully created an Azure Container Registry (ACR) and pushed your .NET application's Docker image to it. That image is now securely stored in the cloud, ready for deployment.
Today, we'll take the final step in this workflow: deploying and running your application. Our learning outcome is to deploy a containerized application from ACR using Azure Container Instances (ACI). We will cover what ACI is, why it's a powerful tool for rapid deployment, and walk through the process of launching your container from the registry and making it accessible over the internet.
1. What is Azure Container Instances (ACI)?
Azure Container Instances (ACI) is the simplest and fastest way to run a container in Azure, without having to manage any virtual machines or adopt a complex container orchestrator. It's a "serverless containers" offering, meaning Azure handles all the underlying infrastructure for you.
You can think of ACI as the perfect tool for scenarios like simple web apps, task automation, or build jobs where you just need to run a container and don't need the full orchestration capabilities of a service like Azure Kubernetes Service (AKS).
To get a solid overview of ACI and its core benefits, please watch the beginning of the following video.
Azure Container Instances Tutorial | Serverless containers in cloud
This video from Adam Marczak - Azure for Everyone provides an excellent introduction to Azure Container Instances, explaining what it is and its key features.
Watch the video from the beginning until 05:34. Pay attention to: The comparison between containers and virtual machines. The concept of a 'container group' as the fundamental resource in ACI. The key benefits, especially 'fast startup times', 'public IP and DNS name', and the lack of infrastructure management.
The workflow we are completing today is a classic container deployment pattern. You've already handled the local build and the push to the registry. Now, we'll focus on the final deployment step.
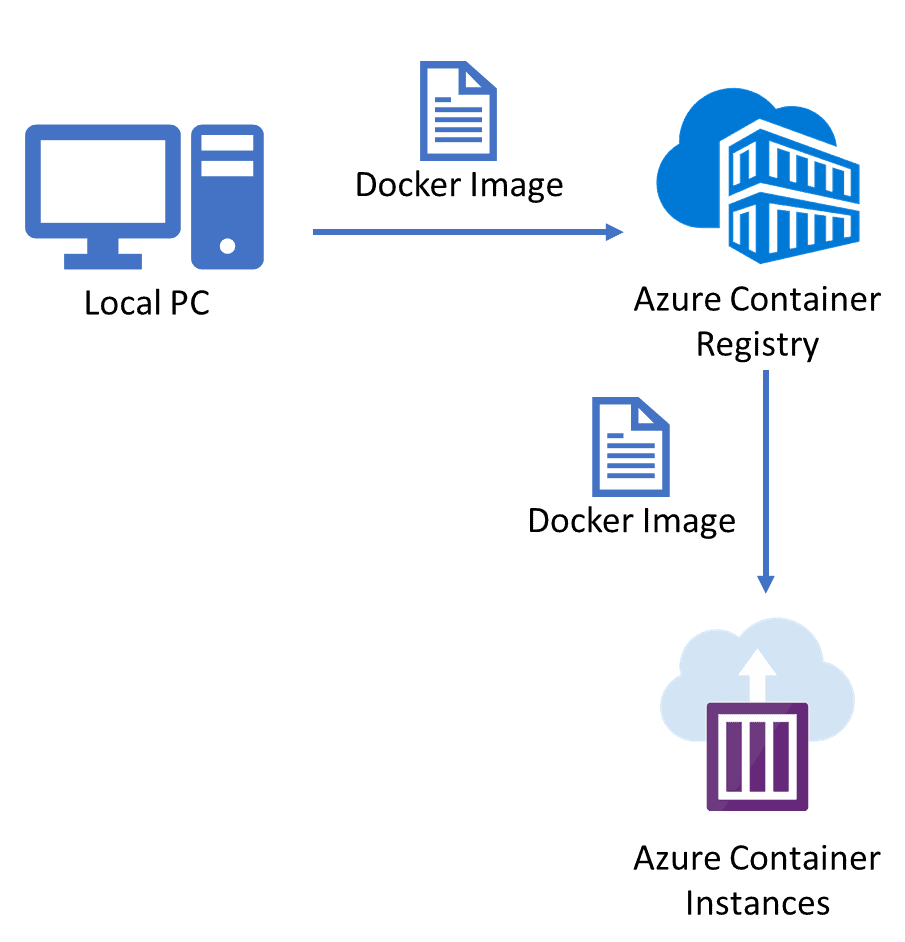
2. Deploying from ACR to ACI
To deploy your container, ACI needs to be able to pull the image from your private Azure Container Registry. This requires authentication. While there are several ways to authenticate, we will start with the most straightforward method for development and initial testing: using the registry's admin user account.
Later in this lesson, we will briefly touch upon a more secure and recommended approach for production environments using managed identities.
Step 1: Enable the Admin User on Your ACR
By default, the admin account on an ACR is disabled for security reasons. For our deployment, we'll enable it to get a username and password that ACI can use.
Open your terminal with the Azure CLI and run the following command, replacing <your-acr-name> with the name of the registry you created in the last lesson.
# Enable the admin user
az acr update --name <your-acr-name> --admin-enabled true


# Retrieve the credentials
az acr credential show --name <your-acr-name> --output table
Copy the username and one of the passwords (password or password2). You will need them for the next step.
Step 2: Create the Azure Container Instance
Now we'll use the az container create command to deploy your image. This single command will create the container instance, pull the image from your ACR, and expose it to the internet.
The command has several important parameters:
--name: A unique name for your container instance within the resource group.--image: The full path to your container image, in the format<loginServer>/<repository>:<tag>.--resource-group: The resource group where your ACR is located.--registry-login-server: The login server of your ACR (e.g.,youracrname.azurecr.io).--registry-username: The admin username you just retrieved.--registry-password: The admin password you just retrieved.--ip-address Public: This assigns a public IP address.--dns-name-label: This creates a public, human-readable DNS name to access your app. This label must be globally unique across Azure.--ports: The port your application listens on inside the container. For the default .NET web app, this is typically port 80.
Here is a template for the command. Before running it, replace all the placeholder values (<...>) with your specific details.
az container create \
    --resource-group my-container-rg \
    --name my-dotnet-app-aci \
    --image <your-acr-name>.azurecr.io/mydockerapp:v1 \
    --registry-login-server <your-acr-name>.azurecr.io \
    --registry-username <your-acr-username> \
    --registry-password <your-acr-password> \
    --ip-address Public \
    --dns-name-label <your-globally-unique-name> \
    --ports 80
This deployment may take a few minutes. The CLI will show a running indicator until the process is complete.
For a video walkthrough of a similar process (though using the Azure portal for the final step), you can refer to the demonstration in the video "How to Deploy Azure Container Registry" by Mike in the Cloud (LINK). The relevant section starts at 20:41, where the presenter configures and creates the container instance.
Step 3: Verify the Deployment
Once the command finishes, it will output a JSON object describing your new container instance. To check the status and find the URL, run:
az container show \
    --resource-group my-container-rg \
    --name my-dotnet-app-aci \
    --query "{FQDN:ipAddress.fqdn,ProvisioningState:provisioningState}" \
    --output table
This command will show you the Fully Qualified Domain Name (FQDN) and the current state of your instance. Once the ProvisioningState is Succeeded, copy the FQDN and paste it into your web browser.
You should see your running .NET application, served from an Azure Container Instance!

3. A More Secure Approach: Managed Identity
Using an admin username and password directly in a script is convenient for a quick start, but it's not a best practice for automated or production workflows, as it involves handling long-lived credentials.
Azure provides a more secure and robust mechanism: managed identities. You can assign an identity to your Azure Container Instance and then grant that identity permission to pull images from your Azure Container Registry. This eliminates the need to manage passwords entirely.
We will cover managed identities in depth in Module 8, but it's valuable to see what the deployment command looks like using this pattern.
Deploy to Azure Container Instances from Azure Container Registry using a managed identity
The official Microsoft documentation describes how to deploy to ACI from ACR using a managed identity. You don't need to perform the steps now, but reviewing the final CLI command is useful.
Briefly read the section titled 'Deploy using the Azure CLI'. Notice the parameters --assign-identity and --acr-identity. These replace the --registry-username and --registry-password parameters, providing a more secure, password-less authentication method.
The key takeaway is that for automated and secure deployments, you would replace the username/password parameters with an identity-based approach. This aligns with modern cloud security principles and is an important concept for the AZ-204 exam.
Conclusion
Excellent work! You have successfully completed the entire containerization lifecycle within Azure: you built an image, pushed it to a private registry, and deployed it to a serverless container environment. You now have a publicly accessible web application running in Azure, all without managing a single server.
Key Takeaways:
- Azure Container Instances (ACI) is a serverless platform for running single containers or simple container groups quickly.
- The
az container createcommand is the primary tool for deploying to ACI from the CLI. - To pull from a private ACR, ACI needs credentials. We used the simple admin user method, but the recommended production approach is to use a managed identity.
- By specifying
--ip-address Publicand--dns-name-label, you can easily expose your containerized application to the internet.
Next Steps
ACI is ideal for single-instance applications. However, modern cloud applications are often built as a set of collaborating microservices. For those scenarios, you need a service that understands how to manage, scale, and network multiple containers.
In our next lesson, we will explore Azure Container Apps, a service designed specifically for running containerized microservices. We will learn its features and see how it builds upon the concepts we've learned with ACI.