Hello! Let's get started with our second lesson in the "Developing for Azure App Service" module.
Introduction
In our previous lesson, we established a solid conceptual foundation for Azure App Service. You learned that it's a powerful Platform-as-a-Service (PaaS) offering, what an App Service Plan is, and how the different pricing tiers map to various application needs.
Today, we transition from theory to practice. This lesson is designed to be a hands-on lab where you'll leverage your extensive background in .NET and Visual Studio to achieve our learning outcome: Create and deploy a .NET web application to Azure App Service using Visual Studio.
We will walk through the entire process:
- Creating a simple ASP.NET Core web application in Visual Studio.
- Using the built-in Visual Studio Publish wizard to create the necessary Azure resources.
- Deploying your application code to the newly created App Service.
- Verifying the deployment and, critically, cleaning up the resources to manage costs.
This is a milestone lesson where you'll see your code running live on the internet via Azure for the first time.
Part 1: Prepare Your .NET Application
To begin, we need an application to deploy. While you could use an existing project, we'll create a new, simple ASP.NET Core Web App to ensure a clean and predictable starting point. Given your experience, this should be a quick task. The focus here isn't on the app's code, but on the deployment process that follows.
You can create either a Blazor or MVC project template for this exercise; the deployment steps are identical.
The following video demonstrates creating a new Blazor WebAssembly app. If you're already comfortable with this, you can just create the project on your own and skip ahead.
Publishing a .NET Core Web App to Azure with VS 2022 (It's SO EASY)
Watch this brief segment from The C# Academy to see how to quickly create a new Blazor app in Visual Studio 2022. This will be our sample application for deployment.
Watch from 01:00 to 02:06. The key takeaway is simply the creation of a standard .NET web project that we can then deploy.
Action:
- Open Visual Studio 2022.
- Create a new project using the ASP.NET Core Web App template (or Blazor Web App).
- Give it a name, like
MyFirstAzureWebApp. - Use a recent .NET version (e.g., .NET 8.0). For authentication type, you can leave it as None for this simple deployment.
- Once the project is created, run it locally (F5 or Ctrl+F5) just to confirm that the default template works as expected.
Part 2: Deploying to Azure App Service from Visual Studio
Now for the main event. Visual Studio has deeply integrated tooling that makes publishing a .NET application to Azure remarkably straightforward. We will use the "Publish" feature to guide us.
To start the process, you'll right-click on the project in the Solution Explorer.

From here, a wizard will guide you through creating and configuring the Azure resources. Let's watch a full walkthrough of this process.
Publishing a .NET Core Web App to Azure with VS 2022 (It's SO EASY)
This video provides a clear, end-to-end demonstration of the publish process from Visual Studio to Azure App Service. It covers logging in, creating the App Service and its related resources, and initiating the deployment.
Watch from 02:12 to 04:33. Pay close attention to the 'Create new App Service' dialog, where you define the core Azure resources. Notice the concepts we discussed in the last lesson—Resource Group and Hosting Plan—appearing here.
Step-by-Step Publish Walkthrough
As you follow along with the video and perform these steps in your own Visual Studio instance, let's break down the crucial "Create App Service" dialog. This is where you map your application to the Azure infrastructure.
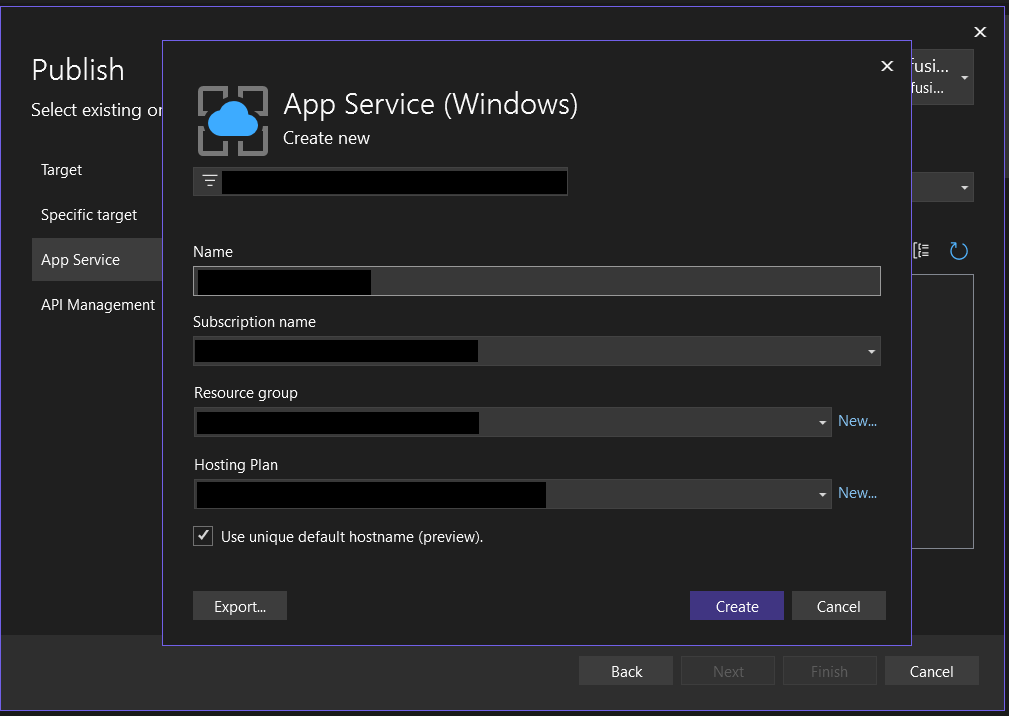
Here's what each field means:
- Name: This will become the public URL for your application (e.g.,
MyFirstAzureWebApp.azurewebsites.net). It must be globally unique across all of Azure. - Subscription: This is your Azure subscription, which acts as the billing and management boundary for all your resources. You should see the one you created earlier.
- Resource Group: As you learned in Module 1, this is a logical container for your Azure resources. The wizard will suggest creating a new one. It's best practice to group the App Service and its App Service Plan together.
- Hosting Plan: This is the App Service Plan we discussed in the last lesson.
- Click New... to create one.
- Location: Choose an Azure region close to you or your users (e.g., East US, West Europe).
- Size: This is the pricing tier. For this lab, select the Free (F1) tier. This is more than sufficient for our test and incurs no cost.
After you click "Create," Visual Studio communicates with Azure to provision these resources. Once done, a "Publish Profile" (.pubxml file) is created in your project. This file stores all the settings for this deployment, making future deployments as simple as a single click.
Finally, click the Publish button. Visual Studio will build your project, package it, and upload it to the App Service you just created. The Output window will show the progress, and upon success, a browser window will automatically open with your live application's URL.
For a detailed textual reference of this entire process, you can consult the official Microsoft documentation.
Quickstart: Deploy an ASP.NET web app
This Microsoft Learn Quickstart provides a comprehensive written guide for the process you just performed. It's a great resource to bookmark for future reference.
Review the section titled 'Publish your web app'. Focus on the steps for Visual Studio. This will reinforce what you saw in the video and provide additional screenshots and context.
Part 3: Verification and Cleanup
Congratulations! Your .NET application is now running in Azure.
Verification:
- The browser window opened by Visual Studio should display your running application.
- Navigate to the Azure Portal.
- Go to Resource groups and find the one you just created (e.g.,
MyFirstAzureWebAppResourceGroup). - Inside, you will see at least two resources: an App Service and an App Service Plan. This confirms that the Visual Studio wizard created the infrastructure as expected.
Crucial Step: Cleanup
To avoid incurring any potential costs and to keep your Azure subscription tidy, it is essential to delete the resources you've created once you are finished. The easiest way to do this is to delete the entire resource group.
The final part of the video we watched demonstrates this process perfectly.
Publishing a .NET Core Web App to Azure with VS 2022 (It's SO EASY)
Please watch this short clip to see how to properly clean up your resources by deleting the resource group.
Watch from 04:39 to 05:28. Follow these steps in the Azure Portal to delete the resource group you created for this lesson.
To summarize the cleanup steps:
- In the Azure Portal, navigate to the resource group you created.
- Click Delete resource group.
- You will be prompted to type the name of the resource group to confirm the action. This is a safety measure to prevent accidental deletion.
- Click Delete.
For Your Information: Handling Database Dependencies
Our simple application didn't have a database, but most real-world applications do. Your extensive experience with C# and REST APIs likely involves connecting to databases like SQL Server.
The Visual Studio Publish wizard is smart enough to detect these dependencies. If your project used Entity Framework Core and had a DbContext, the wizard would offer to provision an Azure SQL Database for you and configure the connection string automatically.
You don't need to perform these steps now, but it's valuable to see what this process looks like for future reference.
How to deploy asp.net core web api to azure app service
This video from kudvenkat shows the deployment of an ASP.NET Core Web API with a SQL database dependency. It demonstrates how the publish wizard handles this more complex scenario.
Watch the segments from 02:35 to 04:07 and 04:21 to 04:54. Focus on how Visual Studio detects the SQL Server dependency and provides an option to 'Apply this migration on publish'. We will cover connection strings in detail in the next lesson.
Conclusion
In this lesson, you successfully bridged the gap between local development and cloud deployment. You took a standard .NET web application and, with a few clicks in Visual Studio, provisioned the necessary cloud infrastructure and published your code for the world to see.
Key Takeaways:
- Visual Studio provides a powerful, integrated Publish wizard for deploying applications to Azure.
- The wizard allows you to create and configure Azure resources like App Services, App Service Plans, and Resource Groups directly from your IDE.
- A Publish Profile (
.pubxml) saves your deployment settings for easy, one-click redeployments. - Cleaning up by deleting the resource group is a critical practice for managing costs and keeping your Azure environment organized.
Next Steps
Now that you have an application running in Azure, the next logical step is to manage its configuration. In our next lesson, we will address the learning outcome: "Configure application settings and connection strings for an App Service app." You will learn how to move sensitive information like connection strings out of your code and manage them securely in the Azure platform.