Hello! Welcome back to your AZ-204 preparation.
In our last lesson, you authored your first Bicep file, main.bicep, to declaratively define an Azure Storage Account. You now have a blueprint for your infrastructure.
Introduction
Today, we bring that blueprint to life. This lesson focuses on the final and most crucial step of the Infrastructure as Code (IaC) process: deployment. Our goal is to achieve the learning outcome: Deploy a Bicep file to Azure using the Azure CLI.
We will cover the following key steps:
- Understanding the deployment workflow from Bicep to live Azure resources.
- Using the Azure CLI's
what-ifoperation to preview changes before they happen. - Executing the deployment with the
az deployment group createcommand. - Verifying your deployed resources in the Azure Portal.
The process we'll follow is analogous to your experience as a developer: you write source code (your .bicep file), use a tool to compile and run it (the Azure CLI), and then verify the result on the target platform (Azure). Let's get started.
The Bicep Deployment Workflow
Before we run any commands, it's important to understand what happens behind the scenes. When you ask the Azure CLI to deploy a .bicep file, it doesn't send the file directly to Azure. Instead, a two-step process occurs:
- Transpilation: The Bicep CLI (which is integrated into the Azure CLI) transpiles your Bicep code into a standard ARM JSON template.
- Deployment: The Azure CLI then sends this generated ARM template to the Azure Resource Manager (ARM) API, which orchestrates the creation or modification of your resources.
With modern versions of the Azure CLI, this transpilation happens automatically and in-memory, so you don't have to manage the intermediate JSON file.
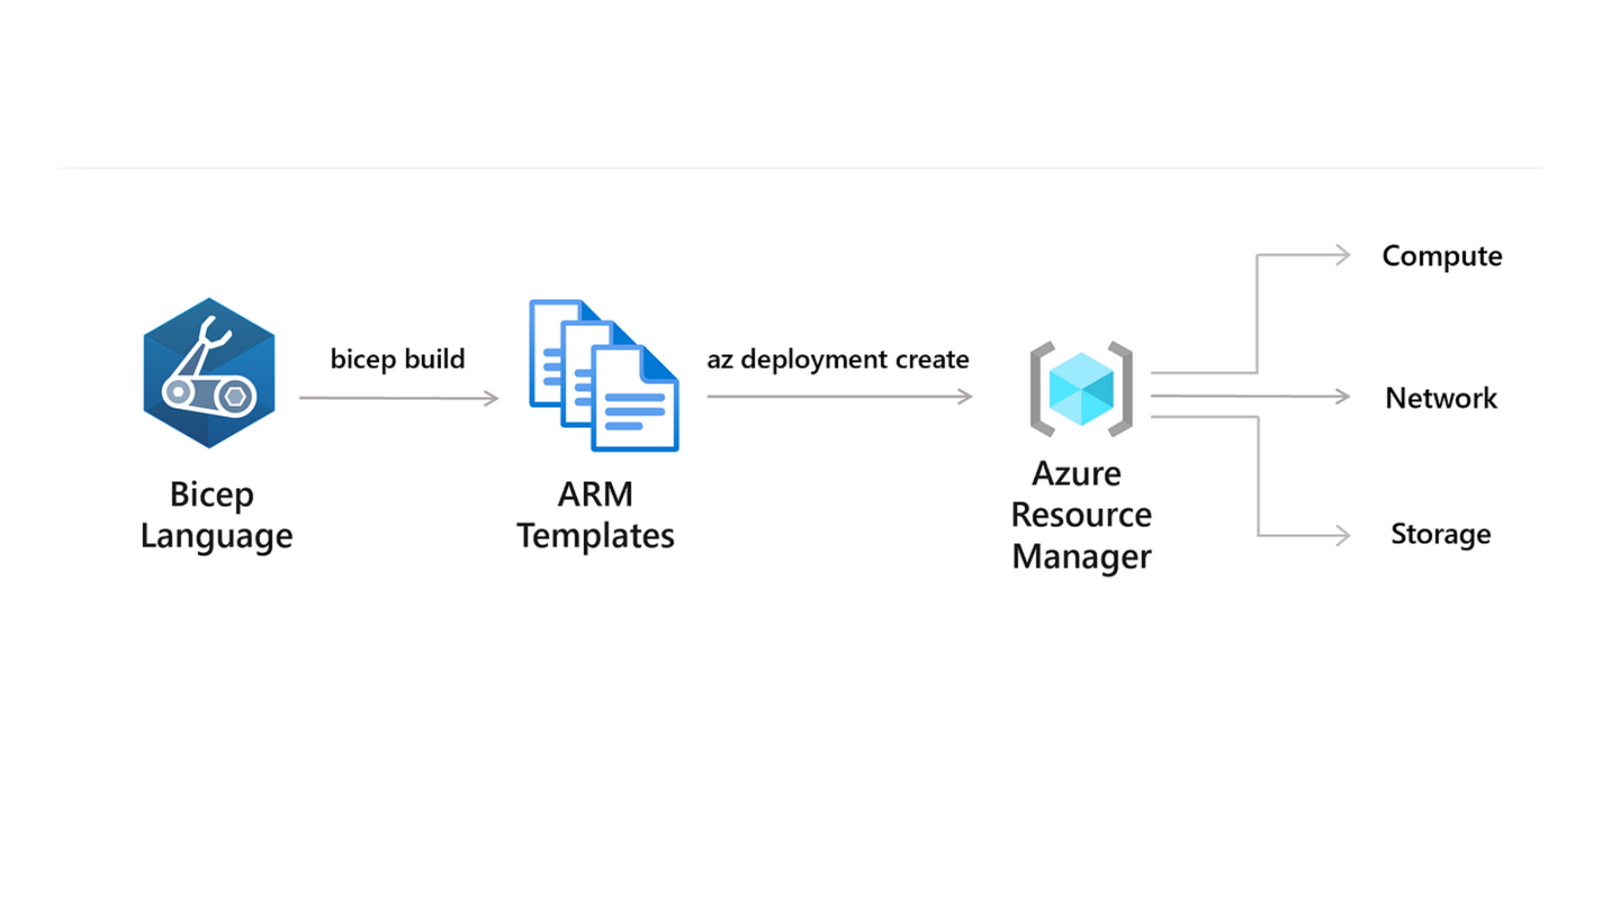
To see a detailed walkthrough of this process, including how the Azure CLI handles the Bicep file without you needing to create a separate JSON file, the following video provides an excellent explanation.
Understanding and Using Project BICEP - The NEW Azure Deployment Technology
This video from John Savill's Technical Training provides a clear explanation of how the Azure CLI processes Bicep files for deployment.
Watch from 32:16 to 34:44. Focus on how the az deployment group create command is used directly with the .bicep file and how the CLI handles the in-memory transpilation before submitting the job to Azure Resource Manager.
Previewing Changes with the what-if Operation
A core principle of reliable operations is to "look before you leap." Before making changes to your infrastructure, you should always preview the potential impact. The Azure CLI provides a powerful --what-if flag for exactly this purpose.
Running a deployment command with --what-if doesn't change anything in Azure. Instead, it compares the desired state defined in your Bicep file with the current state of your Azure resources and shows you a summary of what will be:
- Created (
+) - Modified (
~) - Deleted (
-)
This is an essential safety check, similar to reviewing a pull request before merging it.

Now, let's practice this. In your terminal, navigate to the directory where you saved main.bicep from the previous lesson. Run the following command, making sure to replace <YourResourceGroupName> with the name of the resource group you created in a previous lesson (e.g., Bicep-RG).
az deployment group create \
  --resource-group <YourResourceGroupName> \
  --template-file main.bicep \
  --what-if
Since this is the first time you are deploying this storage account, the output should show one resource to be created ([+] Create).
Deploying the Bicep File
Now that you've confirmed the changes with --what-if, you're ready to deploy. The command is nearly identical; you just remove the --what-if flag.
The primary command for deploying to a resource group is az deployment group create. For a comprehensive look at this command and its options, the official Microsoft Learn documentation is the best resource.
Deploy Bicep files with the Azure CLI
Please read these sections from the Microsoft Learn documentation. They provide the authoritative reference for the deployment commands and parameters we are using.
Read the sections 'Prerequisites', 'Deployment scope', and 'Deploy local Bicep file'. This will reinforce the requirements and the exact syntax for the deployment command.
Hands-On Deployment
You are now ready to execute the deployment.
-
Run the Deployment Command:
In your terminal, run the following command. The--nameparameter gives the deployment a recognizable name in the Azure portal's history, which is useful for tracking.az deployment group create \ --name 'initial-storage-deploy' \ --resource-group <YourResourceGroupName> \ --template-file main.bicepThe deployment will now start. The CLI will wait for the operation to complete and then show you the results, including a
provisioningStateofSucceeded. -
Verify in the Azure Portal:
The final step is to see the result of your work.- Go to the Azure Portal.
- Navigate to your resource group.
- You should now see the Azure Storage Account you defined in your Bicep file listed as a resource.
- On the left-hand menu for your resource group, click on Deployments. You will see an entry named
initial-storage-deploywith a "Succeeded" status. Clicking on it provides details about the operation, which is invaluable for troubleshooting.
This short video provides a quick, consolidated view of executing the deployment command and seeing the result.
How to use Bicep to Deploy Azure Resources
This clip from Claudio Bernasconi provides a concise demonstration of running the deployment command and verifying the result in the Azure portal.
Watch from 08:39 to 09:33. This serves as a quick visual confirmation of the steps you just performed.
Conclusion
Excellent work! You have now completed the full Infrastructure as Code cycle: authoring a template, previewing the deployment, executing it, and verifying the result. This is a foundational skill for any Azure developer.
Key Takeaways:
- The core command for deploying a Bicep file to a resource group is
az deployment group create. - The Azure CLI automatically transpiles Bicep to an ARM Template in memory, simplifying the workflow.
- The
--what-ifoperation is a critical best practice to preview changes and prevent unintended consequences. - You can verify a deployment's success by checking the CLI output and observing the created resources and deployment history in the Azure Portal.
Next Steps
You have now completed the first module, "Azure Foundations and Infrastructure as Code," giving you the essential skills to provision resources in a repeatable and automated way.
In our next lesson, we will begin the "Developing for Azure App Service" module. We'll start by exploring one of the most fundamental PaaS (Platform-as-a-Service) offerings in Azure. You will learn about the features, pricing tiers, and common use cases of Azure App Service, which will be the target for deploying your .NET applications later in the course.