Hello! Welcome back to our course on preparing for the AZ-204 certification.
In the last lesson, you did an excellent job implementing the publish-subscribe pattern with Azure Service Bus topics and subscriptions. You saw how to broadcast a single message to multiple, decoupled consumers—a foundational pattern for scalable, event-driven systems.
Today's lesson addresses a critical aspect of building robust and reliable messaging solutions. We will cover the learning outcome: Configure message properties such as Time-to-Live (TTL) and manage dead-lettered messages. You'll learn how to control a message's lifespan to prevent stale data and how to handle messages that fail processing, ensuring no data is lost and that you have a strategy for remediation.
1. Controlling Message Lifespan with Time-to-Live (TTL)
Not all data is valuable forever. An instruction to refresh a cache, a password reset token, or a time-sensitive promotional offer all have a limited period of utility. Sending a message that gets processed long after it's relevant can cause unexpected behavior or errors. Azure Service Bus solves this with the Time-to-Live (TTL) property.
TTL is a duration you can set on a message or as a default on a queue/topic. When a message's TTL expires, it becomes ineligible for retrieval and is either dropped or moved to a special queue, which we'll discuss shortly.
To understand the fundamentals, please read the following sections from the official Microsoft documentation.
Azure Service Bus - Message expiration (Time to Live)
This article, 'Azure Service Bus - Message expiration (Time to Live)', explains the core concepts of TTL and how it's applied at both the message and entity level.
Please read the first two main sections: Start at the top and read down to 'Scheduled messages'. Focus on the definitions of Time-to-Live and the expires-at-utc property. Continue with the section 'Entity-level expiration'. Understand how a default TTL on a queue or topic works and how it acts as a ceiling for message-level TTL.
Configuring Time-to-Live
You can configure TTL in two primary ways:
- At the Entity Level (Default): You set a default
message-time-to-livewhen creating a queue or topic. Any message sent to this entity will inherit this TTL unless explicitly overridden. - At the Message Level: You can set the
TimeToLiveproperty on an individualServiceBusMessageobject in your C# code. This gives you fine-grained control and overrides the entity's default.
This video segment provides a practical demonstration of both concepts.
AZ-204 - Connect and Consume Services - Azure Service Bus
In this clip from Alan Rodrigues's tutorial on Azure Service Bus, you will see how to set the TTL for an individual message in C# and observe its effect.
Watch the segment from 00:27:27 to 00:30:45. Pay attention to: The 'message time to live' setting shown in the Azure Portal for the queue (the entity-level default). How the TimeToLive property is set on the ServiceBusMessage object to a short duration (30 seconds). The result: after waiting, the messages sent with the short TTL expire and are removed from the queue's active message count.
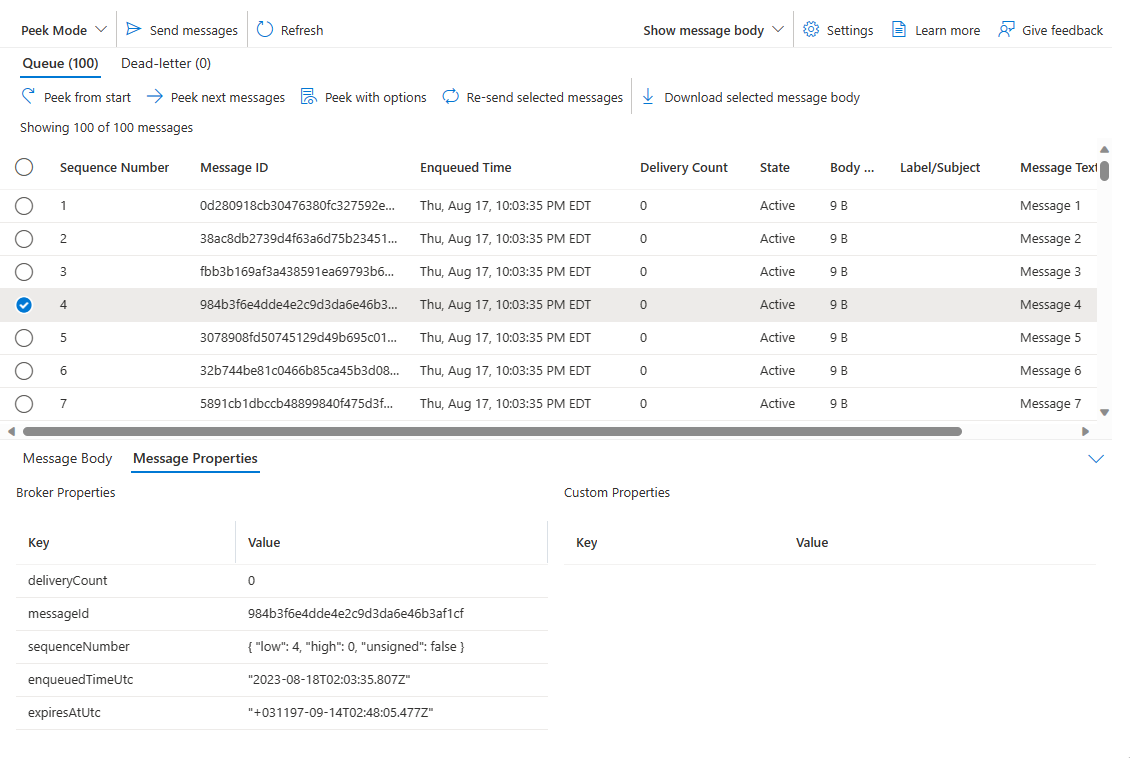
Once a message with a TTL is sent, its expiresAtUtc property is set. You can inspect this property using tools like the Service Bus Explorer in the Azure Portal.
2. The Dead-Letter Queue (DLQ)
What happens when a message expires? Or what if a receiver tries to process a message multiple times but keeps failing? Instead of losing these messages, Service Bus can move them to a dead-letter queue (DLQ).
A DLQ is a sub-queue associated with your main queue or subscription. It acts as a holding area for messages that couldn't be delivered or processed correctly. This gives you an opportunity to inspect, repair, and potentially resubmit them.
Let's dive into the official documentation for a thorough overview.
Overview of Service Bus dead-letter queues - Azure - Microsoft
This document, 'Overview of Service Bus dead-letter queues', is the definitive guide to understanding how DLQs work and the various reasons messages end up there.
Please read the following sections to build a strong conceptual foundation: Start at the top and read 'The dead-letter queue' to understand its purpose. Read 'Moving messages to the DLQ' to learn about the DeadLetterReason and DeadLetterErrorDescription properties. Read the two key system-driven reasons: 'Time to live' (which sets TTLExpiredException) and 'Maximum delivery count' (which sets MaxDeliveryCountExceeded).
As you've just read, there are two primary automatic reasons for a message to be dead-lettered:
- TTL Expiration: The message's
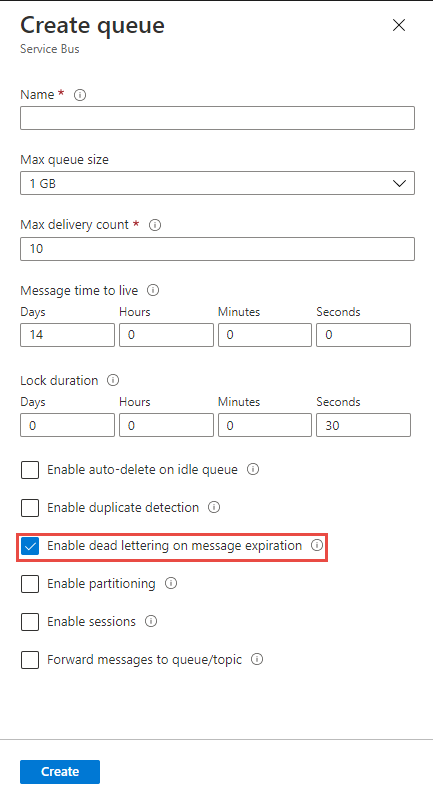
TimeToLivehas passed. This only happens if you've enabled the "Enable dead lettering on message expiration" setting on your queue or subscription. - Max Delivery Count Exceeded: The message was delivered to a consumer using the
PeekLockreceive mode, but the consumer either abandoned it or the lock expired. After a configurable number of delivery attempts, Service Bus gives up and dead-letters the message.
3. Managing and Reading from the DLQ
Now, let's combine these concepts. We'll enable dead-lettering for expired messages, send some that are destined to expire, and then write code to read them from the DLQ.
This next video segment is an excellent end-to-end demonstration.
AZ-204 - Connect and Consume Services - Azure Service Bus
Continuing with Alan Rodrigues's tutorial, this section shows the complete workflow: enabling the DLQ, watching an expired message get dead-lettered, and writing C# code to retrieve it.
Watch from 00:30:45 to 00:34:57. This is a critical section. Observe: How 'dead lettering on message expiration' is enabled in the portal. After sending messages with a short TTL, the 'Dead-Letter Message Count' in the portal increases. The crucial change in the C# code to read from the DLQ: appending /$deadletterqueue to the queue/subscription name. How the code inspects the DeadLetterReason and DeadLetterErrorDescription properties.
Explicitly Dead-Lettering Messages
Sometimes, your application knows immediately that a message is invalid. Perhaps it's a malformed JSON payload, or it fails a business validation rule. Instead of repeatedly trying to process it, you can explicitly send it to the DLQ from your receiver code.
This gives you full control over your error-handling logic. You can do this by calling the DeadLetterMessageAsync() method on the receiver.
Overview of Service Bus dead-letter queues - Azure - Microsoft
This section of the DLQ documentation explains how your application can proactively dead-letter messages and provides the .NET method for doing so.
Please read the section 'Application-level dead-lettering'. Note the C# method ServiceBusReceiver.DeadLetterMessageAsync and the best practice of including exception details in the properties when you call it.
Here's a quick example of what this looks like inside your ServiceBusProcessor message handler:
async Task MessageHandler(ProcessMessageEventArgs args)
{
    string body = args.Message.Body.ToString();
    try
    {
        // Attempt to deserialize or process the message
        var order = JsonSerializer.Deserialize<Order>(body);

        // If successful, complete the message
        await args.CompleteMessageAsync(args.Message);
    }
    catch (JsonException ex)
    {
        // The message is malformed, dead-letter it immediately
        Console.WriteLine($"Malformed message: {body}. Dead-lettering.");

        // Add exception details for later inspection
        await args.DeadLetterMessageAsync(args.Message, "MalformedJSON", ex.ToString());
    }
}
4. Hands-On Lab: Capturing and Inspecting Expired Messages
It's time to apply what you've learned. In this lab, you will configure one of the subscriptions from the previous lesson to capture expired messages in its DLQ, and then you'll build a small utility to inspect them.
-
Configure the Subscription:
- Navigate to your Service Bus Namespace in the Azure Portal.
- Go to the
order-topicyou created in the last lesson. - Select one of your subscriptions (e.g.,
email-subscription). - In its Properties, set the Message time to live to a short duration, like 1 minute.
- Ensure the Enable dead lettering on message expiration checkbox is checked. Save the changes.
-
Send an Expiring Message:
- Open the
TopicPublisherconsole app from the previous lesson. - Run the app to send one or more messages to
order-topic. - Since you aren't setting a message-level TTL, the messages will inherit the 1-minute TTL from the subscription's default setting.
- Open the
-
Observe the DLQ:
- Wait for about a minute.
- Go back to the subscription's overview page in the Azure Portal.
- Refresh the page. You should see the Active message count drop to 0 and the Dead-letter message count increase.
-
Create a DLQ Reader:
- In Visual Studio, create a new .NET Console App named
DLQReader. - Add the
Azure.Messaging.ServiceBusNuGet package. - Use the following code as a template. Remember to replace the placeholders for your connection string, topic name, and subscription name.
using Azure.Messaging.ServiceBus; using System.Threading.Tasks; using System; class Program { static string connectionString = "<YOUR_NAMESPACE_CONNECTION_STRING>"; static string topicName = "order-topic"; static string subscriptionName = "email-subscription"; // The subscription you configured static async Task Main() { // The path to the DLQ is a combination of the topic and subscription, // with a special sub-queue path. string deadLetterQueueName = $"{topicName}/subscriptions/{subscriptionName}/$deadletterqueue"; await using (ServiceBusClient client = new ServiceBusClient(connectionString)) { // Create a receiver that listens to the DLQ ServiceBusReceiver receiver = client.CreateReceiver(deadLetterQueueName); Console.WriteLine("Receiving dead-lettered messages..."); var receivedMessage = await receiver.ReceiveMessageAsync(TimeSpan.FromSeconds(5)); if (receivedMessage != null) { Console.WriteLine($"\n--- Received Dead-Letter Message ---"); Console.WriteLine($"Message Body: {receivedMessage.Body.ToString()}"); Console.WriteLine($"Sequence Number: {receivedMessage.SequenceNumber}"); // Inspect the dead-letter properties Console.WriteLine($"Dead-Letter Reason: {receivedMessage.DeadLetterReason}"); Console.WriteLine($"Dead-Letter Error Description: {receivedMessage.DeadLetterErrorDescription}"); // Remove the message from the DLQ await receiver.CompleteMessageAsync(receivedMessage); Console.WriteLine("Message completed and removed from DLQ."); } else { Console.WriteLine("No dead-letter messages found."); } await receiver.CloseAsync(); } Console.WriteLine("\nPress any key to end the program."); Console.ReadKey(); } } - In Visual Studio, create a new .NET Console App named
-
Run and Verify:
- Run your
DLQReaderapp. - It should connect to the subscription's DLQ, retrieve the expired message, and print its body along with the reason for being dead-lettered, which should be
TTLExpiredException.
- Run your
Conclusion
Fantastic work today! You have now mastered two essential features for building resilient and fault-tolerant messaging applications. These concepts are not only vital for system stability but are also frequently tested in the AZ-204 exam.
Key Takeaways:
- Time-to-Live (TTL) controls a message's lifespan, preventing the processing of stale data. It can be set at the entity level (default) or per-message (override).
- The Dead-Letter Queue (DLQ) is a sub-queue that holds messages that couldn't be processed, safeguarding against data loss.
- Messages are dead-lettered automatically due to TTL expiration or exceeding the max delivery count.
- Your application can explicitly dead-letter a message using
DeadLetterMessageAsync()for immediate, controlled error handling. - You can read from a DLQ by creating a receiver with the path
.../$deadletterqueueand inspect theDeadLetterReasonproperty to diagnose failures.
Next Steps
So far, we've handled message delivery to multiple consumers (pub/sub) and message failures (DLQ). But what if a sequence of related messages must be processed in the exact order they were sent? In our next lesson, we will implement message sessions to process a sequence of related messages in order, tackling another critical requirement in complex, distributed systems.