Hello! Welcome back to our module on "Implementing Message-Based Solutions."
In the last lesson, we compared Azure Queue Storage and Azure Service Bus, concluding that Service Bus is the go-to choice for enterprise-grade scenarios that demand reliability, advanced features, and guaranteed message ordering.
Today, we'll put that theory into practice. This lesson directly addresses the learning outcome: Implement a solution that sends and receives messages using an Azure Service Bus queue and the .NET SDK. You'll use your C# and .NET expertise to build two console applications: one that sends messages to a Service Bus queue and another that receives and processes them. This is a fundamental skill for any Azure developer and a common task tested on the AZ-204 exam.
1. The Core Components of a Service Bus Solution
Before we write code, let's visualize the components we'll be working with. A message-based solution using Service Bus Queues involves a few key pieces:
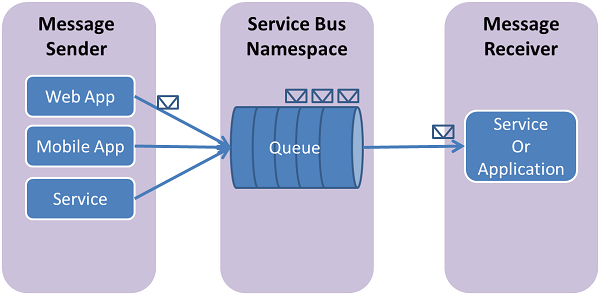
Our plan for today is to:
- Set up the infrastructure: Create a Service Bus Namespace and a Queue in the Azure Portal.
- Build a Sender: Write a .NET console app to serialize a C# object and send it as a message to the queue.
- Build a Receiver: Write a second .NET console app to listen for messages, process them, and safely remove them from the queue.
2. Setting Up Azure Service Bus Resources
First, you need a place for your queues to live. In Azure Service Bus, all messaging entities (like queues and topics) are scoped within a Namespace.
To see how this is done, the following video provides a clear walkthrough of creating both the namespace and the queue using the Azure Portal.
AZ-204 - Connect and Consume Services - Azure Service Bus
This video from Alan Rodrigues demonstrates the initial setup process in the Azure Portal. Pay attention to the distinction between the namespace and the queue itself.
Watch the segment from the beginning until 02:32. Focus on: Creating the Service Bus Namespace. Selecting the 'Standard' pricing tier, which is necessary for using queues and topics. Creating a queue within the new namespace.
As you saw, the process is straightforward. When you create a queue, you can configure various properties, such as its maximum size and how long messages can live before they expire.
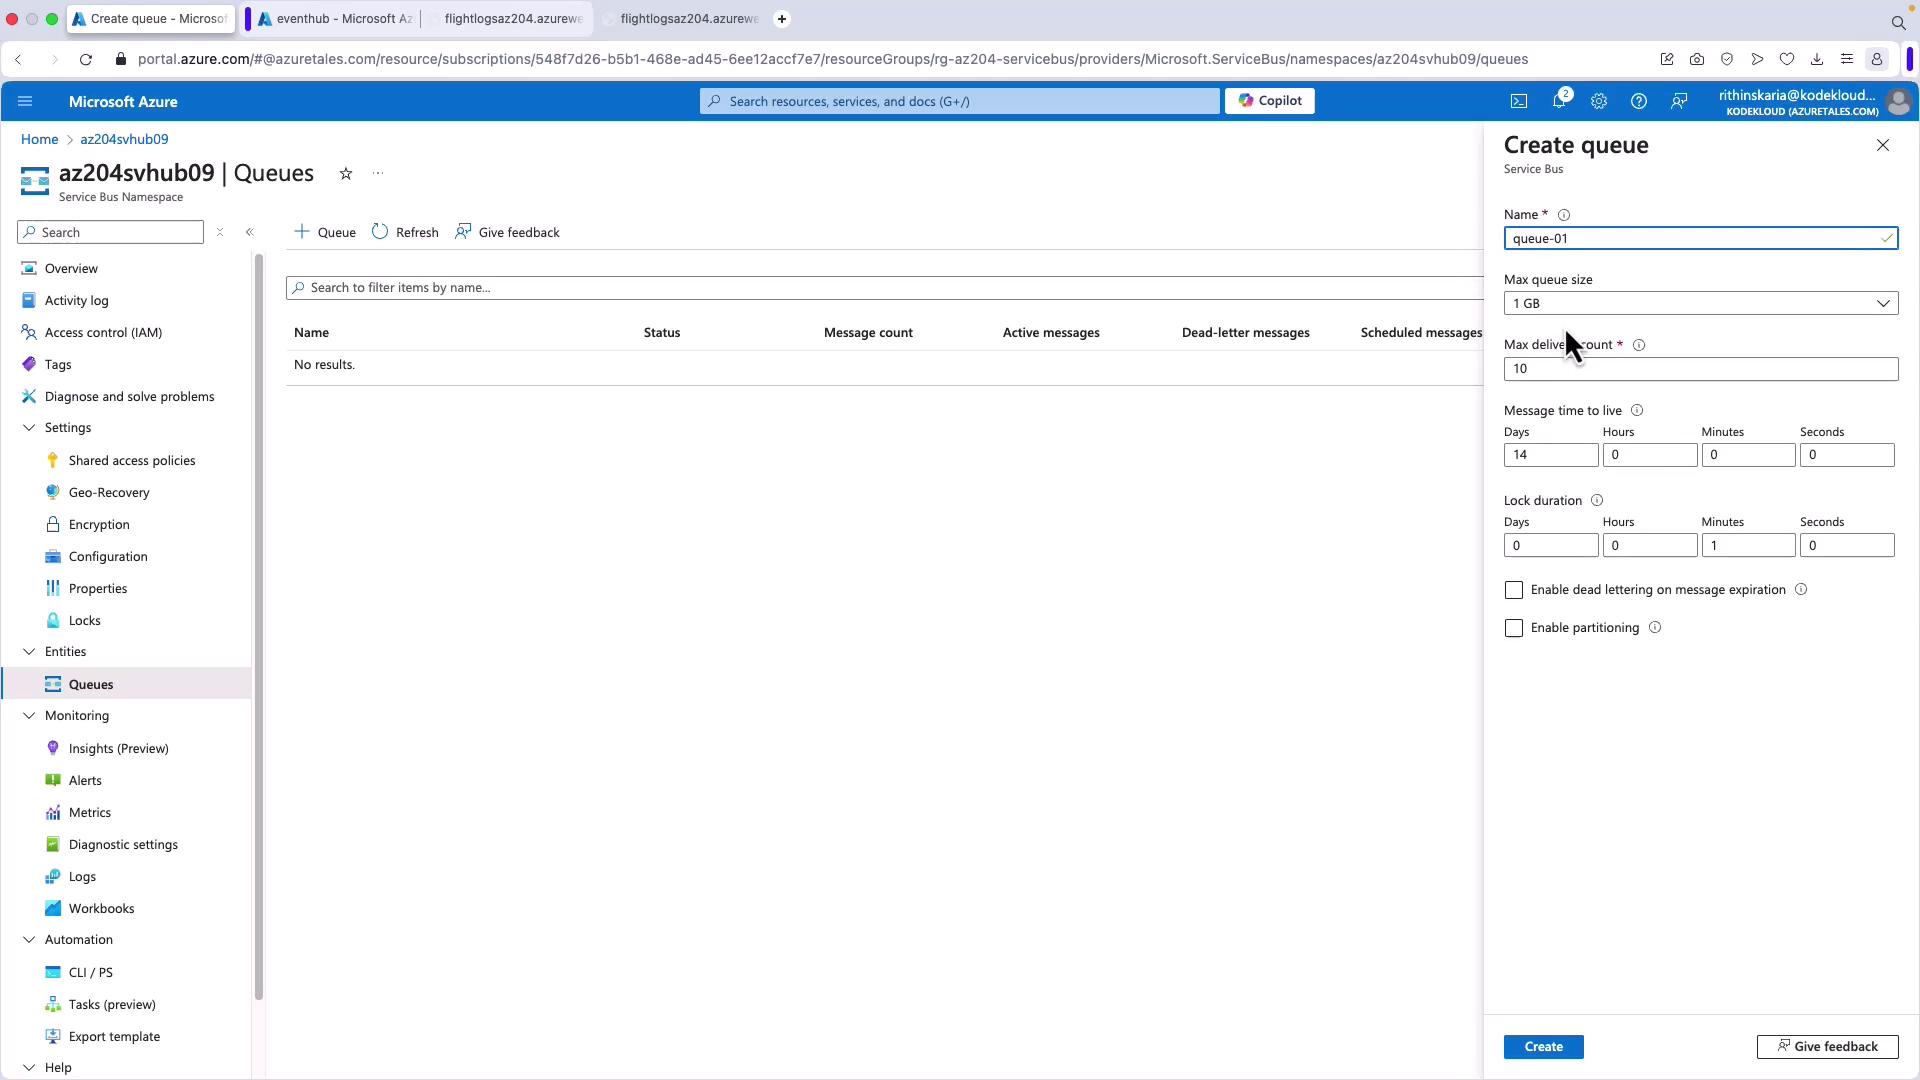
After creating the queue, you'll need to grant your application permission to access it. This is done using Shared Access Policies (SAP), which provide connection strings with specific rights (Send, Listen, Manage).
For this exercise, you can find the primary connection string under your namespace's Shared access policies -> RootManageSharedAccessKey. This key grants full control. In a production environment, you would follow the principle of least privilege by creating separate policies with only 'Send' permissions for your sender application and 'Listen' permissions for your receiver.
3. Sending Messages with the .NET SDK
Now, let's build the application that sends messages. For interacting with Service Bus from .NET, we'll use the modern Azure.Messaging.ServiceBus library.
You can install it into a new .NET Console App project using the NuGet Package Manager Console:Install-Package Azure.Messaging.ServiceBus
The main classes you'll use for sending messages are:
ServiceBusClient: The main entry point for the library. You'll create a single instance of this (it's safe to use as a singleton) using your connection string.ServiceBusSender: Created from theServiceBusClientfor a specific queue. It's used to send one or more messages.ServiceBusMessage: Represents a single message. The body can be a string, but for structured data, it's best practice to serialize a C# object into a JSON string.
Let's look at the official Microsoft Learn quickstart, which provides the complete code for a sender application.
Azure Service Bus Queue Quickstart for .NET Apps
This Microsoft Learn article is the definitive guide for getting started. We will follow its structure to build our sender and receiver apps.
Please read through the first half of this quickstart, focusing on the following sections: 'Create a namespace in the Azure portal' and 'Create a queue in the Azure portal': You can skim these as we've covered them, but note the instructions. 'Get the connection string': This shows exactly how to find the RootManageSharedAccessKey. 'Send messages to the queue': Study this section carefully. Follow the steps to create a console app named QueueSender, add the NuGet package, and review the C# code provided under the 'Connection string' tab. Notice how it creates a client, a sender, and then sends a batch of messages.
The code in the quickstart sends a batch of simple string messages. In a real-world application, you would typically send structured data. Given your background in C# and .NET, you can easily adapt this to send a serialized object.
Here is a conceptual example of how you would send a custom Order object:
// Define a simple Order class
public record Order(string OrderId, int Quantity, decimal UnitPrice);

// In your main method...
var myOrder = new Order("O123", 10, 99.99m);
string orderJson = System.Text.Json.JsonSerializer.Serialize(myOrder);

// Create a message with the JSON payload
var message = new ServiceBusMessage(orderJson);
message.ContentType = "application/json"; // Good practice to set the content type

// Send the message
await sender.SendMessageAsync(message);
4. Receiving Messages with the .NET SDK
Now for the other side: the receiver. The key decision when receiving messages is choosing the receive mode.
PeekLock(Default): This is the safest mode and provides an at-least-once delivery guarantee. The service "hides" the message from other receivers for a configured lock duration. Your code must explicitly complete the message to delete it from the queue. If your app crashes before completing, the lock expires, and the message becomes visible again for another receiver to process.ReceiveAndDelete: This mode provides an at-most-once delivery guarantee. The message is deleted from the queue the moment it's delivered to your app. If your app crashes before finishing its work, the message is lost forever. This is faster but less reliable.
For most business applications, PeekLock is the correct choice.
To implement a robust receiver, the SDK provides the ServiceBusProcessor class. It's a high-level abstraction that runs in the background, continuously fetches messages, and invokes event handlers that you provide.
The key steps are:
- Create a
ServiceBusProcessorfor your queue. - Register a handler for the
ProcessMessageAsyncevent. This is where your business logic will live. - Register a handler for the
ProcessErrorAsyncevent to log any exceptions. - Inside
ProcessMessageAsync, after you've successfully processed the message, you must callargs.CompleteMessageAsync(args.Message). - Start and stop the processor using
StartProcessingAsync()andStopProcessingAsync().
The second half of the Microsoft Learn quickstart walks through creating this receiver application.
Azure Service Bus Queue Quickstart for .NET Apps
Let's continue with the Microsoft Learn quickstart to build our receiver.
Now, read the 'Receive messages from the queue' section. Follow the steps to create a second console app (QueueReceiver), add the NuGet package, and implement the code. Pay close attention to: The creation of the ServiceBusProcessor. The implementation of the MessageHandler and ErrorHandler methods. The critical call to args.CompleteMessageAsync(args.Message) inside the MessageHandler.
To see a more integrated example of this pattern, the following video demonstrates implementing a receiver as a Background Service in an ASP.NET Core application, which is a common production scenario.
Build Async Messaging in .NET with Azure Service Bus (Step-by-Step)
This video from Milan Jovanović shows a very practical, modern .NET implementation of a message consumer.
Watch the segment from 13:18 to 18:08. You don't need to replicate the whole setup, but observe how he: Creates a ServiceBusProcessor. Sets processor options, like AutoCompleteMessages = false. Implements the message and error handlers. Calls CompleteMessageAsync after processing, just like in the console app.
5. Hands-On Lab: Build the Solution
It's time to apply what you've learned. Your task is to implement the full quickstart.
- Create Resources: In your Azure subscription, create a Service Bus namespace and a queue. Give your queue a unique name.
- Get Connection String: Copy the primary connection string from the
RootManageSharedAccessKeypolicy. - Build the Sender: Create the
QueueSenderconsole application as described in the Microsoft Learn guide. Remember to replace the placeholder connection string and queue name with your own. - Build the Receiver: Create the
QueueReceiverconsole application. Use the same connection string and queue name. - Test:
- Run the
QueueSenderapplication. You should see a confirmation that messages were published. - Check the Azure Portal. On your queue's overview page, you should see the "Active Message Count" has increased.
- Now, run the
QueueReceiverapplication. It should start, print the received messages to the console, and then wait. - Let it run for a moment, then press any key to stop it.
- Go back to the Azure Portal and refresh. The "Active Message Count" should now be 0.
- Run the
This exercise will solidify your understanding of the end-to-end message flow.
Conclusion
Congratulations! You have successfully implemented a complete message-based solution using Azure Service Bus queues and the .NET SDK. This pattern is a cornerstone of building resilient, scalable, and decoupled applications in the cloud.
Key Takeaways:
- The
Azure.Messaging.ServiceBusNuGet package is the modern library for working with Service Bus. - The
ServiceBusClientis the main entry point, from which you createServiceBusSenderandServiceBusProcessorinstances. - For sending, you create a
ServiceBusMessage, often with a serialized JSON payload, and send it withSendMessageAsync. - For receiving, the
ServiceBusProcessorprovides a robust, event-driven model for continuous listening. - Using the default
PeekLockmode requires you to explicitly callCompleteMessageAsyncto delete a message after processing, which ensures reliable delivery.
Next Steps
We've mastered the one-to-one communication pattern with queues. But what if you need to broadcast a message to multiple interested consumers? That's where topics and subscriptions come in. In our next lesson, we will implement a publish-subscribe model using Azure Service Bus topics and subscriptions.