Hello! In our previous lesson, we covered how to manage the data about your blobs by setting system properties and user-defined metadata. This gives you fine-grained control over individual blobs.
Today, we'll scale up our management strategy. As your applications generate more and more data, managing each blob individually becomes impractical. This lesson addresses the learning outcome: Configure blob lifecycle management policies to automate tiering and deletion. You will learn how to create "set and forget" rules that automatically manage your data, optimizing costs and ensuring compliance with data retention requirements. This is a core competency for Azure developers and a frequent topic on the AZ-204 exam.
1. Understanding Storage Tiers and Lifecycle Management
To manage a blob's lifecycle, you first need to understand the destinations you can move it to. Azure Blob Storage offers several access tiers, each with a different pricing model and performance characteristics. Optimizing costs involves moving data to the most appropriate tier as its access patterns change over time.
To get a concise overview of these tiers and the purpose of lifecycle management, please watch the beginning of the following video.
AZ-204 Exam EP 12: Blob Storage Lifecycle
This video from 'A Guide To Cloud' introduces the different storage tiers and explains how lifecycle management helps you transition data between them.
Watch the video from the beginning until the timestamp 03:52. Focus on: The characteristics of the Hot, Cool, and Archive tiers. The trade-off between storage costs and transaction (access) costs for each tier. The fundamental purpose of a lifecycle management policy.
As the video explained, the core idea is to balance cost and performance:
- Hot Tier: Optimized for frequently accessed data. It has the highest storage cost but the lowest access cost. Ideal for data that is actively being used by your application.
- Cool Tier: Optimized for infrequently accessed data that must be stored for at least 30 days. It has a lower storage cost than Hot but higher access costs. Good for short-term backup or older data that is still occasionally needed.
- Archive Tier: Optimized for rarely accessed data that can tolerate several hours of retrieval latency. It offers the cheapest storage costs but has the highest retrieval costs. It's designed for long-term backup and compliance data that must be stored for at least 180 days.
A lifecycle management policy is the automation engine that moves your blobs between these tiers or deletes them based on a set of rules you define. It runs once per day at the storage account level, evaluating all blobs against your policy rules.
2. The Anatomy of a Lifecycle Policy
At its core, a lifecycle management policy is a JSON document that you apply to a storage account. This policy is a collection of rules, and each rule is composed of three main parts: a name, a filter set, and an action set.
To understand this structure, let's turn to the official Microsoft documentation.
Azure Blob Storage lifecycle management policy structure
This article from Microsoft Learn breaks down the JSON structure of a lifecycle management policy. Understanding this structure is key to authoring effective rules.
Please read the following sections: Rules: Understand that a policy is a collection of rules. Filters: Focus on the blobTypes and prefixMatch filters. Actions: Note the different actions available, like TierToCool, TierToArchive, and Delete. Action run conditions: Pay close attention to conditions like daysAfterModificationGreaterThan.
Let's distill the key concepts from that reading into a simple model:
Policy = A set of Rules
Rule = IF (Filter is met) AND (Condition is met) THEN (Perform Action)
Let's look at each component:
-
Filters (
IF): These define which blobs the rule applies to. You can filter by:blobTypes: Most commonlyblockBlob.prefixMatch: This is very powerful. It allows you to target blobs within a specific container or virtual folder. For example, a prefix oflogs/2023/would match all blobs in that path.blobIndexMatch: You can also filter based on the Blob Index Tags we briefly mentioned in a previous lesson.
-
Action Run Conditions (
AND): These are time-based triggers. A rule's action will only execute if the blob meets the filter criteria and the time condition. The most common conditions are:daysAfterModificationGreaterThan: Triggers based on the number of days since the blob was last written to.daysAfterCreationGreaterThan: Triggers based on when the blob was created.daysAfterLastAccessTimeGreaterThan: Triggers based on when the blob was last read. This requires you to explicitly enable access time tracking on the storage account, which may have a small associated cost.
-
Actions (
THEN): This is what you want to do to the blob.tierToCool/tierToArchivedelete
Here's a sample JSON rule that illustrates this structure. This rule targets block blobs in a container named sample-container whose names start with log. If they haven't been modified in over 30 days, they are moved to the cool tier.
{
  "rules": [
    {
      "enabled": true,
      "name": "move-logs-to-cool",
      "type": "Lifecycle",
      "definition": {
        "actions": {
          "baseBlob": {
            "tierToCool": {
              "daysAfterModificationGreaterThan": 30
            }
          }
        },
        "filters": {
          "blobTypes": [ "blockBlob" ],
          "prefixMatch": [ "sample-container/log" ]
        }
      }
    }
  ]
}
3. Configuring a Lifecycle Policy
Now that you understand the components, let's see how to apply a policy. Azure provides several ways to do this, catering to different workflows. We'll focus on the two most common methods for a developer: the visual Azure Portal and the scriptable Azure CLI.
The following document covers the various methods. We will use it as a reference as we walk through the steps.
Configure a lifecycle management policy - Azure Blob Storage
This Microsoft Learn document provides the step-by-step instructions for configuring a policy using the Portal, PowerShell, CLI, and ARM Templates. We'll focus on the Portal and CLI sections.
You don't need to read this in depth right away. Keep it open as a reference as we discuss the Portal and CLI methods.
Method 1: Using the Azure Portal (Visual Approach)
The Azure Portal provides a user-friendly interface for building rules. This is the best way to start and to visualize how the policy components fit together.
- Navigate to your Storage Account in the Azure Portal.
- Under Data management, select Lifecycle Management.
- Click Add a rule.
You will see a form that directly maps to the concepts we just discussed.
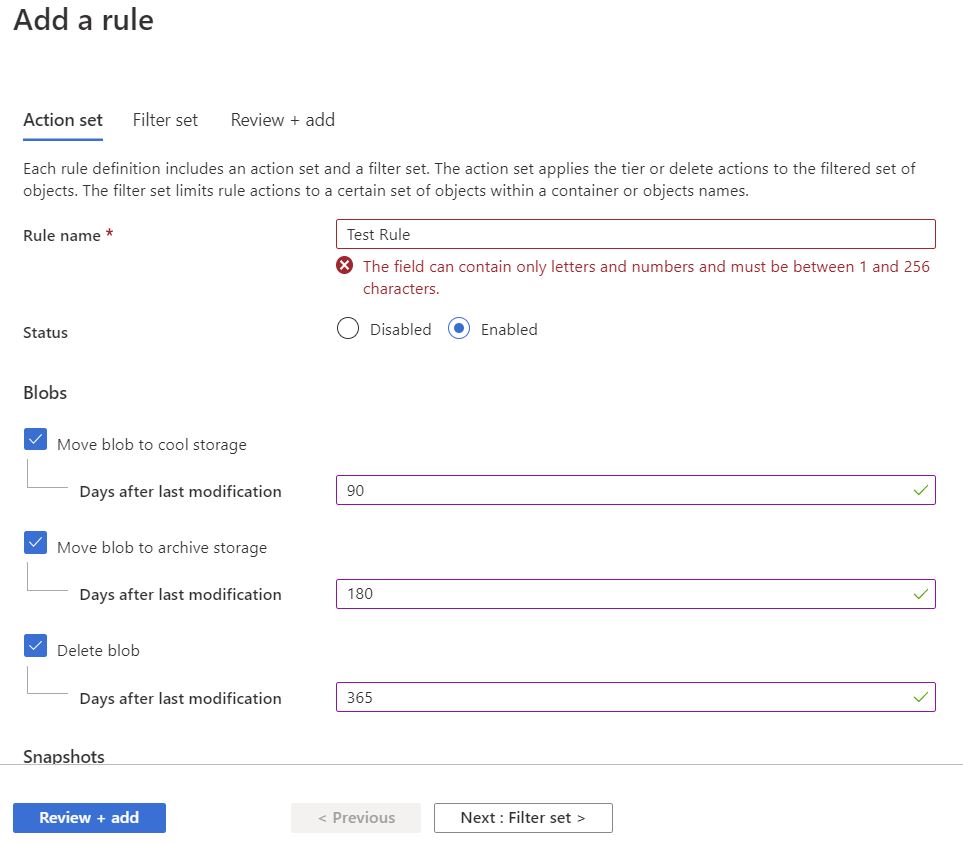
As you fill out the form, you are visually building a rule. You can set the scope (applying to all blobs or using filters), define the blob types, and then add one or more actions based on time conditions.
Once you save a rule, you can switch to the Code View tab in the portal. This is a crucial step for your learning, as it shows you the JSON that the portal generated from your visual settings.

Method 2: Using the Azure CLI (Scriptable Approach)
For automation and integration into deployment scripts (Infrastructure as Code), the Azure CLI is the preferred method. The process involves two steps:
- Author the policy in a local JSON file (e.g.,
policy.json). You can even create a policy in the portal first, copy the JSON from the Code View, and save it to a file. - Apply the policy using the
az storage account management-policy createcommand.
Here's the command structure, as shown in the Microsoft Learn document:
az storage account management-policy create \
    --account-name <storage-account-name> \
    --policy @policy.json \
    --resource-group <resource-group-name>
The @policy.json syntax tells the CLI to read the content of the policy.json file as the policy definition. This approach is powerful because you can version-control your policy file in Git, just like your application code.
4. Practical Scenario
Let's solidify this with a common business requirement. Imagine you are storing daily application logs in a container named app-logs. The retention policy is as follows:
- Logs are actively queried for the first 30 days.
- After 30 days, they should be moved to cheaper Cool storage for occasional analysis.
- After 90 days, they must be archived for one year for compliance.
- After a total of 455 days (30 + 90 + 365), they must be deleted.
Here is the JSON for a lifecycle rule that implements this policy:
{
  "rules": [
    {
      "enabled": true,
      "name": "log-retention-policy",
      "type": "Lifecycle",
      "definition": {
        "actions": {
          "baseBlob": {
            "tierToCool": { "daysAfterModificationGreaterThan": 30 },
            "tierToArchive": { "daysAfterModificationGreaterThan": 90 },
            "delete": { "daysAfterModificationGreaterThan": 455 }
          }
        },
        "filters": {
          "blobTypes": [ "blockBlob" ],
          "prefixMatch": [ "app-logs" ]
        }
      }
    }
  ]
}
Notice how a single rule can contain multiple actions. The lifecycle management service will apply the most appropriate action based on the blob's age. For a 40-day-old blob, tierToCool applies. For a 100-day-old blob, tierToArchive applies.
Conclusion
In this lesson, you learned how to automate data management in Azure Blob Storage, a critical skill for controlling costs and maintaining data hygiene.
Key Takeaways:
- Storage Tiers (Hot, Cool, Archive) offer a trade-off between storage cost and access cost/latency.
- Lifecycle Management Policies automate the process of moving blobs between tiers or deleting them.
- A policy consists of rules, which contain filters (the "if") and actions (the "then").
- Filters, like
prefixMatch, allow you to precisely target blobs. - Actions are triggered by time-based conditions, such as
daysAfterModificationGreaterThan. - You can configure policies visually in the Azure Portal or programmatically via the Azure CLI by providing a JSON file.
Next Steps
We've now covered creating blobs, managing their metadata, and automating their lifecycle. The next logical step is to control who can access them. In our next lesson, Generate and use Shared Access Signatures (SAS) to grant limited, delegated access to blob resources, you will learn how to create temporary, permission-bound URLs that allow clients to interact with your blobs directly and securely, without exposing your storage account keys.