Introduction
Welcome back! In our previous lesson, you provisioned a complete Azure Storage setup using the Azure CLI, creating a storage account and containers. This laid the essential groundwork for our application. Now, it's time to bring your core C# and .NET skills to the forefront.
Today's lesson directly addresses the learning outcome: Upload, download, and manage blobs programmatically using the Azure.Storage.Blobs .NET SDK. We will write a .NET application that connects to the storage account you created and performs the fundamental operations of creating, reading, listing, and deleting blobs.
Given your strong background in C# and developing REST APIs, you will find the SDK's object model and asynchronous patterns intuitive. We will focus on the key classes and methods that enable you to integrate Azure Blob Storage seamlessly into your applications.
The Blob Storage Object Model
Before we write code, it's helpful to visualize the hierarchy of the .NET SDK's client objects. This structure directly mirrors the Azure Storage hierarchy we've discussed.

To interact with these resources, the Azure.Storage.Blobs SDK provides three primary client classes:
BlobServiceClient: This object represents the storage account itself. It's your starting point for creating and managing containers.BlobContainerClient: This represents a specific container within your storage account. You use it to list, create, or delete blobs within that container.BlobClient: This represents an individual blob (a file). This is the object you'll use for uploading, downloading, and deleting the blob's content.
The following diagram illustrates this flow from your code to the individual blob.
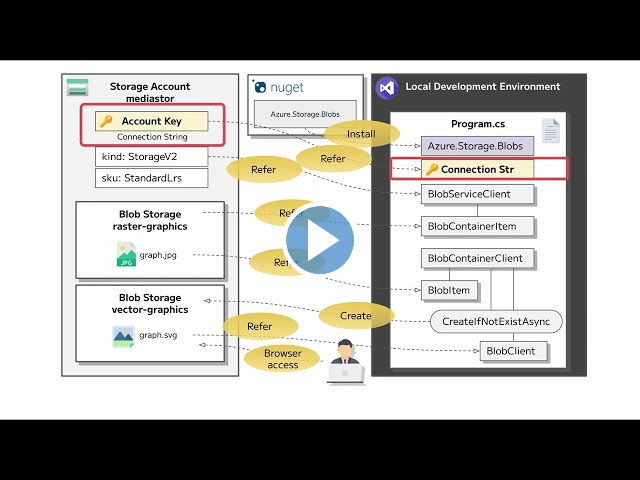
1. Setting Up Your .NET Project
Let's start by creating a simple .NET console application. This will serve as our environment for experimenting with the SDK.
Quickstart: Azure Blob Storage client library for .NET
The official Microsoft Learn quickstart provides clear, step-by-step instructions for setting up a new project and installing the necessary packages. We will follow this guide.
Follow the instructions in the 'Setting up' section. Specifically, complete the steps under 'Create the project' and 'Install the package' using the .NET CLI. This will create a new console app and add the Azure.Storage.Blobs package to it.
In your terminal, follow these steps:
-
Create a console app:
dotnet new console -n BlobManager cd BlobManager -
Install the Azure Blob Storage SDK:
dotnet add package Azure.Storage.Blobs -
Install the Azure Identity SDK: We will discuss authentication next, and the recommended approach uses this package.
dotnet add package Azure.Identity
Now you have a basic project ready for your code.
2. Authenticating Your Application
To perform any operation, your application must first authenticate with your Azure Storage account. The AZ-204 exam and modern development practices emphasize secure, passwordless authentication.
Let's review the two primary methods.
Quickstart: Azure Blob Storage client library for .NET
This section of the Quickstart guide is critical. It contrasts the modern, recommended DefaultAzureCredential approach with the older connection string method.
Read the section 'Authenticate to Azure and authorize access to blob data'. Pay close attention to the two tabs: 'Passwordless (Recommended)' and 'Connection String'. Understand the conceptual difference and why DefaultAzureCredential is preferred for production environments.
Key Authentication Methods:
-
DefaultAzureCredential(Recommended): This is the cornerstone of modern Azure authentication in .NET. It creates a credential that automatically tries a chain of authentication methods, such as:- Credentials from your Visual Studio or Azure CLI login (ideal for local development).
- Managed Identity (when deployed to Azure services like App Service or Functions).
- Environment variables.
This allows your code to work seamlessly across different environments without changes. To use this, your signed-in user needs the "Storage Blob Data Contributor" role, which you assigned in the previous lesson.
-
Connection String (Simple, for local testing): A connection string contains the storage account name and one of its access keys. While simple to use, it's less secure because it hardcodes credentials. Anyone with the string has full access. It is, however, very convenient for quick, local-only proof-of-concept work.
For today's hands-on exercise, we will use a connection string as it is straightforward to set up for a console app and is well-demonstrated in the video we'll be using. However, remember that for any real application, DefaultAzureCredential is the superior choice.
To get your connection string, run this Azure CLI command. Replace <your-unique-storage-name> with the name of the storage account you created in the last lesson.
az storage account show-connection-string --name <your-unique-storage-name> --resource-group az204-storage-rg --query connectionString -o tsv
Copy the output string. You will need it shortly.
3. Performing Blob Operations with the .NET SDK
Now for the main event: writing the code. We will use a video from Nick Chapsas, which provides a fast-paced, practical demonstration of building a simple service to manage blobs within an ASP.NET Core project. While he uses a web API, the core logic using the BlobServiceClient is identical to what you'd use in our console app.
This video will guide you through initializing the client and performing the core create, read, list, and delete operations.
Getting started with Azure Blob Storage in .NET Core | Azure Tutorial
This video, 'Getting started with Azure Blob Storage in .NET Core' by Nick Chapsas, is a fantastic, developer-focused walkthrough of the Azure.Storage.Blobs SDK. We'll use it to guide our hands-on coding.
We will work through this video section by section. You can either code along in your console app or simply watch to understand the patterns, which we will then summarize.
Step 3.1: Initialize the BlobServiceClient
First, let's see how to set up the client. The video demonstrates this in the context of dependency injection in Startup.cs, a pattern you'll be familiar with from your work with ASP.NET Core.
Watch: From 01:50 to 06:51. Focus on how he installs the package and uses the connection string to create and register a BlobServiceClient.
Summary for your Console App:
In your Program.cs, you can achieve the same result directly.
using Azure.Storage.Blobs;

// 1. Get your connection string.
// In a real app, use a secure config method. For this demo, we'll paste it.
string connectionString = "PASTE_YOUR_CONNECTION_STRING_HERE";

// 2. Create a BlobServiceClient object
var blobServiceClient = new BlobServiceClient(connectionString);

// 3. Get (or create) a container client
string containerName = "images";
BlobContainerClient containerClient = blobServiceClient.GetBlobContainerClient(containerName);
await containerClient.CreateIfNotExistsAsync();

Console.WriteLine("Connected to blob storage.");
Step 3.2: Download (Get) a Blob
Watch: From 07:40 to 10:33. This segment shows how to get a client for a specific blob and download its content as a stream.
Code Pattern:
// Get a client to a specific blob
BlobClient blobClient = containerClient.GetBlobClient("my-image.png");

if (await blobClient.ExistsAsync())
{
    // Download the blob's content and save it to a file
    await blobClient.DownloadToAsync($"downloaded-my-image.png");
    Console.WriteLine("Blob downloaded.");
}
Step 3.3: List All Blobs in a Container
Watch: From 10:33 to 12:26. See how to iterate through all the blobs in a container.
Code Pattern:
Console.WriteLine("\nListing blobs...");

await foreach (var blobItem in containerClient.GetBlobsAsync())
{
    Console.WriteLine($"\t- {blobItem.Name}");
}
Step 3.4: Upload a Blob
The SDK offers flexible ways to upload data. The video covers two common scenarios: uploading from a file path and uploading from an in-memory stream.
Watch:
- Upload from file path (12:26 - 17:01): See how
UploadAsynccan take a local file path directly. - Upload from in-memory stream (17:01 - 20:34): See how to convert a string to a stream and upload it, which is useful for dynamically generated content.
Code Pattern (Upload from file):
// Create a local file to upload
string localFilePath = "data.txt";
await File.WriteAllTextAsync(localFilePath, "Hello, Azure Blob Storage!");

// Get a client to the blob
BlobClient blobClientForUpload = containerClient.GetBlobClient("data.txt");

// Upload the file
await blobClientForUpload.UploadAsync(localFilePath, overwrite: true);
Console.WriteLine("\nBlob uploaded from file.");

// Clean up local file
File.Delete(localFilePath);
For a deeper dive into more advanced upload options, including setting HTTP headers, metadata, and access tiers, the Microsoft Learn documentation is an excellent resource.
Upload a blob with .NET - Azure Storage | Microsoft Learn
This article, 'Upload a blob with .NET', provides comprehensive examples for various upload scenarios beyond what the video covers.
Feel free to browse this resource. Pay attention to the different upload methods: 'Upload a block blob from a local file path', 'Upload a block blob from a stream', 'Upload a block blob from a string', and 'Set a blob's access tier on upload'. These demonstrate the flexibility of the SDK.
Step 3.5: Delete a Blob
Watch: From 20:34 to 22:02. The final piece is deleting a blob.
Code Pattern:
// Get a client to the blob you want to delete
BlobClient blobToDelete = containerClient.GetBlobClient("data.txt");

// Delete the blob if it exists
await blobToDelete.DeleteIfExistsAsync();
Console.WriteLine("\nBlob deleted.");
A Note on Local Development with Azurite
For a professional developer workflow, repeatedly deploying to Azure for every small change can be slow and inefficient. Azurite is a local emulator for Azure Storage that you can run on your machine (e.g., via Docker). It simulates the Blob, Queue, and Table storage APIs, allowing for rapid, offline development and testing.
The DefaultAzureCredential we discussed earlier won't work with Azurite, but it provides a special, well-known connection string for local development.
Simple File API Using Azure Blob Storage (running locally)
If you're interested in setting up a local development loop, this video by Milan Jovanović, 'Simple File API Using Azure Blob Storage (running locally)', is an excellent guide. He demonstrates setting up Azurite with Docker and connecting a .NET API to it.
Watch the beginning (00:00 - 01:54) to see how Azurite is run in Docker. Then, skip to the connection part (09:44 - 11:09) to see how the special development connection string is configured in appsettings.json.
This is a powerful technique to add to your toolkit, though not strictly required for the AZ-204 exam itself.
Conclusion
In this lesson, you bridged the gap between infrastructure and application code. You learned how to use the Azure.Storage.Blobs .NET SDK to programmatically manage the lifecycle of blobs in your storage account.
Key Takeaways:
- The SDK object model consists of
BlobServiceClient,BlobContainerClient, andBlobClient, which map directly to the storage hierarchy. - Authentication is handled securely using
DefaultAzureCredentialin production, with connection strings offering a simpler alternative for local testing. - The core asynchronous methods for managing blobs are intuitive:
UploadAsyncfor creating/updating blobs from files or streams.DownloadToAsyncorDownloadContentAsyncfor retrieving blobs.GetBlobsAsyncfor listing blobs within a container.DeleteIfExistsAsyncfor removing blobs.
Next Steps
You can now move data in and out of Azure Blob Storage. However, blobs can hold more than just their content. In our next lesson, Set and manage blob metadata and properties using the .NET SDK, we will explore how to attach and read key-value metadata to blobs, which is essential for indexing, categorization, and building more intelligent applications.