Hello! Welcome back.
In the last few lessons, you've done the heavy lifting of building publisher nodes for LinkedIn, X, and Instagram. Your agent now has the technical capability to post content across all your target platforms. However, just posting isn't enough; when you post can significantly impact your content's reach and engagement.
This lesson bridges that gap. Our learning outcome is to implement scheduling logic to post at optimal engagement times per platform. We will explore the data on when your audience is most active and then implement a robust, scalable scheduling system in TypeScript to automate posting at those exact times.
1. The "When": Identifying Optimal Posting Times
Before writing any code, we need a strategy. The "best" time to post is when your target audience is most likely to be scrolling. While this can vary, large-scale data analysis provides excellent starting points.
Best Time to Post on Social Media in 2025: Every Platform
The social media management platform Buffer conducts extensive research on this topic. Their guide for 2025 provides data-backed recommendations for all our target platforms. We will use this as the foundation for our scheduling logic.
Read the sections covering the best times to post on Instagram, LinkedIn, and X (Twitter). You can start with the 'quick guide' cheat sheet, then dive into the specific sections for each platform. Pay close attention to: The recommended days and time windows. The rationale behind the patterns (e.g., LinkedIn usage during work hours). The days identified as having the lowest engagement.
To make these patterns more intuitive, heatmaps are incredibly useful. They provide an at-a-glance view of engagement levels throughout the week.

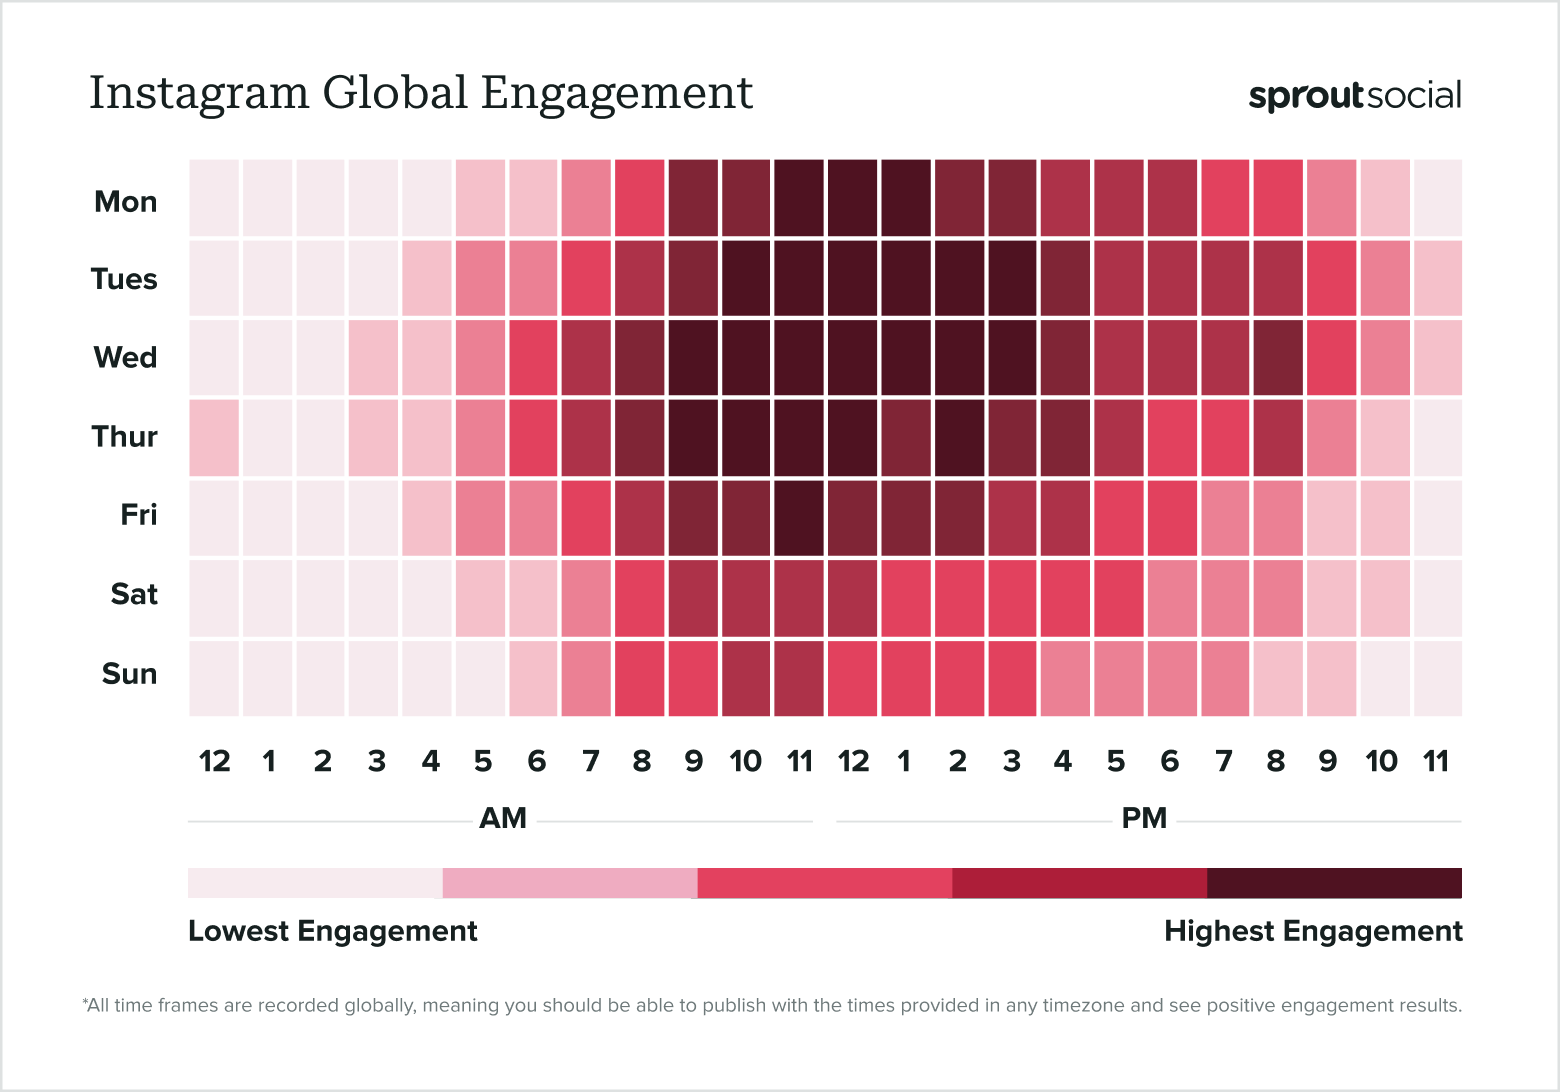
Based on the Buffer article, let's consolidate the top-tier posting times into a simple structure we can use in our code. These are expressed in cron syntax, which we'll explore next. For now, just recognize the pattern: minute hour day-of-month month day-of-week.
// A simplified structure to hold our initial scheduling strategy
const optimalPostTimes = {
  linkedIn: {
    // Weekday mornings and midday, e.g., 10 AM on Tuesdays
    cron: '0 10 * * 2',
  },
  x: {
    // Weekday mornings, e.g., 9 AM on Wednesdays
    cron: '0 9 * * 3',
  },
  instagram: {
    // Weekday afternoons, e.g., 3 PM on Fridays
    cron: '0 15 * * 5',
  },
};
Note: These are single examples. A real-world implementation might schedule multiple posts per week.
2. The "How": A Scalable Job Queue with Bull
Now for the implementation. How do we execute code at a specific time? While you could use a simple setTimeout for a one-off delay, a far more robust and scalable solution for recurring tasks is a job queue.
Given your background with event-driven architectures, you'll recognize the pattern:
- A Producer adds "jobs" (e.g., "post this content to LinkedIn") to a queue.
- A Worker process listens to the queue, picks up jobs, and executes them.
This decouples the task scheduling from the task execution, making the system resilient. If the worker crashes, the job remains in the queue and can be retried. For our project, we'll use Bull, a popular and powerful job queue library for Node.js that uses Redis as its backend.
This video provides an excellent introduction to Bull's core concepts.
Bull Queue - Redis - Nodejs Javascript - A gentle introduction to Bull Queues
The video 'A gentle introduction to Bull Queues' by DeKay clearly explains what Bull is, how to set it up, and its key features. We will focus on its ability to schedule recurring jobs.
Please watch the following sections: Introduction (00:00 - 01:28): Understand what a queue is and the problem it solves. Basic Setup (01:28 - 05:42): Pay attention to how a queue is instantiated and how a producer (.add()) and consumer (.process()) are created. You'll already have Redis available from your work in Module 3. Recurring Jobs (20:34 - 23:08): This is the most critical part. The video explains how to use the repeat option with cron syntax to create scheduled, recurring jobs. This is the exact mechanism we will use.
3. Implementing the Scheduler and Worker
Now, let's integrate Bull into our project. The plan is to create two main components:
- A Scheduler: A script that defines our queues and adds the recurring jobs based on the optimal times we identified.
- A Worker: A long-running process that listens to the queues and executes the appropriate publisher function when a job is ready.
First, install Bull:npm install bull
You will also need the types for it:npm install --save-dev @types/bull
The Worker
Let's start with the worker, as its job is to process tasks. Create a new file at src/worker.ts. This file will import our queue definitions (which we'll create next) and our existing publisher functions.
The following article demonstrates a similar pattern using Bull's successor, BullMQ. While the library is slightly different, the architectural concept of a worker file that processes jobs by calling an API is identical.
Build an AI-powered Social Media Post Scheduler (Twitter API, Next ...
To see a practical example of a worker file in action, review the following tutorial. It shows how a worker listens to a queue and executes a function to post to X (Twitter).
Skim the section 'Managing and Scheduling Posts using Redis and BullMQ'. Specifically, look at the code block for the worker.ts file and the snippet for the scheduleWorker. Observe how it defines a Worker that listens to a queue ('schedule-queue') and contains the logic to process a job (in their case, fetching the Twitter API).
Here is our implementation using Bull. Create the file src/queues.ts to define and export our queues so both the scheduler and worker can use them.
// src/queues.ts
import Bull from 'bull';

// Assumes Redis is running on localhost:6379. Configure as needed.
const redisConfig = {
  redis: {
    host: '127.0.0.1',
    port: 6379,
  },
};

export const linkedInQueue = new Bull('linkedin-posts', redisConfig);
export const xQueue = new Bull('x-posts', redisConfig);
export const instagramQueue = new Bull('instagram-posts', redisConfig);
Now, create the worker file at src/worker.ts.
// src/worker.ts
import { linkedInQueue, xQueue, instagramQueue } from './queues';
import { shareOnLinkedIn } from './publishers/linkedin';
import { shareOnX } from './publishers/twitter';
import { shareOnInstagram } from './publishers/instagram';

console.log('Worker process started. Listening for jobs...');

// LinkedIn Worker
linkedInQueue.process(async (job) => {
  console.log(`Processing LinkedIn job ${job.id}`);
  const { articleUrl } = job.data;
  if (!articleUrl) throw new Error('LinkedIn job requires an articleUrl');

  await shareOnLinkedIn(articleUrl);
  console.log(`Successfully posted to LinkedIn for job ${job.id}`);
});

// X (Twitter) Worker
xQueue.process(async (job) => {
  console.log(`Processing X job ${job.id}`);
  const { text } = job.data;
  if (!text) throw new Error('X job requires text');

  await shareOnX(text);
  console.log(`Successfully posted to X for job ${job.id}`);
});

// Instagram Worker
instagramQueue.process(async (job) => {
  console.log(`Processing Instagram job ${job.id}`);
  const { imageUrl, caption } = job.data;
  if (!imageUrl || !caption) throw new Error('Instagram job requires imageUrl and caption');

  await shareOnInstagram(imageUrl, caption);
  console.log(`Successfully posted to Instagram for job ${job.id}`);
});

// Event listeners for logging and debugging
linkedInQueue.on('completed', (job) => console.log(`Job ${job.id} on linkedin-posts completed.`));
linkedInQueue.on('failed', (job, err) => console.error(`Job ${job.id} on linkedin-posts failed with error: ${err.message}`));
// ... add similar listeners for xQueue and instagramQueue
To run this worker, you would add a script to your package.json and execute it in a separate terminal:
// package.json
"scripts": {
  // ...
  "worker": "tsx src/worker.ts"
}
npm run worker
The Scheduler
Finally, let's create the scheduler that adds the jobs. Create src/scheduler.ts. The purpose of this script is to populate the queues with our recurring jobs. In a real system, you might run this once upon application startup.
// src/scheduler.ts
import { linkedInQueue, xQueue, instagramQueue } from './queues';

async function setupSchedules() {
  console.log('Setting up recurring schedules...');

  // First, remove any old recurring jobs to prevent duplicates on restart
  const queues = [linkedInQueue, xQueue, instagramQueue];
  for (const queue of queues) {
    const repeatableJobs = await queue.getRepeatableJobs();
    for (const job of repeatableJobs) {
      await queue.removeRepeatableByKey(job.key);
    }
  }

  // --- Placeholder Job Data ---
  // In the full agent, this data would be dynamically pulled from your
  // trend analysis and content generation steps.
  const placeholderData = {
    linkedIn: { articleUrl: 'https://my-blog.com/awesome-tech-post' },
    x: { text: 'Here is a hot take on the latest tech trend! #techtwitter' },
    instagram: {
      imageUrl: 'https://picsum.photos/1080/1080.jpg', // Publicly accessible JPEG
      caption: 'Visualizing the future of code. #programming #devlife'
    }
  };

  // Schedule for LinkedIn: Tuesday at 10:00 AM
  await linkedInQueue.add(placeholderData.linkedIn, {
    repeat: { cron: '0 10 * * 2' }, // Every Tuesday at 10:00
    jobId: 'weekly-linkedin-post' // A stable ID prevents duplicates
  });

  // Schedule for X: Wednesday at 9:00 AM
  await xQueue.add(placeholderData.x, {
    repeat: { cron: '0 9 * * 3' }, // Every Wednesday at 9:00
    jobId: 'weekly-x-post'
  });

  // Schedule for Instagram: Friday at 3:00 PM (15:00)
  await instagramQueue.add(placeholderData.instagram, {
    repeat: { cron: '0 15 * * 5' }, // Every Friday at 15:00
    jobId: 'weekly-instagram-post'
  });

  console.log('Schedules successfully created.');
  console.log('Current scheduled jobs:', await Promise.all(queues.map(q => q.getRepeatableJobs())));

  // In a real app, you might exit or just let the script end.
  process.exit(0);
}

setupSchedules().catch(err => {
  console.error(err);
  process.exit(1);
});
To run this, you'd execute tsx src/scheduler.ts once. The jobs are persisted in Redis, and the running worker will pick them up at the scheduled times.
Conclusion
Excellent work. You have now implemented one of the most critical components of a true automation system: a reliable, persistent scheduler. Your agent is no longer just a set of functions that can post, but a system that will post at the most strategic times, without manual intervention.
Key Takeaways:
- Strategy First: Optimal posting times are derived from data on user behavior for each specific platform.
- Job Queues for Reliability: Using a system like Bull with Redis provides a robust, scalable, and persistent way to manage background and scheduled tasks.
- Decoupled Architecture: Separating the Scheduler (which adds jobs) from the Worker (which executes them) is a clean architectural pattern that enhances resilience and maintainability.
- Cron for Scheduling: Cron syntax is the universal standard for defining time-based job schedules.
Preview of the next lesson:
You've now automated the full pipeline from data collection to publishing on a schedule. But how do you know if it's working? Are your posts effective? In our next lesson, we will begin Module 9, "Monitoring & Continuous Improvement," by tackling the learning outcome: "Retrieve engagement metrics (likes, comments, shares) from the LinkedIn, X, and Instagram APIs." This is the first step in creating a feedback loop to make your agent not just autonomous, but intelligent.